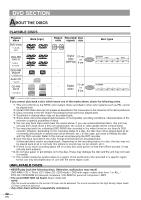
Symphonic SC720FDF Owners Manual - Page 19
Automatic Timer Recording
 |
View all Symphonic SC720FDF manuals
Add to My Manuals
Save this manual to your list of manuals |
Page 19 highlights
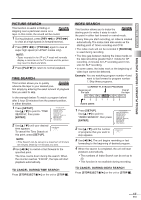
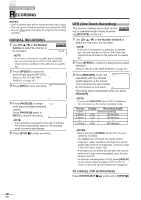
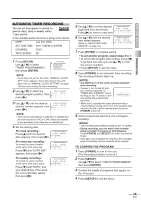
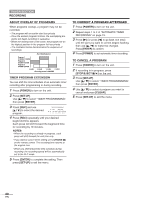
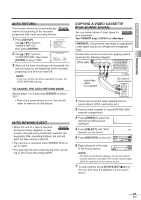
TV/VCR SECTION RECORDING AUTOMATIC TIMER RECORDING You can set 8 programs to record on specific days, daily or weekly within 1 year period. TV/VCR In the example below, the timer is being set to record: DATE: July 3rd, 2006 SETTING TIME: from 7:30PM to 8:50PM CHANNEL: CH61 TAPE SPEED: SP 1 Press [SET-UP]. Use [K / L] to select "TIMER PROGRAMMING", then press [ENTER]. NOTE: - TV/VCR SETUP - B TIMER PROGRAMMING SETTING CLOCK CHANNEL SET UP USER'S SET UP V-CHIP SET UP LANGUAGE [ENGLISH] CAPTION [OFF] ZERO RETURN TIME SEARCH INDEX SEARCH • If you have not yet set the clock, "MANUAL CLOCK SET" menu appears. Set to the present time and date (refer to "MANUAL CLOCK SETTING" on page 10) then start setting the timer recording. 2 Use [K / L] to select the - TIMER PROGRAMMING - desired program position, then press [B]. 3 Use [K / L] until the desired CH DATE BEGIN END B TI-M/-E- R-P-R-OG-:-R-AMMI-N:-G- -- - channel number appears, then CH DATE BEGIN END B 61 press [B]. NOTE: • If the unit is connected to a cable box or satellite box, the unit must be on CH3 or CH4. Select the channel to be recorded on the cable box or satellite box. 4 Set the starting date. For once recording : Press [K] until the desired date appears. Then press [B]. For every day recording : To record the same channel at the same time every day. Press [L] until "EVRY DAY" appears, then press [B]. - TIMER PROGRAMMING - CH DATE BEGIN END B 61 7/03 MON - -- TI-M/-E-R -P-R-OG-:R- A- MMIN-:G- --- - CH DATE BEGIN END B 61 EVRY DAY For weekly recording : To record the same channel at the same time every week. Press [L] until "EVRY" and your desired day of the week (Ex. Every Monday) appear, then press [B]. - TIMER PROGRAMMING - CH DATE BEGIN END B 61 EVRY MON 5 Use [K / L] to set the desired - TIMER PROGRAMMING - begin/end hour and minute. CH DATE BEGIN END B 61 7/03 MON 7:30PM 8:50PM- - Press [B] to move to next item 6 Use [K / L] until the desired TIMER PROGRAMMING - tape speed appears. (Refer to "SELECTING TAPE SPEEDS" on page 15.) CH DATE BEGIN END B 61 - - - - - - 7/03 MON 7:30PM 8:50PMSP 7 Press [ENTER] to complete setting. • To set another program, repeat steps 2 to 7. • To correct the program while setting, press [s] to go back one step and use [K / L] to enter the correct numbers. • Press [SET-UP] to exit the menu. 8 Press [POWER] to set automatic timer recording. The recording indicator lights up. NOTES: • You MUST turn off the unit to activate automatic timer recording. • If power is not turned off and you continue watching TV, "TIMER REC STANDBY" starts flashing on the TV screen 2 minutes before the programmed start time. TIMER REC STANDBY • Make sure a cassette with erase-prevention tab is inserted before turning off the unit. If the cassette does not have the tab, it will be ejected when you press [POWER] to turn off. 9 At the programmed start time, the unit begins recording. NOTES: • The recording starts without turning on the TV screen. • During recording, you can watch only currently being recorded TV program or DVD playback. Press [POWER] and [SELECT] to select the desired mode. • If the tape runs out before the end time, the recording stops immediately and the cassette will be ejected. TO CONFIRM THE PROGRAM 1 Press [POWER] to turn on the unit. (The Recording indicator turns off.) 2 Press [SET-UP]. Use [K / L] to select "TIMER PROGRAMMING", then press [ENTER]. 3 Confirm the details of programs that appear on the TV screen. 4 Press [SET-UP] to exit the menu. 19 EN
-
 1
1 -
2
-
3
-
4
-
5
-
6
-
7
-
8
-
9
-
10
-
11
-
12
-
13
-
 14
14 -
 15
15 -
 16
16 -
 17
17 -
 18
18 -
 19
19 -
 20
20 -
 21
21 -
 22
22 -
 23
23 -
 24
24 -
25
-
26
-
27
-
28
-
29
-
30
-
31
-
32
-
33
-
34
-
35
-
36
-
37
-
38
-
39
-
40
-
41
-
42
-
43
-
44
 |
 |