Symphonic SR90VE Owner's Manual - Page 15
Connection to an Audio System - owners manual
 |
View all Symphonic SR90VE manuals
Add to My Manuals
Save this manual to your list of manuals |
Page 15 highlights
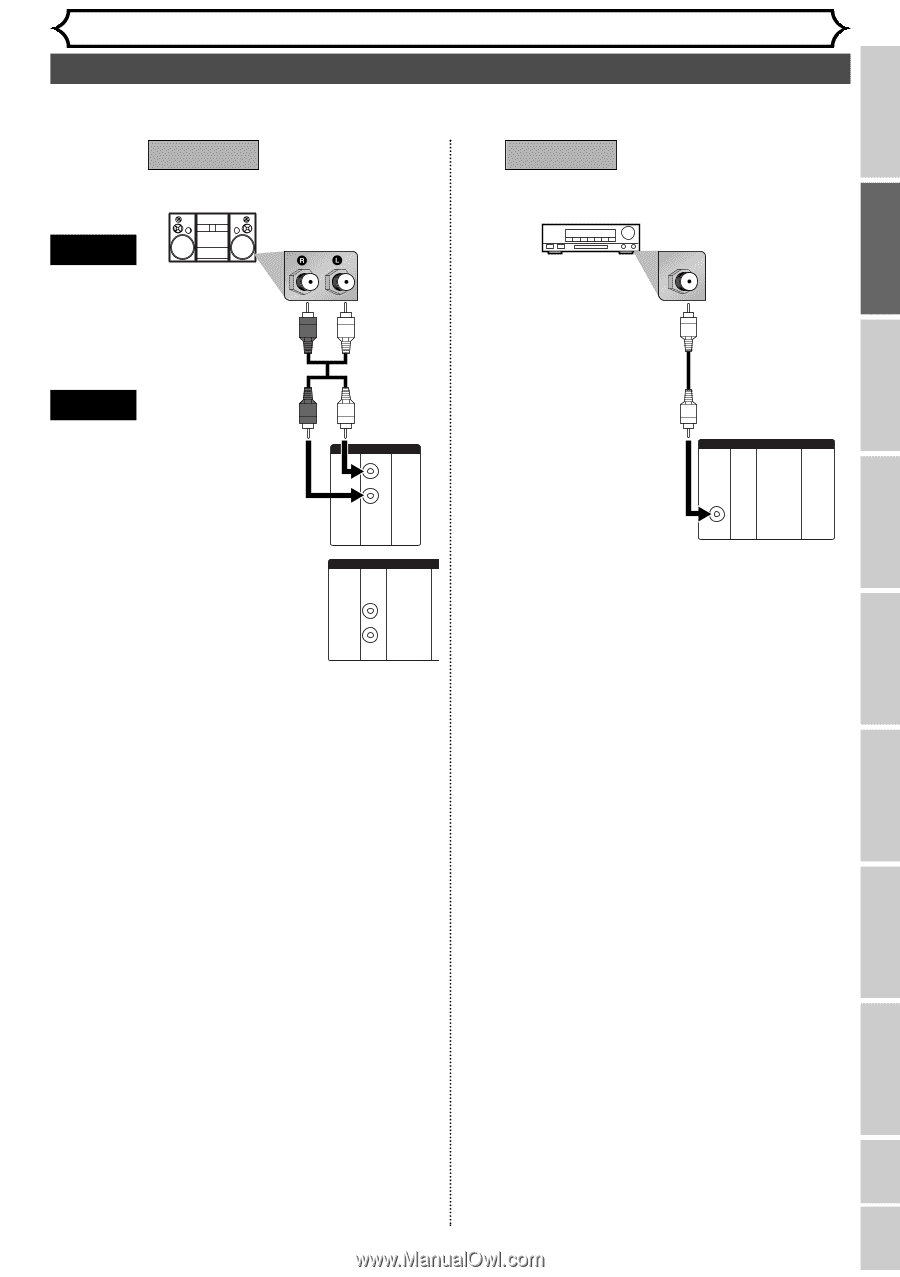
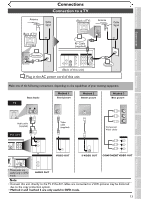
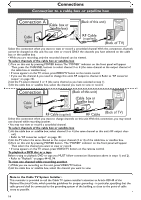
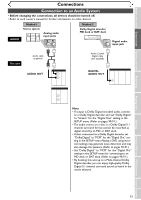
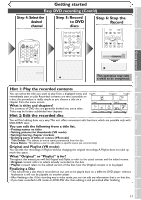
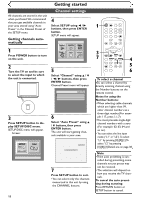
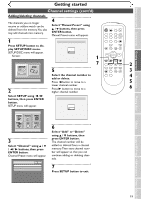
Before you start Connections Getting started Recording Connections Connection to an Audio System • Before changing the connections, all devices should be turned off. • Refer to each owner's manual for further information on other devices. AUDIO Method 1 Stereo system Analog audio input jacks Method 2 Dolby Digital decoder, MD deck or DAT deck COAXIAL Digital audio input jack This unit Audio cable (supplied) AUDIO OUT DVD/VCR AUDIO OUT L R or DVD AUDIO OUT L R Audio Coaxial Digital cable (not supplied) DIGITAL AUDIO OUT DIGITAL AUDIO OUT DVD COAXIAL Note • If output is Dolby Digital encoded audio, connect to a Dolby Digital decoder and set "Dolby Digital" to "Stream" for the "Digital Out" setting in the SETUP menu. (Refer to pages 90-91.) • The audio source on a disc in a Dolby Digital 5.1 channel surround format cannot be recorded as digital sound by an MD or DAT deck. • Unless connected to a Dolby Digital decoder, set "Dolby Digital" to "PCM" for the "Digital Out" setting in the SETUP menu. Playing a DVD using incorrect settings may generate noise distortion and may also damage the speakers. (Refer to pages 90-91.) • Set "Dolby Digital" to "PCM" for the "Digital Out" setting in the SETUP menu for connecting to an MD deck or DAT deck. (Refer to pages 90-91.) • By hooking this unit up to a Multi-channel Dolby Digital decoder, you can enjoy high-quality Dolby Digital 5.1 channel surround sound as heard in the movie theaters. Playing discs Editing Changing the SETUP menu VCR functions Others Español 15
-
 1
1 -
2
-
3
-
4
-
5
-
6
-
7
-
8
-
9
-
 10
10 -
 11
11 -
 12
12 -
 13
13 -
 14
14 -
 15
15 -
 16
16 -
 17
17 -
 18
18 -
 19
19 -
 20
20 -
21
-
22
-
23
-
24
-
25
-
26
-
27
-
28
-
29
-
30
-
31
-
32
-
33
-
34
-
35
-
36
-
37
-
38
-
39
-
40
-
41
-
42
-
43
-
44
-
45
-
46
-
47
-
48
-
49
-
50
-
51
-
52
-
53
-
54
-
55
-
56
-
57
-
58
-
59
-
60
-
61
-
62
-
63
-
64
-
65
-
66
-
67
-
68
-
69
-
70
-
71
-
72
-
73
-
74
-
75
-
76
-
77
-
78
-
79
-
80
-
81
-
82
-
83
-
84
-
85
-
86
-
87
-
88
-
89
-
90
-
91
-
92
-
93
-
94
-
95
-
96
-
97
-
98
-
99
-
100
-
101
-
102
-
103
-
104
-
105
-
106
-
107
-
108
 |
 |