Symphonic SR90VE Owner's Manual - Page 37
Settings for an external source
 |
View all Symphonic SR90VE manuals
Add to My Manuals
Save this manual to your list of manuals |
Page 37 highlights
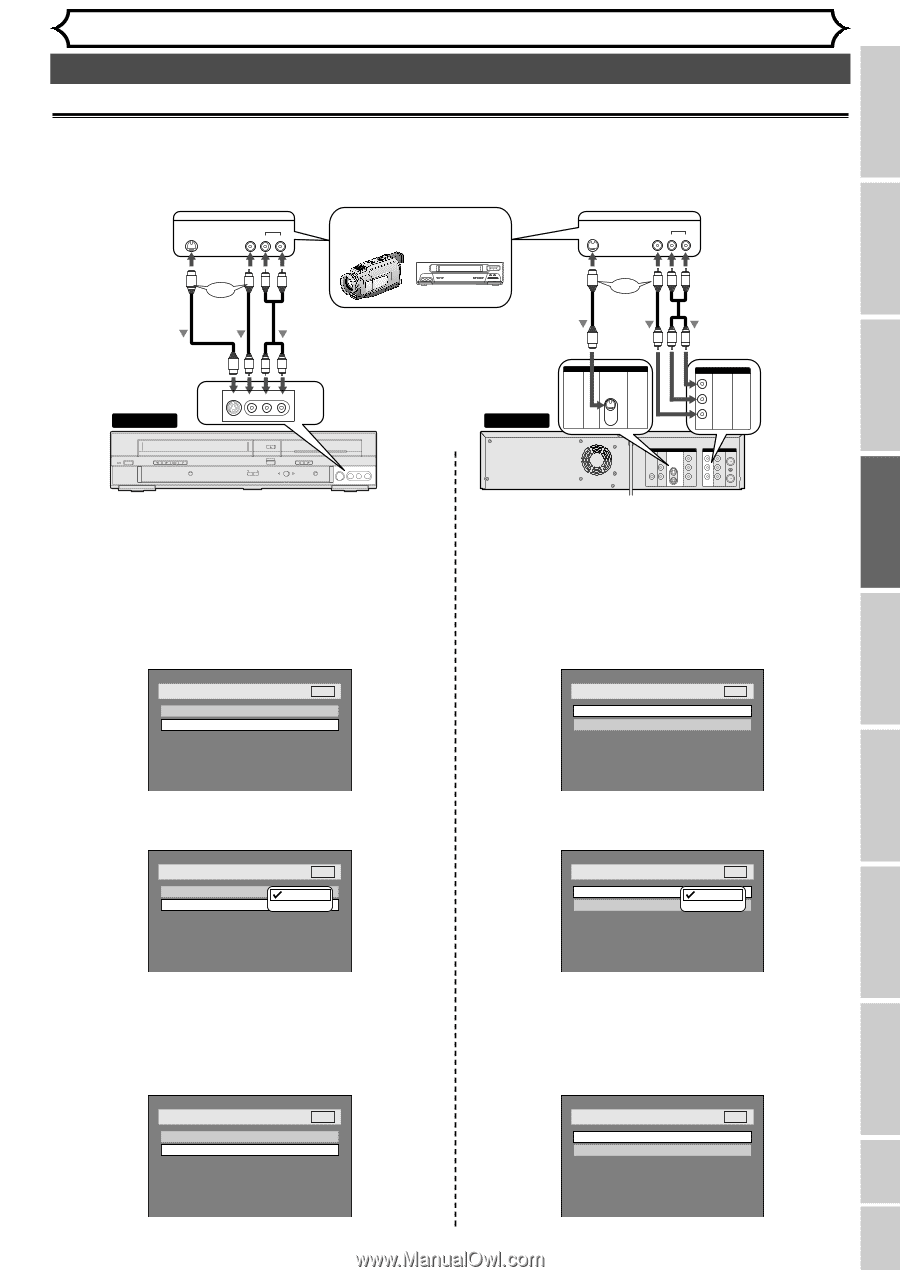
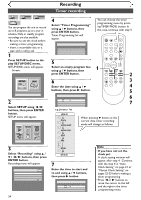
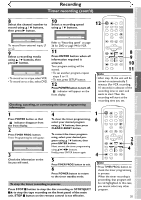
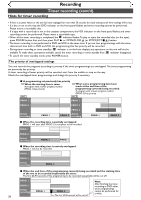
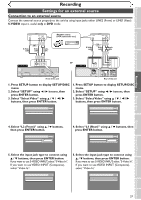
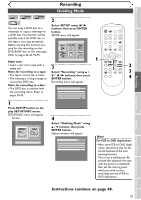
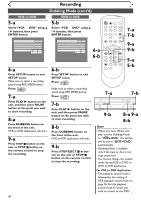
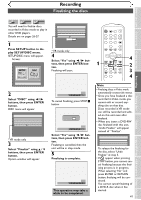
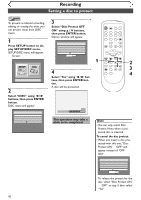
Before you start Connections Getting started Recording Recording Settings for an external source Connection to an external source Connect the external source properly to the unit by using input jacks either LINE2 (Front) or LINE1 (Rear). S-VIDEO input is useful only in DVD mode. S- VIDEO OUTPUT VIDEO AUDIO LR S-Video cable or Video cable Audio cable Another source (VCR camcorder etc.) S -VIDEO OUTPUT VIDEO AUDIO RL S-Video cable or Video cable Audio cable To LINE 2 IN POWER REW F.FWD STOP/EJECT PLAY VCR RECORD S-VIDEO VIDEO L - AUDIO - R OPEN/CLOSE CHANNEL DUBBING STOP PLAY OUTPUT SELECT VCR DVD DVD RECORD S-VIDEO VIDEO L - AUDIO - R Front of this unit or To LINE 1 IN DVD S-VIDEO IN DVD/VCR AUDIO IN L R VIDEO IN DVD DIGITAL AUDIO AUDIO OUT OUT S-VIDEO COMPONENT VIDEO OUT Y L COAXIAL R CB IN CR OUT DVD/VCR AUDIO IN AUDIO OUT ANTENN IN L L R R VIDEO IN VIDEO OUT OUT Rear of this unit 1. Press SETUP button to display SETUP/DISC menu. 2. Select "SETUP" using { / B buttons, then press ENTER button. 3. Select "Select Video" using K / L / { / B buttons, then press ENTER button. 1. Press SETUP button to display SETUP/DISC menu. 2. Select "SETUP" using { / B buttons, then press ENTER button. 3. Select "Select Video" using K / L / { / B buttons, then press ENTER button. Setup > Select Video L1 (Rear) L2 (Front) DVD Video In Video In Setup > Select Video L1 (Rear) L2 (Front) DVD Video In Video In 4. Select "L2 (Front)" using K / L buttons, then press ENTER button. Setup > Select Video L1 (Rear) L2 (Front) DVD VidVeidoeIon In S-Video In 4. Select "L1 (Rear)" using K / L buttons, then press ENTER button. Setup > Select Video L1 (Rear) L2 (Front) DVD VidVeidoeIon In S-Video In 5. Select the input jack type to connect using K / L buttons, then press ENTER button. If you want to use S-VIDEO INPUT, select "S-Video In". If you want to use VIDEO INPUT (Composite), select "Video In". 5. Select the input jack type to connect using K / L buttons, then press ENTER button. If you want to use S-VIDEO INPUT, select "S-Video In". If you want to use VIDEO INPUT (Composite), select "Video In". Setup > Select Video L1 (Rear) L2 (Front) DVD Video In S-Video In Setup > Select Video L1 (Rear) L2 (Front) DVD S-Video In Video In Playing discs Editing Changing the SETUP menu VCR functions Others Español 37
-
 1
1 -
2
-
3
-
4
-
5
-
6
-
7
-
8
-
9
-
10
-
11
-
12
-
13
-
14
-
15
-
16
-
17
-
18
-
19
-
20
-
21
-
22
-
23
-
24
-
25
-
26
-
27
-
28
-
29
-
30
-
31
-
 32
32 -
 33
33 -
 34
34 -
 35
35 -
 36
36 -
 37
37 -
 38
38 -
 39
39 -
 40
40 -
 41
41 -
 42
42 -
43
-
44
-
45
-
46
-
47
-
48
-
49
-
50
-
51
-
52
-
53
-
54
-
55
-
56
-
57
-
58
-
59
-
60
-
61
-
62
-
63
-
64
-
65
-
66
-
67
-
68
-
69
-
70
-
71
-
72
-
73
-
74
-
75
-
76
-
77
-
78
-
79
-
80
-
81
-
82
-
83
-
84
-
85
-
86
-
87
-
88
-
89
-
90
-
91
-
92
-
93
-
94
-
95
-
96
-
97
-
98
-
99
-
100
-
101
-
102
-
103
-
104
-
105
-
106
-
107
-
108
 |
 |