Synology DS218play Synology NAS Users Guide - Based on DSM 7.1 - Page 22
Create a group, Group Creation Wizard
 |
View all Synology DS218play manuals
Add to My Manuals
Save this manual to your list of manuals |
Page 22 highlights
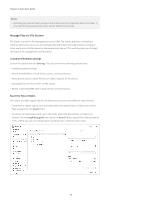
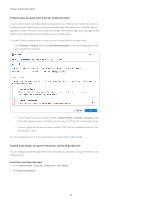
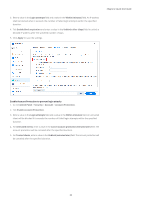
Chapter 2: Quick Start Guide 6. On the Assign shared folders permissions page, choose which shared folders the user can access. When the user permissions conflict with group permissions, the privilege priority is as follows: No access > Read/Write > Read only. The Preview column displays the access privileges that will take effect. 7. On the Assign user quota page, you can specify the maximum amount of space the user can use for each volume/shared folder. Enter a value and select the size unit in the User Quota field. 8. On the Assign application permissions page, you can control which services the user can access. When the user permissions conflict with group permissions, the Deny permission always has priority over the Allow permission. 9. On the Set user speed limit page, you can enable a speed limit for different services (e.g., File Station, FTP, rsync, etc.) to restrict the amount of bandwidth consumed by the user when transferring files. For each service, you can select one of the following: • Apply group settings: If the user belongs to multiple groups, the group with a higher speed limit has priority over other ones. • Set up speed cap: Specify upload and download speed limits in the fields to the right. • Advanced settings: Two customized speed limits and the group limit can be applied to the user according to the schedule you set. You can modify the speed limit settings and set the schedule in the pop-up window. 10. On the Confirm settings page, check and confirm the setting summary. 11. Click Done to finish the settings. Create a group 1. Go to Control Panel > User & Group > Group. 2. Click Create to launch Group Creation Wizard. 3. On the Enter group information page, enter a group name. 4. On the Select members page, add target users to the group. 5. On the Assign shared folder permissions page, specify group members' permissions to each shared folder. 6. On the Assign group quota page, you can enable usage quota for each service to control how much storage can be used by each group member. 7. On the Assign application permissions page, you can control which services group members can access. 8. On the Set group speed limit page, you can enable a speed limit for different services (e.g., File Station, FTP, rsync, etc.) to restrict the amount of bandwidth consumed by each group member when transferring files. For each service, you can select one of the following: • Set up speed cap: Specify upload and download speed limits in the fields to the right. • Advanced settings: Two customized speed limits and no limits can be applied according to the schedule you set. You can modify the speed limit settings and set the schedule in the pop-up window. 19
-
 1
1 -
2
-
3
-
4
-
5
-
6
-
7
-
8
-
9
-
10
-
11
-
12
-
13
-
14
-
15
-
16
-
 17
17 -
 18
18 -
 19
19 -
 20
20 -
 21
21 -
 22
22 -
 23
23 -
 24
24 -
 25
25 -
 26
26 -
 27
27 -
28
-
29
-
30
-
31
-
32
-
33
-
34
-
35
-
36
-
37
-
38
-
39
-
40
-
41
-
42
-
43
-
44
-
45
-
46
-
47
-
48
-
49
-
50
-
51
-
52
-
53
-
54
-
55
-
56
-
57
-
58
-
59
-
60
-
61
-
62
-
63
-
64
-
65
-
66
-
67
-
68
-
69
-
70
-
71
-
72
-
73
-
74
-
75
-
76
-
77
-
78
-
79
-
80
-
81
-
82
-
83
 |
 |
