TP-Link Archer VR400 Archer VR400EU V1 User Guide - Page 74
Use WPS for Wireless Connection, Method 1 Use the WPS Button - access point
 |
View all TP-Link Archer VR400 manuals
Add to My Manuals
Save this manual to your list of manuals |
Page 74 highlights
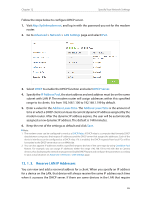
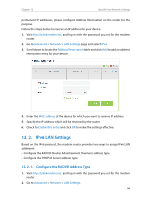
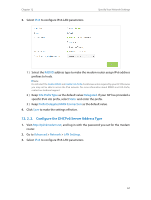
Chapter 12 Specify Your Network Settings • 802.11ac/n mixed (5Ghz): Select if you are using both 802.11ac and 802.11n wireless clients. • 802.11a/n/ac mixed (5Ghz): Select if you are using a mix of 802.11a, 802.11n and 802.11ac wireless clients. It is strongly recommended that you select 11a/n/ac mixed. Channel: Select the channel you want to use from the drop-down list. This field determines which operating frequency will be used. It is not necessary to change the wireless channel unless you notice interference problems with another nearby access point. Channel Width: Select the channel width from the drop-down list. The default setting is Automatic, which can adjust the channel width for your clients automatically. ¾¾ To change the security option: 1. Go to Advanced > Wireless >Wireless Settings page. 2. Select the wireless network 2.4GHz or 5GHz. 3. Select an option from the Security drop-down list. The router provides four options, None, WPA/WPA2 Personal (Recommended), WPA/WPA2 Enterprise, WEP. WPA2 uses the newest standard and the security level is the highest. We recommend you don't change the default settings unless necessary. 12. 3. 2. Use WPS for Wireless Connection You can use WPS (Wi-Fi Protected Setup) feature to add a new wireless device to your existing network quickly. Method 1 Use the WPS Button Use this method if your client device has a WPS button. 1. Press the WPS button the modem router for 1 second. 2. Press the WPS button of the client device directly. 3. The WPS LED flashes for about 2 minutes during the WPS process. 4. When the WPS LED is on, the client device has successfully connected to the modem router. Method 2 Enter the client device's PIN on the modem router 1. Visit http://tplinkmodem.net, and log in with the password you set for the modem router. 2. Go to Advanced > Wireless >WPS page. Select the wireless network 2.4GHz or 5GHz according to your wireless client. 70
-
 1
1 -
2
-
3
-
4
-
5
-
6
-
7
-
8
-
9
-
10
-
11
-
12
-
13
-
14
-
15
-
16
-
17
-
18
-
19
-
20
-
21
-
22
-
23
-
24
-
25
-
26
-
27
-
28
-
29
-
30
-
31
-
32
-
33
-
34
-
35
-
36
-
37
-
38
-
39
-
40
-
41
-
42
-
43
-
44
-
45
-
46
-
47
-
48
-
49
-
50
-
51
-
52
-
53
-
54
-
55
-
56
-
57
-
58
-
59
-
60
-
61
-
62
-
63
-
64
-
65
-
66
-
67
-
68
-
 69
69 -
 70
70 -
 71
71 -
 72
72 -
 73
73 -
 74
74 -
 75
75 -
 76
76 -
 77
77 -
 78
78 -
 79
79 -
80
-
81
-
82
-
83
-
84
-
85
-
86
-
87
-
88
-
89
-
90
-
91
-
92
-
93
-
94
-
95
-
96
-
97
-
98
-
99
-
100
-
101
-
102
-
103
-
104
-
105
-
106
-
107
-
108
-
109
-
110
-
111
 |
 |
