TP-Link T2600G-52TS TL-SG3452 T2600G-52TS V1 Installation Guide - Page 25
Configure the Switch Using CLI
 |
View all TP-Link T2600G-52TS TL-SG3452 manuals
Add to My Manuals
Save this manual to your list of manuals |
Page 25 highlights
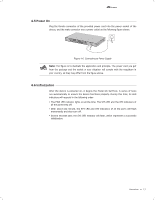
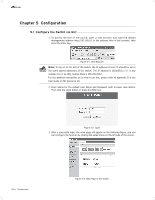
Gigabit L2 Managed Switch 5.2 Configure the Switch Using CLI You can log on to the switch and access the CLI by the following two methods: ■■ Log on to the switch by the Console (USB) port or Console (RJ-45) port on the switch. ■■ Log on to the switch remotely by a Telnet or SSH connection through an Ethernet port. ■■ Logon by a Console Port The switch has two console ports: an RJ-45 console port and a Micro-USB console port. Console output is active on devices connected to both console ports, but console input is only active on one console port at a time. The Micro-USB connector takes precedence over the RJ-45 connector. Install the TP-LINK USB Console Driver if you are using the USB serial port for the first time on a Windows-based PC. The driver can be found on the attached CD and Download page of our official website. Refer to the User Guide to learn more about the installation. To log on to the switch by the console port on the switch, please take the following steps: 1. Connect the PC or terminal to the console port on the switch by the provided cable. Refer to 4.3 Console Port to learn how to connect. 2. If you attach a PC, start the terminal emulation program (such as the Hyperterminal) on the PC. 3. Specify the connection COM port in the terminal emulation program. If the MicroUSB console port is used, you can view which COM port number is assigned to the USB serial port in the following path: Control Panel -> Hardware and Sournd -> Device Manager -> Ports -> USB Serial Port. 4. Configure the terminal emulation program or the terminal to use the following settings: ■■ Baud rate: 38400 bps ■■ Data bits: 8 ■■ Parity: none ■■ Stop bits: 1 ■■ Flow control: none 5. The DOS prompt "T2600G-28TS>" will appear after pressing the Enter button as Figure 5-4 shows. It indicates that you can use the CLI now. Figure 5-4 Log in the Switch Configuration 19
-
 1
1 -
2
-
3
-
4
-
5
-
6
-
7
-
8
-
9
-
10
-
11
-
12
-
13
-
14
-
15
-
16
-
17
-
18
-
19
-
 20
20 -
 21
21 -
 22
22 -
 23
23 -
 24
24 -
 25
25 -
 26
26 -
 27
27 -
 28
28 -
 29
29 -
 30
30 -
31
-
32
 |
 |