TP-Link TL-WR541G User Guide - Page 41
Wireless MAC Address Filtering entry, Add or Modify - as repeater
 |
UPC - 696726541004
View all TP-Link TL-WR541G manuals
Add to My Manuals
Save this manual to your list of manuals |
Page 41 highlights
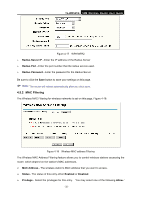
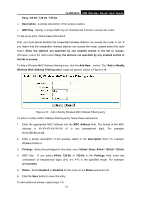
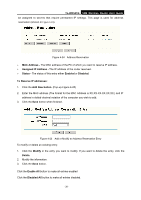
Deny / 64-bit / 128-bit / 152-bit. TL-WR541G 54M Wireless Router User Guide ¾ Description - A simple description of the wireless station. ¾ WEP Key - Specify a unique WEP key (in Hexadecimal format) to access the router. To set up an entry, follow these instructions: First, you must decide whether the unspecified wireless stations can access the router or not. If you desire that the unspecified wireless stations can access the router, please select the radio button Allow the stations not specified by any enabled entries in the list to access, otherwise, select the radio button Deny the stations not specified by any enabled entries in the list to access. To Add a Wireless MAC Address filtering entry, click the Add New... button. The "Add or Modify Wireless MAC Address Filtering entry" page will appear, shown in Figure 4-19: Figure 4-19 Add or Modify Wireless MAC Address Filtering entry To add or modify a MAC Address Filtering entry, follow these instructions: 1. Enter the appropriate MAC Address into the MAC Address field. The format of the MAC Address is XX-XX-XX-XX-XX-XX (X is any hexadecimal digit). For example: 00-0A-EB-B0-00-0B. 2. Enter a simple description of the wireless station in the Description field. For example: Wireless station A. 3. Privilege - Select the privileges for this entry, one of Allow / Deny / 64-bit / 128-bit / 152-bit. 4. WEP Key - If you select 64-bit, 128-bit or 152-bit in the Privilege field, enter any combination of hexadecimal digits (0-9, a-f, A-F) in the specified length. For example: 2F34D20BE2. 5. Status - Select Enabled or Disabled for this entry on the Status pull-down list. 6. Click the Save button to save this entry. To add additional entries, repeat steps 1-6. - 33 -
-
 1
1 -
2
-
3
-
4
-
5
-
6
-
7
-
8
-
9
-
10
-
11
-
12
-
13
-
14
-
15
-
16
-
17
-
18
-
19
-
20
-
21
-
22
-
23
-
24
-
25
-
26
-
27
-
28
-
29
-
30
-
31
-
32
-
33
-
34
-
35
-
 36
36 -
 37
37 -
 38
38 -
 39
39 -
 40
40 -
 41
41 -
 42
42 -
 43
43 -
 44
44 -
 45
45 -
 46
46 -
47
-
48
-
49
-
50
-
51
-
52
-
53
-
54
-
55
-
56
-
57
-
58
-
59
-
60
-
61
-
62
-
63
-
64
-
65
-
66
-
67
-
68
-
69
-
70
-
71
-
72
-
73
-
74
-
75
-
76
-
77
-
78
-
79
-
80
-
81
-
82
-
83
-
84
-
85
-
86
-
87
 |
 |
