TP-Link TL-WR542G User Guide - Page 14
Hardware Installation of the TL-WR542G 54Mbps Wireless Router
 |
View all TP-Link TL-WR542G manuals
Add to My Manuals
Save this manual to your list of manuals |
Page 14 highlights
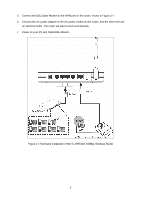
5. Connect the DSL/Cable Modem to the WAN port on the router, shown in Figure 2-1. 6. Connect the AC power adapter to the AC power socket on the router, and the other end into an electrical outlet. The router will start to work automatically. 7. Power on your PC and Cable/DSL Modem. Figure 2-1 Hardware Installation of the TL-WR542G 54Mbps Wireless Router 7
-
 1
1 -
2
-
3
-
4
-
5
-
6
-
7
-
8
-
 9
9 -
 10
10 -
 11
11 -
 12
12 -
 13
13 -
 14
14 -
 15
15 -
 16
16 -
 17
17 -
 18
18 -
 19
19 -
20
-
21
-
22
-
23
-
24
-
25
-
26
-
27
-
28
-
29
-
30
-
31
-
32
-
33
-
34
-
35
-
36
-
37
-
38
-
39
-
40
-
41
-
42
-
43
-
44
-
45
-
46
-
47
-
48
-
49
-
50
-
51
-
52
-
53
-
54
-
55
-
56
-
57
-
58
-
59
-
60
-
61
-
62
-
63
-
64
-
65
-
66
-
67
-
68
-
69
-
70
-
71
-
72
-
73
-
74
-
75
-
76
-
77
-
78
-
79
-
80
-
81
-
82
-
83
-
84
-
85
-
86
-
87
-
88
-
89
-
90
 |
 |

7
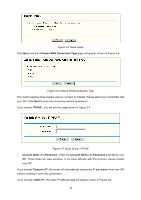
5.
Connect the DSL/Cable Modem to the WAN port on the router, shown in Figure 2-1.
6.
Connect the AC power adapter to the AC power socket on the router, and the other end into
an electrical outlet. The router will start to work automatically.
7.
Power on your PC and Cable/DSL Modem.
Figure 2-1 Hardware Installation of the TL-WR542G 54Mbps Wireless Router