TRENDnet TEW-841APBO Users Guide - Page 24
Hardware and Mounting Installation, Waterproof Kit Installation
 |
View all TRENDnet TEW-841APBO manuals
Add to My Manuals
Save this manual to your list of manuals |
Page 24 highlights
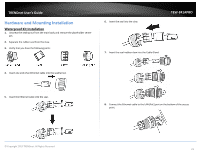
TRENDnet User's Guide Hardware and Mounting Installation Waterproof Kit Installation 1. Unscrew the sealing nut from the main body and remove the placeholder center pin. 2. Separate the rubber seal from the claw. 3. Verify that you have the following parts: 6. Insert the seal into the claw. TEW-841APBO 7. Insert the seal+rubber claw into the Cable Gland. 4. Insert one end of an Ethernet cable into the sealing nut. 5. Insert the Ethernet cable into the seal. 8. Connect the Ethernet cable to the LAN (PoE) port on the bottom of the access point. © Copyright 2019 TRENDnet. All Rights Reserved. 21
-
 1
1 -
2
-
3
-
4
-
5
-
6
-
7
-
8
-
9
-
10
-
11
-
12
-
13
-
14
-
15
-
16
-
17
-
18
-
 19
19 -
 20
20 -
 21
21 -
 22
22 -
 23
23 -
 24
24 -
 25
25 -
 26
26 -
 27
27 -
 28
28 -
 29
29 -
30
-
31
-
32
-
33
-
34
-
35
-
36
-
37
-
38
-
39
-
40
-
41
-
42
-
43
-
44
-
45
-
46
-
47
-
48
-
49
-
50
-
51
-
52
-
53
-
54
-
55
-
56
-
57
 |
 |

© Copyright 2019 TRENDnet. All Rights Reserved.
TRENDnet User’s Guide
TEW-841APBO
21
Hardware and Mounting Installation
Waterproof Kit Installation
1.
Unscrew the sealing nut from the main body and remove the placeholder center
pin.
2.
Separate the rubber seal from the claw.
3.
Verify that you have the following parts:
4.
Insert one end of an Ethernet cable into the sealing nut.
5.
Insert the Ethernet cable into the seal.
6.
Insert the seal into the claw.
7.
Insert the seal+rubber claw into the Cable Gland.
8.
Connect the Ethernet cable to the LAN (PoE) port on the bottom of the access
point.