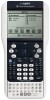
Texas Instruments TINSPIRE Getting Started - Page 34
Navigating through the Welcome Screen icons, Graphs, Geometry, Lists & Spreasheet - graphing calculator
 |
View all Texas Instruments TINSPIRE manuals
Add to My Manuals
Save this manual to your list of manuals |
Page 34 highlights
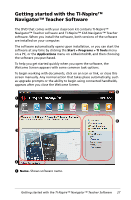
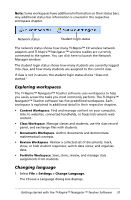
Á Quick Start icons. Click one of these icons to create a new document in the chosen application. The icon applications are Calculator, Graphs, Geometry, Lists & Spreasheet, Data & Statistics, Question, Notes, and Vernier® DataQuest. The Welcome Screen automatically closes and the chosen application opens. Â Preview area. When your mouse is hovering over an application icon or a link in Teacher Tools, this area shows a preview of the application or tool. A brief description of the icon or link is also displayed at the top of the area. Ã Always show this at startup. Deselect this checkbox to skip this screen when you open the software. Ä Close the Welcome Screen. Click here to close this screen and begin working in the software. Å Teacher Tools. Click one of these links to close the Welcome Screen and open the software in the chosen tool. • View content. Opens the Content workspace, where you can find content on your computer, the web, or connected handhelds. • Manage handhelds. Opens the Content workspace where you can see every handheld connected to your computer as well as the status of each. • Transfer documents. Opens the Transfer Tool application in the Content workspace, where you can send documents, folders, or new handheld OS files to the connected handhelds. • View classes and students. Opens the Class workspace where you can see the students in a class, or add new classes and students. • Open. Opens a dialog box where you can select an existing file on your computer to open. • Recent Documents. Lists the names of recently opened documents. As your mouse hovers over each document name, the first page of that document is displayed in the Preview Pane. Click the name of a document in the list to open that document. Navigating through the Welcome Screen icons ` Press Tab to navigate through the icons. ` Press Shift + Tab to go backward through the icons. ` Click to act on the selected icon. As you move through the icons, the Preview area displays a preview of the application. 28 Getting started with the TI-Nspire™ Navigator™ Teacher Software
-
 1
1 -
2
-
3
-
4
-
5
-
6
-
7
-
8
-
9
-
10
-
11
-
12
-
13
-
14
-
15
-
16
-
17
-
18
-
19
-
20
-
21
-
22
-
23
-
24
-
25
-
26
-
27
-
28
-
 29
29 -
 30
30 -
 31
31 -
 32
32 -
 33
33 -
 34
34 -
 35
35 -
 36
36 -
 37
37 -
 38
38 -
 39
39 -
40
-
41
-
42
-
43
-
44
-
45
-
46
-
47
-
48
-
49
-
50
-
51
-
52
-
53
-
54
-
55
-
56
-
57
-
58
-
59
-
60
-
61
-
62
-
63
-
64
-
65
-
66
-
67
-
68
-
69
-
70
-
71
-
72
-
73
-
74
-
75
-
76
-
77
-
78
-
79
-
80
-
81
-
82
-
83
-
84
-
85
-
86
-
87
-
88
-
89
-
90
-
91
-
92
-
93
-
94
-
95
-
96
-
97
-
98
-
99
-
100
-
101
-
102
-
103
-
104
-
105
-
106
-
107
-
108
-
109
-
110
-
111
-
112
-
113
-
114
-
115
-
116
-
117
-
118
-
119
-
120
-
121
-
122
-
123
-
124
-
125
-
126
-
127
-
128
-
129
-
130
-
131
-
132
-
133
-
134
-
135
-
136
-
137
-
138
-
139
-
140
-
141
-
142
-
143
-
144
-
145
-
146
-
147
-
148
-
149
-
150
-
151
-
152
-
153
-
154
-
155
-
156
-
157
-
158
-
159
-
160
-
161
-
162
-
163
-
164
-
165
-
166
-
167
-
168
-
169
-
170
-
171
-
172
-
173
-
174
-
175
-
176
-
177
-
178
-
179
-
180
-
181
-
182
-
183
-
184
-
185
-
186
-
187
-
188
-
189
-
190
-
191
-
192
-
193
-
194
-
195
-
196
-
197
-
198
-
199
-
200
-
201
-
202
-
203
-
204
-
205
-
206
-
207
-
208
-
209
-
210
-
211
-
212
-
213
-
214
-
215
-
216
-
217
-
218
-
219
-
220
-
221
-
222
-
223
-
224
-
225
-
226
-
227
-
228
-
229
-
230
 |
 |