Thermador PODS301W Instruction manual - Page 25
Defrost, Reheating, Refill Water Tank
 |
View all Thermador PODS301W manuals
Add to My Manuals
Save this manual to your list of manuals |
Page 25 highlights
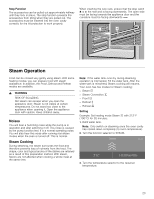
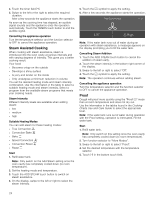
6. Swipe to the left or the right to select the required duration. 7. Touch the 8 symbol to apply the setting. After a few seconds the appliance starts the operation. As soon as the cooking time has elapsed, an audible signal sounds and the appliance ends the operation automatically. Cancelling the appliance operation Turn the temperature selector and the function selector to OFF to cancel the appliance operation. Defrost Use the "Defrost "" heating mode to defrost frozen products. Note: If the water tank runs dry during operation with the Defrost setting, operation is interrupted. Fill the water tank. After the water tank is reinserted, Defrost will resume. Start 1. Refill water tank. Note: Only switch on this setting once the oven cavity has completely cooled down (to room temperature). 2. Turn function selector to "More Modes". 3. Swipe to the left or right to select "Defrost". 4. Set the desired temperature with the temperature selector. 5. Touch + in the bottom touch field. 6. Swipe to the left or the right to select the required duration. 7. Touch the 8 symbol to apply the setting. After a few seconds the appliance starts the operation. As soon as the cooking time has elapsed, an audible signal sounds and the appliance ends the operation automatically. Cancelling the appliance operation Turn the temperature selector and the function selector to OFF to cancel the appliance operation. Reheating With the "Reheat ¨" heating mode, you can gently reheat food that has already been cooked or crisp up day-old baked goods. Steam is switched on automatically. Note: If the water tank runs out of water during the operation with the Reheating setting, the operation is interrupted. Fill the water tank. After the water tank is reinserted, Reheating will resume. Start 1. Refill water tank. Note: Only switch on this setting once the oven cavity has completely cooled down (to room temperature). 2. Turn function selector to "More Modes". 3. Swipe to the left or right to select "Reheat". 4. Set the desired temperature with the temperature selector. 5. Touch + in the bottom touch field. 6. Swipe to the left or the right to select the required duration. 7. Touch the 8 symbol to apply the setting. After a few seconds the appliance starts the operation. As soon as the cooking time has elapsed, an audible signal sounds and the appliance ends the operation automatically. Cancelling the appliance operation Turn the temperature selector and the function selector to OFF to cancel the appliance operation. Refill Water Tank The water tank is located at the right side of the oven cavity. Before starting an operation with steam, fill the water tank with water. Ensure that the water hardness range has been set correctly. 9 WARNING RISK OF INJURY AND FIRE Only fill the water tank with water or with the descaling solution we have recommended. Do not pour any flammable liquids (e.g. alcoholic drinks) into the water tank. Due to hot surfaces, vapors from flammable liquids may catch fire in the oven cavity (explosion). The appliance door may spring open. Hot steam and flames may escape. 9 WARNING RISK OF BURNS The water tank may heat up while the appliance is in operation. Wait until the water tank has cooled down after the previous appliance operation. Remove the water tank from the water tank recess. NOTICE: The appliance may become damaged due to the use of unsuitable liquids. Do not use distilled water, highly chlorinated tap water (>4 mg/l) or other liquids. Only use cold, fresh tap water, softened water or noncarbonated mineral water. Do not overfill tank above max level line to avoid water from spilling inside the tank housing. 25
-
 1
1 -
2
-
3
-
4
-
5
-
6
-
7
-
8
-
9
-
10
-
11
-
12
-
13
-
14
-
15
-
16
-
17
-
18
-
19
-
 20
20 -
 21
21 -
 22
22 -
 23
23 -
 24
24 -
 25
25 -
 26
26 -
 27
27 -
 28
28 -
 29
29 -
 30
30 -
31
-
32
-
33
-
34
-
35
-
36
-
37
-
38
-
39
-
40
-
41
-
42
-
43
-
44
-
45
-
46
-
47
-
48
-
49
-
50
-
51
-
52
-
53
-
54
-
55
-
56
-
57
-
58
-
59
-
60
-
61
-
62
-
63
-
64
-
65
-
66
-
67
-
68
-
69
-
70
-
71
-
72
-
73
-
74
-
75
-
76
-
77
-
78
-
79
-
80
-
81
-
82
-
83
-
84
-
85
-
86
-
87
-
88
 |
 |
