Thermador T36FT820NS Instructions for Use - Page 8
Installing the appliance, Preparing the appliance for first, Connecting the appliance to the,
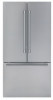 |
View all Thermador T36FT820NS manuals
Add to My Manuals
Save this manual to your list of manuals |
Page 8 highlights
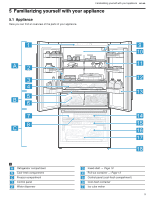
en-us Installation and connection The weight of the appliance may be up to 345 lbs (155 kg) depending on the model. The subfloor must be sufficiently stable to bear the weight of the appliance. 4.3 Installing the appliance ▶ Install the appliance in accordance with the enclosed installation instructions. 4.4 Preparing the appliance for first use 1. Remove the information material. 2. Remove the protective film and transit bolts, e.g. re- move the adhesive strips and cardboard. 3. Clean the appliance for the first time. → Page 22 4.5 Connecting the appliance to the drinking water connection Requirements ¡ A shut-off valve must be installed on the water connec- tion and be freely accessible following installation of the appliance. ¡ Ensure that the water coming from the water connection is potable. 1. Rinse the drinking water connection thoroughly until the drinking water is no longer cloudy and contains no deposits. If the drinking water is still cloudy or contains deposits, install an external water filter system. 2. Install the drinking water connection according to the enclosed installation instructions. 4.6 Connecting the appliance to the electricity supply 1. Insert the non-heating appliance plug of the power cable into the appliance. 2. Insert the mains plug of the appliance's power cable in a socket outlet nearby. The connection data of the appliance can be found on the rating plate. → "Appliance", Fig. 1 /11, Page 10 3. Check the mains plug is inserted properly. a The appliance is now ready to use. 8
-
 1
1 -
2
-
 3
3 -
 4
4 -
 5
5 -
 6
6 -
 7
7 -
 8
8 -
 9
9 -
 10
10 -
 11
11 -
 12
12 -
 13
13 -
14
-
15
-
16
-
17
-
18
-
19
-
20
-
21
-
22
-
23
-
24
-
25
-
26
-
27
-
28
-
29
-
30
-
31
-
32
-
33
-
34
-
35
-
36
-
37
-
38
-
39
-
40
-
41
-
42
-
43
-
44
-
45
-
46
-
47
-
48
-
49
-
50
-
51
-
52
-
53
-
54
-
55
-
56
-
57
-
58
-
59
-
60
-
61
-
62
-
63
-
64
-
65
-
66
-
67
-
68
-
69
-
70
-
71
-
72
-
73
-
74
-
75
-
76
-
77
-
78
-
79
-
80
-
81
-
82
-
83
-
84
-
85
-
86
-
87
-
88
-
89
-
90
-
91
-
92
-
93
-
94
-
95
-
96
 |
 |