Thermador VCIN54GWS Installation Instructions - Page 15
Connect to the ductwork.
 |
View all Thermador VCIN54GWS manuals
Add to My Manuals
Save this manual to your list of manuals |
Page 15 highlights
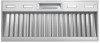
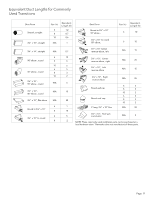
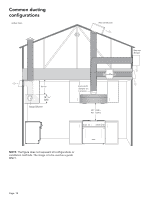
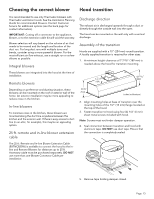
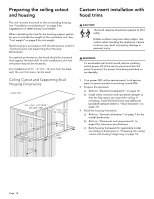
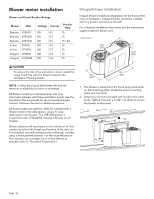
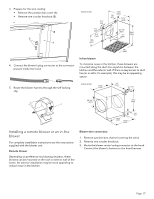
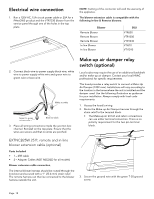
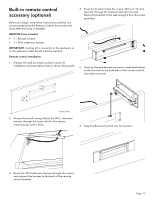
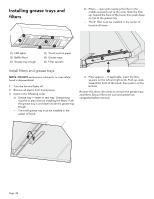
4. Install the hood trim. a) Hold trim flush to the bottom of the housing. Secure the trim to the hood with (20) x 3/8'' (9.5 mm) screws. b) The back trim piece may not be necessary in some installation scenarios where there is a ½'' (12.7 mm) or less space between the hood and the back wall. b) Secure to the rear of the housing framework using six (6) x 1'' (25.4 mm) mounting screws, as indicated below. 5. Prepare for the wire routing. a) Remove the junction box cover. b) Remove one circular knockout. c) Secure to the top of the housing framework using eight (8) x 1'' (25.4 mm) mounting screws, 4 per side. B A c) Install strain relief (not included) into one of the circular knockouts. 6. Install the unit. a) Install the custom insert inside the custom housing. 7. Connect to the ductwork. 8. Install the blower motor. a) Refer to "Choosing the correct blower" on page 13. b) Refer to "Blower motor installation" beginning on page 16. 9. Connect the electrical wiring. a) Connect wiring for applicable blower motor (see blower instructions beginning on page 16). 10. Install hood filters and grease trays. a) Refer to "Installing grease trays and filters" on page 20. 11. Test the installation. a) Test the operation of the blower and the lights. b) Be sure to check for back-draft. With the blower on high, close the windows and doors to the area to ensure that fan does not cause back drafting in any outlet vent for another appliance. Page. 15
-
 1
1 -
2
-
3
-
4
-
5
-
6
-
7
-
8
-
9
-
 10
10 -
 11
11 -
 12
12 -
 13
13 -
 14
14 -
 15
15 -
 16
16 -
 17
17 -
 18
18 -
 19
19 -
 20
20 -
21
-
22
-
23
-
24
-
25
-
26
-
27
-
28
-
29
-
30
-
31
-
32
-
33
-
34
-
35
-
36
-
37
-
38
-
39
-
40
-
41
-
42
-
43
-
44
-
45
-
46
-
47
-
48
-
49
-
50
-
51
-
52
-
53
-
54
-
55
-
56
-
57
-
58
-
59
-
60
-
61
-
62
-
63
-
64
 |
 |
