Thermador VCIN54GWS Installation Instructions - Page 17
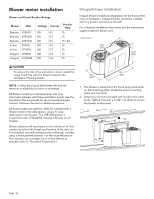
Installing a remote blower or an in-line, blower
 |
View all Thermador VCIN54GWS manuals
Add to My Manuals
Save this manual to your list of manuals |
Page 17 highlights
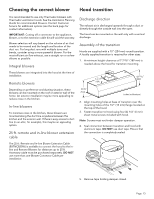
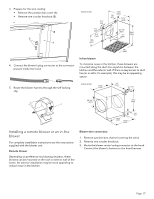
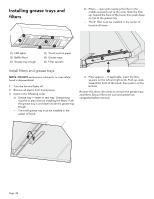
3. Prepare for the wire routing. • Remove the junction box cover (A). • Remove one circular knockout (B). B A inches (mm) 2⅛" (54) 1⅞" (48) 6½" (165) 12⅞" (327) 1¾" (45) 13⅝" (346) 12⅛" (308) dia.9⅞" (251) 10" (254) 20¾" (527) 19" (485) 4. Connect the blower's plug connector to the connector present inside the hood. In-line blower To minimize noise in the kitchen, these blowers are mounted along the duct line anywhere between the kitchen and the exterior wall. If there is easy access to duct line (in an attic, for example), this may be an appealing option. 5. Route the blower harness through the self-locking clip. inches (mm) 12⅛" (308) 12" (305) ⅞" (22) ø 9⅞" (251) 19⅛" (486) 12⅞" (327) 14⅜" (365) 1¾" (44) Installing a remote blower or an in-line blower For complete installation instructions see the instructions supplied with the blower unit. Remote blower Depending on preference and ducting situation, these blowers can be mounted on the roof or exterior wall of the home. An exterior installation may be more appealing to reduce noise in the kitchen. Blower wire connection 1. Remove junction box channel covering the wires. 2. Remove one circular knockout. 3. Route the blower motor's plug connector to the hood. Connect the blower's harness to the hood harness. Page. 17
-
 1
1 -
2
-
3
-
4
-
5
-
6
-
7
-
8
-
9
-
10
-
11
-
 12
12 -
 13
13 -
 14
14 -
 15
15 -
 16
16 -
 17
17 -
 18
18 -
 19
19 -
 20
20 -
 21
21 -
 22
22 -
23
-
24
-
25
-
26
-
27
-
28
-
29
-
30
-
31
-
32
-
33
-
34
-
35
-
36
-
37
-
38
-
39
-
40
-
41
-
42
-
43
-
44
-
45
-
46
-
47
-
48
-
49
-
50
-
51
-
52
-
53
-
54
-
55
-
56
-
57
-
58
-
59
-
60
-
61
-
62
-
63
-
64
 |
 |
