Toshiba 32HLC56 Owners Manual - Page 8
Front and side panel controls and connections - cable connection
 |
UPC - 022265240670
View all Toshiba 32HLC56 manuals
Add to My Manuals
Save this manual to your list of manuals |
Page 8 highlights
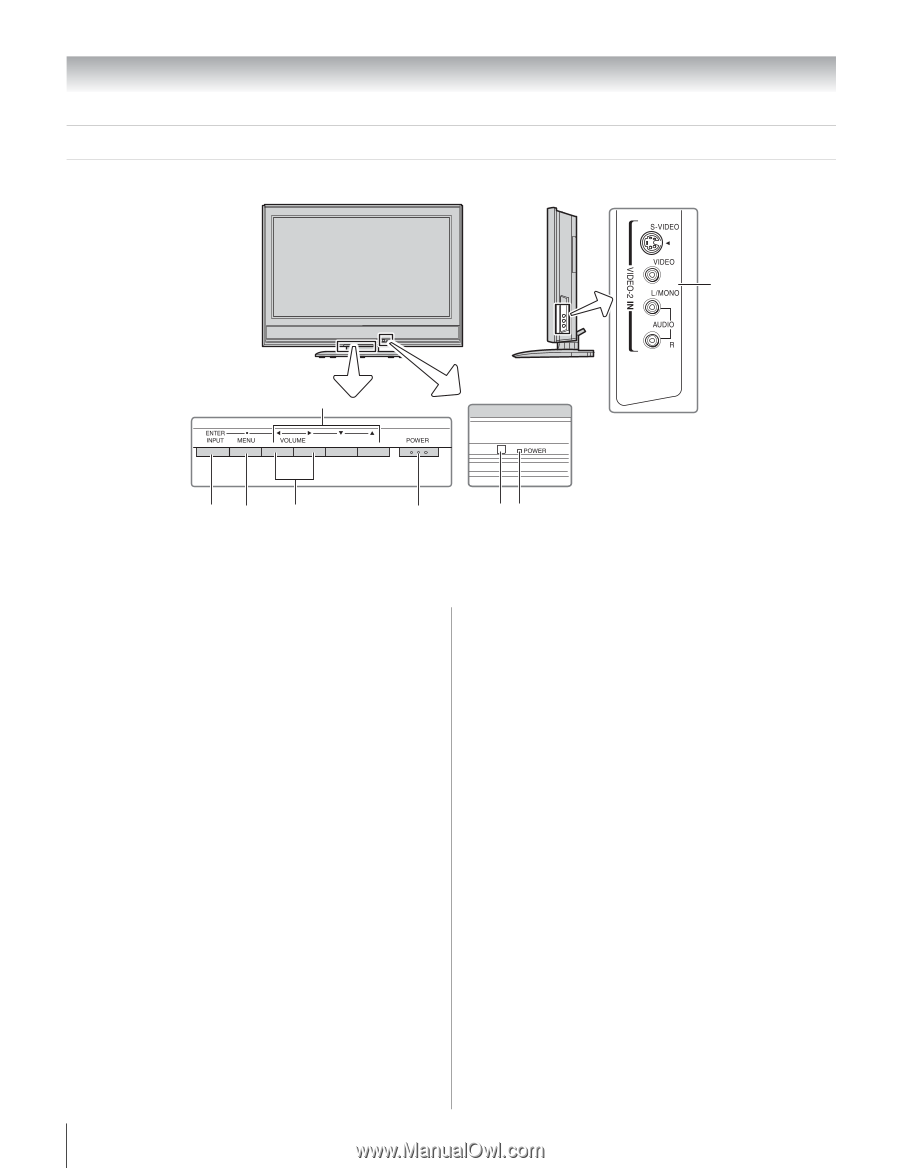
Chapter 1: Introduction Front and side panel controls and connections Monitor front Monitor Side panel 8 Control panel 7 65 4 3 21 1 Red LED - Red light indicates power is on. 2 Remote sensor - Point the remote control toward the remote sensor. See "Remote control effective range" (- page 16). 3 POWER - Press to turn the monitor on and off. 4 VOLUME C c - When no menu is on-screen, these buttons adjust the volume level. When a menu is onscreen, these buttons function as left/right menu navigation buttons. 5 MENU - Press to access the menu system (- page 23). 6 INPUT (ENTER) - Repeatedly press to change the source you are viewing (VIDEO-1/ColorStream HD-1, VIDEO-2, ColorStream HD-2, HDMI, or PC. When a menu is on-screen, the INPUT button on the monitor control panel functions as the Enter button. 7 ARROWS BbC c - When a menu is on-screen, these buttons function as up/down/left/right menu navigation buttons. 8 VIDEO-2 IN - Standard (composite) video and standard (analog) audio inputs plus optional S-video input for connecting devices with either composite video or S-video output. Note: • Standard (composite) video and S-video cables carry only video information; separate audio cables are required for a complete connection. • Do not connect both a composite video and an S-video cable to VIDEO-2 simultaneously or the picture performance will be unacceptable. 8
-
 1
1 -
2
-
 3
3 -
 4
4 -
 5
5 -
 6
6 -
 7
7 -
 8
8 -
 9
9 -
 10
10 -
 11
11 -
 12
12 -
 13
13 -
14
-
15
-
16
-
17
-
18
-
19
-
20
-
21
-
22
-
23
-
24
-
25
-
26
-
27
-
28
-
29
-
30
-
31
-
32
-
33
-
34
-
35
-
36
-
37
-
38
-
39
-
40
-
41
-
42
-
43
-
44
-
45
-
46
 |
 |