Toshiba 32SL410U User Manual - Page 23
Setup/Installation menu layout, Navigating the menu system, Option
 |
View all Toshiba 32SL410U manuals
Add to My Manuals
Save this manual to your list of manuals |
Page 23 highlights
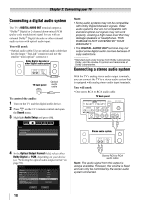
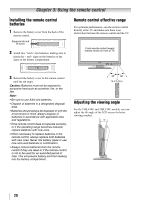
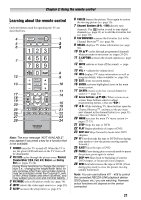
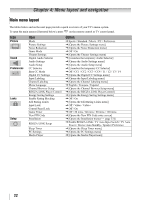
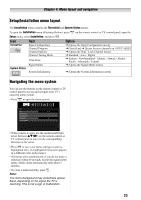
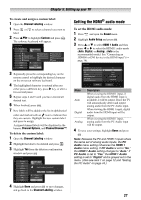
Chapter 4: Menu layout and navigation Setup/Installation menu layout The Installation menu contains the Terrestrial and System Status menus. To open the Installation menu (illustrated below), press on the remote control or TV control panel, open the Setup menu, select Installation, and press . Icon Terrestrial Item Input Configuration Channel Program Channel Options Channel Tuning Mode Time Zone Signal Meter System Status System Information Option J [Opens the Input Configuration menu] J [Start Scan] J [Scans for new channels on ANT/CABLE] J [Opens the Skip / Lock Channel menu] J Standard / Auto / Digital J Eastern / Newfoundland / Atlantic / Hawaii / Alaska / Pacific / Mountain / Central J [Opens the Signal Meter menu] J [Opens the System Information screen] Navigating the menu system You can use the buttons on the remote control or TV control panel to access and navigate your TV's onscreen menu system. • Press to open the menu system. Picture Mode Picture Settings Noise Reduction Game Mode Theater Settings Sports Off • When a menu is open, use the up/down/left/right arrow buttons (STWX) on the remote control or TV control panel to move in the corresponding direction in the menu. • Press to save your menu settings or select a highlighted item. (A highlighted menu item appears in a different color in the menu.) • All menus close automatically if you do not make a selection within 60 seconds, except the signal meter menu, which closes automatically after about 5 minutes. • To close a menu instantly, press . Note: The menu background may sometimes appear black, depending on the signal the TV is receiving. This is not a sign of malfunction. 23
-
 1
1 -
2
-
3
-
4
-
5
-
6
-
7
-
8
-
9
-
10
-
11
-
12
-
13
-
14
-
15
-
16
-
17
-
 18
18 -
 19
19 -
 20
20 -
 21
21 -
 22
22 -
 23
23 -
 24
24 -
 25
25 -
 26
26 -
 27
27 -
 28
28 -
29
-
30
-
31
-
32
-
33
-
34
-
35
-
36
-
37
-
38
-
39
-
40
-
41
-
42
-
43
-
44
-
45
-
46
-
47
-
48
-
49
-
50
-
51
-
52
-
53
-
54
-
55
-
56
-
57
-
58
-
59
-
60
-
61
-
62
 |
 |
