Toshiba 32SL410U User Manual - Page 26
Setting channel skip, Labeling channels
 |
View all Toshiba 32SL410U manuals
Add to My Manuals
Save this manual to your list of manuals |
Page 26 highlights
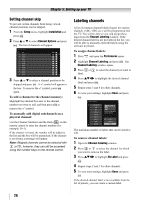
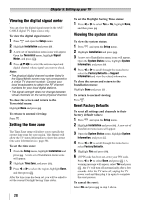
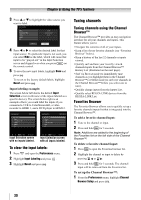
Chapter 5: Setting up your TV Setting channel skip To prevent certain channels from being viewed, channel positions can be skipped. 1 From the Setup menu, highlight Installation and press . 2 Press S or T to select Channel Options and press . The list of channels will appear. Channel Options Ch. Type 1 Digital 2 Analog 3 Digital 4 Analog 5 Analog 6 Analog 7 Analog 8 Analog 9 Analog 10 Analog 3 Press S or T to select a channel position to be skipped and press . A symbol will appear in the box. To remove the symbol, press again. To add a channel to the channel memory: Highlight the checked box next to the channel number you want to add, and then press to remove the symbol. To manually add digital subchannels on a physical channel: Use the Channel Numbers and the Dash ( ) on the remote control to enter the channel number (for example, 56-1). If the channel is found, the number will be added to the list and the box will be unchecked. If the channel is not found, a message will appear. Note: Skipped channels cannot be selected with or ; however, they can still be accessed using the number keys on the remote control. Labeling channels A list of common channel labels (logos) for various channels (ABC, CBS, etc.) will be programmed into the TV. You will be able to view and assign these logos from the Channel Labeling window. If the desired channel label is not provided in the list, you will be able to manually enter/edit labels using the software keyboard. To assign channel labels: 1 Press and open the Preferences menu. 2 Highlight Channel Labeling and press . The Channel Labeling window opens. 3 Press or to select the channel you want to label. 4 Press STWX to highlight the desired channel label and press . 5 Repeat steps 3 and 4 for other channels. 6 To save your settings, highlight Done and press . Channel Labeling {No Label} A&E ABC ABCFAM ABCHD AMAX AMAXW AMC ANIMAL ANT/CABLE 16-1 A&E Press CH UP/DOWN to change channels. Custom Clear All Done The maximum number of labels that can be stored is 128. To remove channel labels: 1 Open the Channel Labeling window. 2 Press or to select the channel for which you want to remove the label. 3 Press STWX to highlight No Label and press . 4 Repeat steps 2 and 3 for other channels. 5 To save your settings, highlight Done and press . If the desired channel label is not available from the list of presets, you can create a custom label. 26
-
 1
1 -
2
-
3
-
4
-
5
-
6
-
7
-
8
-
9
-
10
-
11
-
12
-
13
-
14
-
15
-
16
-
17
-
18
-
19
-
20
-
 21
21 -
 22
22 -
 23
23 -
 24
24 -
 25
25 -
 26
26 -
 27
27 -
 28
28 -
 29
29 -
 30
30 -
 31
31 -
32
-
33
-
34
-
35
-
36
-
37
-
38
-
39
-
40
-
41
-
42
-
43
-
44
-
45
-
46
-
47
-
48
-
49
-
50
-
51
-
52
-
53
-
54
-
55
-
56
-
57
-
58
-
59
-
60
-
61
-
62
 |
 |