Toshiba D-KVR20U User's Guide for Model D-KVR20 - Page 104
OPEN/CLOSE, OPEN/CLOSE], ENTER], The disc canceled during the, repairing process MAY NOT work.,
 |
View all Toshiba D-KVR20U manuals
Add to My Manuals
Save this manual to your list of manuals |
Page 104 highlights
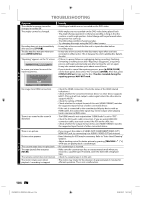
TROUBLESHOOTING Symptom The subtitle language cannot be changed or turned off. The angles cannot be changed. Recording does not stop immediately after you press [STOP C]. The disc tray does not open when you press [OPEN/CLOSE A]. "Repairing" appears on the TV screen. Repairing In a case you intend to cancel the repairing process. D V Do you want to cancel a repairing process ? When selecting "Yes", D the disc may not be usable. Yes No Remedy • Multilingual subtitle are not recorded on the DVD-video. • Multi-angles are not recorded on the DVD-video being played back. • The angle-change operation is whenever possible as long as the disc contains a multi-angle portion. Actual change will be performed when the portion has come up. • The DVD-video prohibits changing angles. • Try changing the angle using the DVD-video's menu. • It may take a few seconds for the unit to input disc data before recording stops. • It may take a few seconds for the disc tray to open after you have recorded or edited a disc. This is because the unit is adding disc data to the disc. • If there is a power failure or unplugging during recording, finalizing, formatting or editing (even after "Repairing" disappears), a repairing process will begin automatically just after turning the unit on again. It may take several minutes up to about several hours. • If you intend to cancel the repairing process, press [AOPEN/CLOSE] on the front panel, then select "Yes" and press [ENTER]. After that, press [OPEN/CLOSE A] to take out the disc. The disc canceled during the repairing process MAY NOT work. Repairing No image from HDMI connection. There is no sound or the sound is distorted. • Check the HDMI connection. (Check the status of the HDMI related indications.) • Check whether the connected monitor device or other device supports HDCP. (This unit will not output a video signal unless the other device supports HDCP.) • Check the setting of HDMI. • Check whether the output format of this unit (HDMI FORMAT) matches the supported input format of other connected device. • If the unit is connected to the unauthorized display device with an HDMI cable, the audio/video signal may not be output when playing back a commercial DVD-video. • The HDMI sound is not output when "HDMI Audio" is set to "OFF". • Check the RCA audio cable connection. If you are using HDMI-DVI conversion cable, you must connect the RCA audio cable, too. • Check whether the output format of this unit (HDMI FORMAT) matches the supported input format of other connected device. There is no picture. • If you connect the cable to S-VIDEO OUT/ COMPONENT VIDEO OUT / HDMI OUT jack, try connecting it to AUDIO / VIDEO OUT jack instead. Picture noise appears. • Head cleaning for VCR may be necessary. Refer to "Auto Head Cleaning" (page 5). • Adjust tracking control for better picture by pressing [TRACKING / ] V while you are playing back a cassette tape. C The cassette tape does not play back. • No cassette tape is inserted. R The tape ejected after you press [REC I]. • Make sure the cassette tape has an erase-protection tab when you record to a cassette tape. If needed, cover the hole with cellophane tape. The remote control does not function. • Check if a cassette tape is in this unit. The motor rotates even when playback / recording is stopped. • The motor may rotate for the duration of approximately 5 minutes for efficient operation. This is not a malfunction. 104 EN E9KGBUD_D-KVR20KU_EN.indd 104 2008/05/27 16:11:52
-
 1
1 -
2
-
3
-
4
-
5
-
6
-
7
-
8
-
9
-
10
-
11
-
12
-
13
-
14
-
15
-
16
-
17
-
18
-
19
-
20
-
21
-
22
-
23
-
24
-
25
-
26
-
27
-
28
-
29
-
30
-
31
-
32
-
33
-
34
-
35
-
36
-
37
-
38
-
39
-
40
-
41
-
42
-
43
-
44
-
45
-
46
-
47
-
48
-
49
-
50
-
51
-
52
-
53
-
54
-
55
-
56
-
57
-
58
-
59
-
60
-
61
-
62
-
63
-
64
-
65
-
66
-
67
-
68
-
69
-
70
-
71
-
72
-
73
-
74
-
75
-
76
-
77
-
78
-
79
-
80
-
81
-
82
-
83
-
84
-
85
-
86
-
87
-
88
-
89
-
90
-
91
-
92
-
93
-
94
-
95
-
96
-
97
-
98
-
 99
99 -
 100
100 -
 101
101 -
 102
102 -
 103
103 -
 104
104 -
 105
105 -
 106
106 -
 107
107 -
 108
108 -
 109
109 -
110
-
111
 |
 |