Toshiba Excite Pure AT15-A16 User's Guide for Excite Pure (Jellybean 4.2) - Page 26
Top, Bottom, Connecting to a power source, Sample Illustration Top view
 |
View all Toshiba Excite Pure AT15-A16 manuals
Add to My Manuals
Save this manual to your list of manuals |
Page 26 highlights
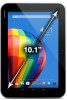
26 Top Getting Started Connecting to a power source Internal microphone Power Button (Sample Illustration) Top view Internal microphone ❖ Internal microphones-Allows you to record sounds using the computer's internal microphone or an optional external microphone. You can listen to audio files using the built-in speakers, headphones, or external speakers. ❖ Power button-Turns the device on and off. Press and hold the button for several seconds to turn the device ON/OFF. Press the button quickly to wake the device from Sleep mode or to place it into Sleep mode. For more information, see "Options for turning off the device" on page 56. Bottom (Sample Illustration) Bottom view Connecting to a power source Your device requires power to operate. Use the USB Power cable and USB/AC adaptor to connect the device to a live electrical outlet, or to charge the device's battery. Always confirm that the power plug (and extension cable plug if used) has been fully inserted into the socket, to ensure a secure electrical connection. Failure to do so may result in a fire or electric shock, possibly resulting in serious injury. Be careful if you use a multiple connector. An overload on one socket could cause a fire or electric shock, possibly resulting in serious injury.
-
 1
1 -
2
-
3
-
4
-
5
-
6
-
7
-
8
-
9
-
10
-
11
-
12
-
13
-
14
-
15
-
16
-
17
-
18
-
19
-
20
-
 21
21 -
 22
22 -
 23
23 -
 24
24 -
 25
25 -
 26
26 -
 27
27 -
 28
28 -
 29
29 -
 30
30 -
 31
31 -
32
-
33
-
34
-
35
-
36
-
37
-
38
-
39
-
40
-
41
-
42
-
43
-
44
-
45
-
46
-
47
-
48
-
49
-
50
-
51
-
52
-
53
-
54
-
55
-
56
-
57
-
58
-
59
-
60
-
61
-
62
-
63
-
64
-
65
-
66
-
67
-
68
-
69
-
70
-
71
-
72
-
73
-
74
-
75
-
76
-
77
-
78
-
79
-
80
-
81
-
82
-
83
-
84
-
85
-
86
-
87
-
88
-
89
-
90
-
91
-
92
-
93
-
94
-
95
-
96
-
97
-
98
-
99
-
100
-
101
-
102
-
103
-
104
-
105
-
106
-
107
-
108
-
109
-
110
-
111
-
112
-
113
-
114
-
115
-
116
-
117
-
118
-
119
-
120
-
121
-
122
-
123
-
124
-
125
-
126
-
127
-
128
-
129
-
130
-
131
-
132
 |
 |
