Toshiba HD-D1 Firmware Upgrade - Page 21
Connecting to a TV
 |
View all Toshiba HD-D1 manuals
Add to My Manuals
Save this manual to your list of manuals |
Page 21 highlights
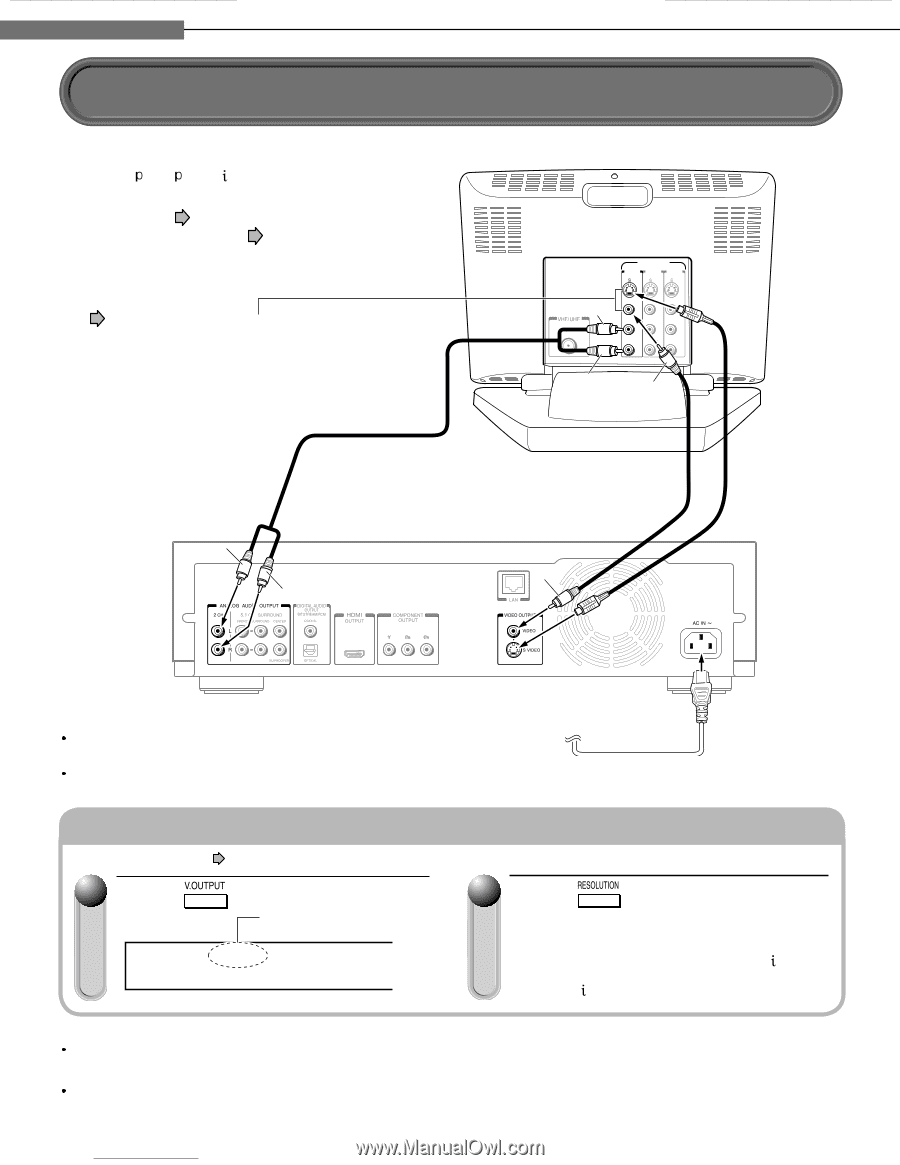
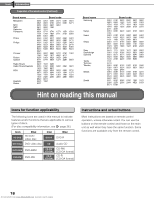
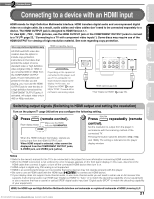
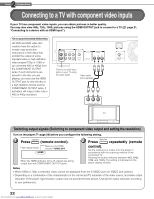
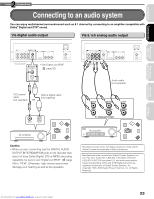
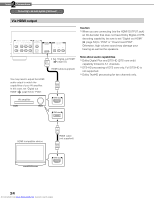
2 Chapter Connections Connecting to a TV Connect the player to your TV to view disc contents. To view 480 , 720 , 1080 pictures, use the HDMI OUTPUT jack or the COMPONENT OUTPUT jacks to connect to a TV. ( page 21, "Connecting to a device with an HDMI input", page 22, "Connecting to a TV with component video inputs"). Some discs may require use of the HDMI OUTPUT for viewing of high resolution material. See page 21. If the TV has an S-video input, connect the player with an S-video cable. When using an S-video cable, do not connect the yellow video cable. Audio cable (supplied) VIDEO INPUT INPUT INPUT INPUT White INPUT (FROM ANTENNA) Red VIDEO VIDEO VIDEO L AUDIO R L AUDIO R L AUDIO R Yellow Video cable (supplied) S-video cable (not supplied) White Red Yellow Caution Do not power this player using any power cord other than the one supplied with this player. Do not use the supplied power cord with any device other than this player. Connect the power cord finally to a 120V AC wall outlet. Switching output signals and setting the resolution Turn on the player ( page 28) before you configure the following setting. 1 Press (remote control). Player display window Make sure the HDMI indicator TURNS OFF. HDMI 2 Press repeatedly (remote control). Set the resolution to output from the player in accordance with the scanning method (480 ) of the connected TV. Select "480 " on the player display window. Notes When you connect the player to your TV, be sure to turn off the power and unplug both units from the wall outlet before making any connections. Connect the player directly to your TV. If you connect the player to a VCR, TV/VCR combination, video selector or AV amplifier, the playback picture may be distorted due to copy protection. 20 Downloaded from www.Manualslib.com manuals search engine
-
 1
1 -
2
-
3
-
4
-
5
-
6
-
7
-
8
-
9
-
10
-
11
-
12
-
13
-
14
-
15
-
 16
16 -
 17
17 -
 18
18 -
 19
19 -
 20
20 -
 21
21 -
 22
22 -
 23
23 -
 24
24 -
 25
25 -
 26
26 -
27
-
28
-
29
-
30
-
31
-
32
-
33
-
34
-
35
-
36
-
37
-
38
-
39
-
40
-
41
-
42
-
43
-
44
-
45
-
46
-
47
-
48
-
49
-
50
-
51
-
52
-
53
-
54
-
55
-
56
-
57
-
58
-
59
-
60
-
61
-
62
-
63
-
64
-
65
-
66
-
67
-
68
-
69
 |
 |