Toshiba HD-D1 Firmware Upgrade - Page 47
Internet connection feature Preparation Continued - password
 |
View all Toshiba HD-D1 manuals
Add to My Manuals
Save this manual to your list of manuals |
Page 47 highlights
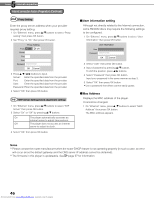
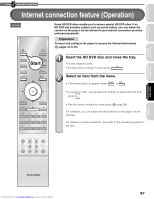
5 Chapter Internet connection Internet connection feature (Preparation) (Continued) 2nd Proxy Setting Enter the proxy server address when your provider requires proxy setting. 1 On "Ethernet" menu, press / buttons to select "Proxy setting" then press OK button. 2 Set "Proxy" to "On" then press OK button. Proxy Setting Proxy On Off Server Port User Password OK Cancel 3 Press / / / buttons to input. Server: Enter the specified data from the provider. Port: Enter the specified data from the provider. User: Enter the specified data from the provider. Password: Enter the specified data from the provider. 4 Select "OK" then press OK button. 3rd NTP Server Setting (Clock adjustment setting) 1 On "Ethernet" menu, press / buttons to select "NTP Server" then press OK button. 2 Select "On" or "Off" by pressing / buttons. On The player automatically accesses an internet server to adjust time protocol. Off The player does not access an internet server to adjust its clock. 3 Select "OK" then press OK button. User information setting Although not directly related to the Internet connection, some HD DVD discs may require the following settings to be configured. 1 On "Ethernet" menu, press / buttons to select "User Information" then press OK button. User information User Password OK Cancel 2 Select "User" then press OK button. 3 Input characters by pressing / buttons. To shift the position, press / buttons. 4 Select "Password" then press OK button. Input your password in the same manner as step 3. 5 Select "OK" then press OK button. • Use a password that others cannot easily guess. Mac Address Displays the MAC address of the player. It cannot be changed. 1 On "Ethernet" menu, press / buttons to select "MAC Address" then press OK button. The MAC address appears. Notes Please contact the router manufacturer when the router DHCP feature is not operating properly (in such a case, an error will occur since the default gateway and the DNS server IP address cannot be obtained). The firmware in this player is updateable. See page 57 for information. 46 Downloaded from www.Manualslib.com manuals search engine
-
 1
1 -
2
-
3
-
4
-
5
-
6
-
7
-
8
-
9
-
10
-
11
-
12
-
13
-
14
-
15
-
16
-
17
-
18
-
19
-
20
-
21
-
22
-
23
-
24
-
25
-
26
-
27
-
28
-
29
-
30
-
31
-
32
-
33
-
34
-
35
-
36
-
37
-
38
-
39
-
40
-
41
-
 42
42 -
 43
43 -
 44
44 -
 45
45 -
 46
46 -
 47
47 -
 48
48 -
 49
49 -
 50
50 -
 51
51 -
 52
52 -
53
-
54
-
55
-
56
-
57
-
58
-
59
-
60
-
61
-
62
-
63
-
64
-
65
-
66
-
67
-
68
-
69
 |
 |