Toshiba KIRAbook 13 i7SC Touch KIRAbook Windows 8.1 User’s Guide - Page 61
Using external display devices, Selecting video cables
 |
View all Toshiba KIRAbook 13 i7SC Touch manuals
Add to My Manuals
Save this manual to your list of manuals |
Page 61 highlights
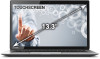
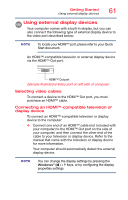
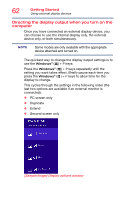
Getting Started Using external display devices 61 Using external display devices Your computer comes with a built-in display, but you can also connect the following type of external display device to the video port described below: NOTE To locate your HDMI™ port, please refer to your Quick Start document. An HDMI™-compatible television or external display device via the HDMI™ Out port. HDMI™ Out port (Sample Illustration) Video port on left side of computer Selecting video cables To connect a device to the HDMI™ Out port, you must purchase an HDMI™ cable. Connecting an HDMI™-compatible television or display device To connect an HDMI™-compatible television or display device to the computer: ❖ Connect one end of an HDMI™ cable (not included with your computer) to the HDMI™ Out port on the side of your computer, and then connect the other end of the cable to your television or display device. Refer to the manual that came with the television or display device for more information. Your computer should automatically detect the external display device. NOTE You can change the display settings by pressing the Windows® ( ) + P keys, or by configuring the display properties settings.
-
 1
1 -
2
-
3
-
4
-
5
-
6
-
7
-
8
-
9
-
10
-
11
-
12
-
13
-
14
-
15
-
16
-
17
-
18
-
19
-
20
-
21
-
22
-
23
-
24
-
25
-
26
-
27
-
28
-
29
-
30
-
31
-
32
-
33
-
34
-
35
-
36
-
37
-
38
-
39
-
40
-
41
-
42
-
43
-
44
-
45
-
46
-
47
-
48
-
49
-
50
-
51
-
52
-
53
-
54
-
55
-
 56
56 -
 57
57 -
 58
58 -
 59
59 -
 60
60 -
 61
61 -
 62
62 -
 63
63 -
 64
64 -
 65
65 -
 66
66 -
67
-
68
-
69
-
70
-
71
-
72
-
73
-
74
-
75
-
76
-
77
-
78
-
79
-
80
-
81
-
82
-
83
-
84
-
85
-
86
-
87
-
88
-
89
-
90
-
91
-
92
-
93
-
94
-
95
-
96
-
97
-
98
-
99
-
100
-
101
-
102
-
103
-
104
-
105
-
106
-
107
-
108
-
109
-
110
-
111
-
112
-
113
-
114
-
115
-
116
-
117
-
118
-
119
-
120
-
121
-
122
-
123
-
124
-
125
-
126
-
127
-
128
-
129
-
130
-
131
-
132
-
133
-
134
-
135
-
136
-
137
-
138
-
139
-
140
-
141
-
142
-
143
-
144
-
145
-
146
-
147
-
148
-
149
-
150
-
151
-
152
-
153
-
154
-
155
-
156
-
157
-
158
-
159
-
160
-
161
-
162
-
163
-
164
 |
 |