Toshiba PA3769A-1LCH LCD Monitor 23.6 inch HD LCD Monitor User Manual - Page 34
Adjusting the position of the picture on the display, Resetting the monitor to factory settings
 |
View all Toshiba PA3769A-1LCH LCD Monitor manuals
Add to My Manuals
Save this manual to your list of manuals |
Page 34 highlights
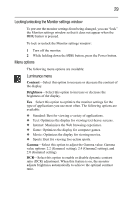
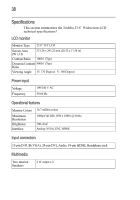
34 Adjusting the position of the picture on the display If part of the picture is cut off on one edge, adjust the position of the picture so that it is centered on the display. To adjust the horizontal and/or vertical position of the picture, follow these steps: 1 Press MENU to display the Monitor settings window. 2 Press + to move the red selection box to the Image Setup icon . The Image Setup menu displays. 3 Press MENU once to highlight the Clock control. 4 Press + twice to highlight the H.Position control. 5 Press MENU to edit the H.Position control. The control is highlighted in red. 6 Press + to move the picture to the right or press - to move the picture to the left. Press + or - repeatedly until the picture is positioned correctly on the screen. 7 Press MENU to enter the new setting and exit Edit mode. The control turns from red to white. 8 Press + to highlight the V.Position control. 9 Press MENU to edit the V.Position control. The control is highlighted in red. 10 Press + or - to adjust the vertical position of the picture. 11 Press MENU to enter the new setting and exit Edit mode. The control turns from red to white. 12 Press AUTO twice to exit the current menu and close the Monitor settings window. Resetting the monitor to factory settings Follow these steps to reset all settings to the default values: 1 Press MENU to display the Monitor settings window. 2 Press + until the red selection box highlights the Extra icon . The Extra menu displays. 3 Press MENU once to highlight the Input Select control. 4 Press + to navigate to the Reset control. 5 Press MENU to edit the Reset control. The control is highlighted in red. 6 Press + to toggle the control to Yes. 7 Press MENU to enter the new setting and exit Edit mode.
-
 1
1 -
2
-
3
-
4
-
5
-
6
-
7
-
8
-
9
-
10
-
11
-
12
-
13
-
14
-
15
-
16
-
17
-
18
-
19
-
20
-
21
-
22
-
23
-
24
-
25
-
26
-
27
-
28
-
 29
29 -
 30
30 -
 31
31 -
 32
32 -
 33
33 -
 34
34 -
 35
35 -
 36
36 -
 37
37 -
 38
38 -
 39
39 -
40
-
41
-
42
-
43
-
44
-
45
-
46
-
47
-
48
-
49
-
50
-
51
-
52
-
53
-
54
-
55
-
56
-
57
-
58
-
59
-
60
-
61
-
62
-
63
-
64
-
65
-
66
-
67
-
68
-
69
-
70
-
71
-
72
-
73
-
74
-
75
-
76
-
77
-
78
-
79
-
80
-
81
-
82
-
83
-
84
-
85
-
86
-
87
-
88
 |
 |
