Toshiba RD-XS35SU Owners Manual - Page 12
Index to parts and controls - remote
 |
View all Toshiba RD-XS35SU manuals
Add to My Manuals
Save this manual to your list of manuals |
Page 12 highlights
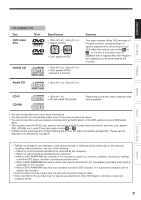
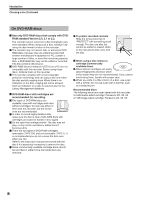
Introduction Index to parts and controls See pages with arrows for details. Front panel 5 1234 6 7 8 9 12 11 10 * The above illustration displays the front panel with the cover open. See the following page on how to open or close the cover. q ON/STANDBY button / ON/STANDBY indicator page 20 Turns the power on/restores the unit in the standby mode. w (STOP) button page 50, 61 Stops playback or recording. e (PLAY) button page 66 Starts playback. r (REC) button page 46 Starts recording. t HDD button/HDD indicator page 45, 50 Press this to operate the HDD. y DVD button/DVD indicator page 45, 66 Press this to operate a disc inside the disc tray. u Disc tray page 20 Loads a disc into the disc drive. i Front panel display page 18 o (OPEN/CLOSE) button page 20 Opens and closes the disc tray. !0 Remote sensor page 18 in "INSTALLATION GUIDE" !1 INPUT2 jacks page 49 Use this when recording from other input source such as a VCR or a camcorder. !2 DV IN terminal page 52 Use this when recording from a digital video device such as a digital video camera. 12
-
 1
1 -
2
-
3
-
4
-
5
-
6
-
 7
7 -
 8
8 -
 9
9 -
 10
10 -
 11
11 -
 12
12 -
 13
13 -
 14
14 -
 15
15 -
 16
16 -
 17
17 -
18
-
19
-
20
-
21
-
22
-
23
-
24
-
25
-
26
-
27
-
28
-
29
-
30
-
31
-
32
-
33
-
34
-
35
-
36
-
37
-
38
-
39
-
40
-
41
-
42
-
43
-
44
-
45
-
46
-
47
-
48
-
49
-
50
-
51
-
52
-
53
-
54
-
55
-
56
-
57
-
58
-
59
-
60
-
61
-
62
-
63
-
64
-
65
-
66
-
67
-
68
-
69
-
70
-
71
-
72
-
73
-
74
-
75
-
76
-
77
-
78
-
79
-
80
-
81
-
82
-
83
-
84
-
85
-
86
-
87
-
88
-
89
-
90
-
91
-
92
-
93
-
94
-
95
-
96
-
97
-
98
-
99
-
100
-
101
-
102
-
103
-
104
-
105
-
106
-
107
-
108
-
109
-
110
-
111
-
112
-
113
-
114
-
115
-
116
-
117
-
118
-
119
-
120
-
121
-
122
-
123
-
124
-
125
-
126
-
127
-
128
-
129
-
130
-
131
-
132
-
133
-
134
-
135
-
136
-
137
-
138
-
139
-
140
-
141
-
142
-
143
-
144
-
145
-
146
-
147
-
148
-
149
-
150
-
151
-
152
-
153
-
154
-
155
-
156
-
157
-
158
-
159
-
160
-
161
-
162
-
163
-
164
-
165
-
166
-
167
-
168
-
169
-
170
-
171
-
172
-
173
-
174
-
175
-
176
-
177
-
178
-
179
-
180
-
181
-
182
-
183
-
184
-
185
-
186
-
187
-
188
-
189
-
190
-
191
-
192
-
193
-
194
-
195
-
196
-
197
-
198
-
199
-
200
-
201
-
202
-
203
-
204
-
205
-
206
-
207
-
208
-
209
-
210
-
211
-
212
-
213
-
214
-
215
-
216
-
217
-
218
-
219
-
220
-
221
-
222
-
223
-
224
-
225
 |
 |
