Toshiba Satellite S75-B7316 Satellite/Satellite Pro S70-B Series Windows 10 Us - Page 56
Using external display devices, Selecting video cables, Connecting an external monitor or projector
 |
View all Toshiba Satellite S75-B7316 manuals
Add to My Manuals
Save this manual to your list of manuals |
Page 56 highlights
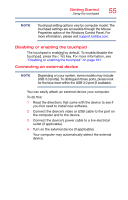
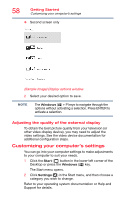
56 Getting Started Using external display devices Using external display devices Your computer comes with a built-in display, but you can also connect the following types of external display devices to the video ports described below: NOTE To locate your HDMI Out port, please refer to your Quick Start document. ❖ An HDMI-compatible television or external display device via the HDMI Out port* ❖ An external monitor or projector via the RGB (monitor) port* HDMI Out port* RGB (monitor) port* *Available on certain models (Sample Illustration) Video ports on right side of computer Selecting video cables To connect a device to the HDMI Out port, you must purchase an HDMI cable. Connecting an external monitor or projector You can easily attach an external monitor or projector to your computer if you need a larger screen. To do this: 1 Read the directions that came with the monitor to see if you first need to install new software. 2 Connect the monitor's video cable to the RGB (monitor) port on the side of the computer. 3 Connect the device's power cable to a live electrical outlet. 4 Turn on the external device. Your computer will automatically detect the external display device.
-
 1
1 -
2
-
3
-
4
-
5
-
6
-
7
-
8
-
9
-
10
-
11
-
12
-
13
-
14
-
15
-
16
-
17
-
18
-
19
-
20
-
21
-
22
-
23
-
24
-
25
-
26
-
27
-
28
-
29
-
30
-
31
-
32
-
33
-
34
-
35
-
36
-
37
-
38
-
39
-
40
-
41
-
42
-
43
-
44
-
45
-
46
-
47
-
48
-
49
-
50
-
 51
51 -
 52
52 -
 53
53 -
 54
54 -
 55
55 -
 56
56 -
 57
57 -
 58
58 -
 59
59 -
 60
60 -
 61
61 -
62
-
63
-
64
-
65
-
66
-
67
-
68
-
69
-
70
-
71
-
72
-
73
-
74
-
75
-
76
-
77
-
78
-
79
-
80
-
81
-
82
-
83
-
84
-
85
-
86
-
87
-
88
-
89
-
90
-
91
-
92
-
93
-
94
-
95
-
96
-
97
-
98
-
99
-
100
-
101
-
102
-
103
-
104
-
105
-
106
-
107
-
108
-
109
-
110
-
111
-
112
-
113
-
114
-
115
-
116
-
117
-
118
-
119
-
120
-
121
-
122
-
123
-
124
-
125
-
126
-
127
-
128
-
129
-
130
-
131
-
132
-
133
-
134
-
135
-
136
-
137
-
138
-
139
-
140
-
141
-
142
-
143
-
144
-
145
-
146
-
147
-
148
-
149
-
150
-
151
-
152
-
153
-
154
-
155
-
156
-
157
-
158
-
159
-
160
-
161
-
162
-
163
-
164
-
165
-
166
-
167
-
168
-
169
-
170
-
171
-
172
-
173
-
174
-
175
-
176
-
177
-
178
-
179
-
180
-
181
-
182
-
183
-
184
 |
 |