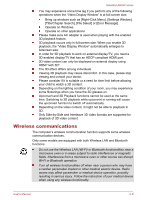
Toshiba Satellite U840W PSU5XC Users Manual Canada; English - Page 40
Special, function mode, Standard F1, F12 mode, Function, Start -> All Programs
 |
View all Toshiba Satellite U840W PSU5XC manuals
Add to My Manuals
Save this manual to your list of manuals |
Page 40 highlights
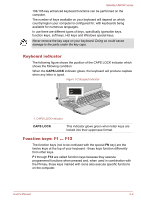
Special Standard F1- function mode F12 mode F1 FN + F1 F2 FN + F2 F3 FN + F3 F4 FN + F4 F5 F6 F7 F8 F9 F10 F11 F12 FN + 1 FN + F5 FN + F6 FN + F7 FN + F8 FN + F9 FN + F10 FN + F11 FN + F12 FN + 1 FN + 2 FN + 2 FN + Space FN + FN + Space FN + Function Satellite U840W series Launches the help file supplied with the software. Decreases the computer's display panel brightness in individual steps. Increases the computer's display panel brightness in individual steps. Changes the active display device. To use a simultaneous mode, you must set the resolution of the internal display panel to match the resolution of the external display device. Enables or disables the Touch Pad. Moves media backward. Plays or pauses media playback. Moves media forward. Decreases the computer's volume. Increases the computer's volume. Turns the sound on or off. Switches the active wireless devices. Reduces the icon size on the desktop or the font sizes within one of the supported application windows. Enlarges the icon size on the desktop or the font sizes within one of the supported application windows. Changes the display resolution. Turns the keyboard backlight on or off. This function is supported with some models. FN Sticky key You can use the TOSHIBA Accessibility Utility to make the FN key sticky, that is, you can press it once, release it, and then press an "F Number" key. To start the TOSHIBA Accessibility utility, click Start -> All Programs -> TOSHIBA -> Tools & Utilities -> Accessibility. User's Manual 3-4
-
 1
1 -
2
-
3
-
4
-
5
-
6
-
7
-
8
-
9
-
10
-
11
-
12
-
13
-
14
-
15
-
16
-
17
-
18
-
19
-
20
-
21
-
22
-
23
-
24
-
25
-
26
-
27
-
28
-
29
-
30
-
31
-
32
-
33
-
34
-
 35
35 -
 36
36 -
 37
37 -
 38
38 -
 39
39 -
 40
40 -
 41
41 -
 42
42 -
 43
43 -
 44
44 -
 45
45 -
46
-
47
-
48
-
49
-
50
-
51
-
52
-
53
-
54
-
55
-
56
-
57
-
58
-
59
-
60
-
61
-
62
-
63
-
64
-
65
-
66
-
67
-
68
-
69
-
70
-
71
-
72
-
73
-
74
-
75
-
76
-
77
-
78
-
79
-
80
-
81
-
82
-
83
-
84
-
85
-
86
-
87
-
88
-
89
-
90
-
91
-
92
-
93
-
94
-
95
-
96
-
97
-
98
-
99
-
100
-
101
-
102
-
103
-
104
-
105
-
106
-
107
-
108
-
109
-
110
-
111
-
112
-
113
-
114
-
115
-
116
-
117
-
118
-
119
-
120
-
121
-
122
-
123
-
124
-
125
-
126
-
127
 |
 |