Toshiba Satellite U845W-S4170 User Guide - Page 109
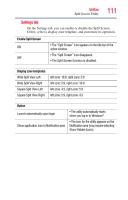
Split Screen Utility, Desktop Assist, Tools & Utilities, Split Screen
 |
View all Toshiba Satellite U845W-S4170 manuals
Add to My Manuals
Save this manual to your list of manuals |
Page 109 highlights
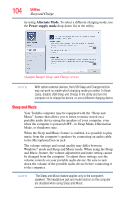
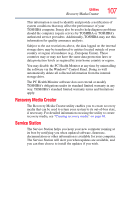
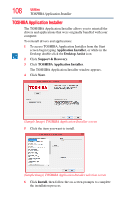
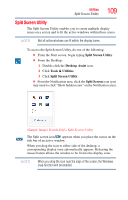
Utilities Split Screen Utility 109 Split Screen Utility The Split Screen Utility enables you to create multiple display zones on a screen and to fit the active windows within those zones. NOTE Not all active windows can fit within the display zones. To access the Split Screen Utility, do one of the following: ❖ From the Start screen, begin typing Split Screen Utility. ❖ From the Desktop: 1 Double-click the Desktop Assist icon. 2 Click Tools & Utilities. 3 Click Split Screen Utility. ❖ From the Notification area, click the Split Screen icon (you may need to click "Show hidden icons" on the Notification area). (Sample Image) Search field - Split Screen Utility The Split screen icon appears when you place the cursor on the title bar of an active window. When you drag the icon to either side of the desktop, a corresponding display zone automatically appears. Releasing the mouse button allows the window to be fit into the display zone. NOTE When you drag the icon near the edge of the screen, the Windows snap function will be enabled.
-
 1
1 -
2
-
3
-
4
-
5
-
6
-
7
-
8
-
9
-
10
-
11
-
12
-
13
-
14
-
15
-
16
-
17
-
18
-
19
-
20
-
21
-
22
-
23
-
24
-
25
-
26
-
27
-
28
-
29
-
30
-
31
-
32
-
33
-
34
-
35
-
36
-
37
-
38
-
39
-
40
-
41
-
42
-
43
-
44
-
45
-
46
-
47
-
48
-
49
-
50
-
51
-
52
-
53
-
54
-
55
-
56
-
57
-
58
-
59
-
60
-
61
-
62
-
63
-
64
-
65
-
66
-
67
-
68
-
69
-
70
-
71
-
72
-
73
-
74
-
75
-
76
-
77
-
78
-
79
-
80
-
81
-
82
-
83
-
84
-
85
-
86
-
87
-
88
-
89
-
90
-
91
-
92
-
93
-
94
-
95
-
96
-
97
-
98
-
99
-
100
-
101
-
102
-
103
-
 104
104 -
 105
105 -
 106
106 -
 107
107 -
 108
108 -
 109
109 -
 110
110 -
 111
111 -
 112
112 -
 113
113 -
 114
114 -
115
-
116
-
117
-
118
-
119
-
120
-
121
-
122
-
123
-
124
-
125
-
126
-
127
-
128
-
129
-
130
-
131
-
132
-
133
-
134
-
135
-
136
-
137
-
138
-
139
-
140
-
141
-
142
-
143
-
144
-
145
-
146
-
147
-
148
-
149
-
150
-
151
-
152
-
153
-
154
-
155
-
156
-
157
-
158
-
159
-
160
-
161
-
162
-
163
 |
 |