Toshiba TLP-X2000 User Manual - Page 13
Turning the power on and off, Label locations - remote
 |
View all Toshiba TLP-X2000 manuals
Add to My Manuals
Save this manual to your list of manuals |
Page 13 highlights
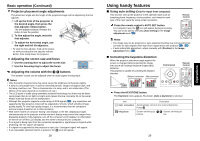
Connection (Continued) Notes • When COMPUTER 2 IN terminal (also used for MONITOR OUT terminal) is used as MONITOR OUT terminal, the signal which is input to COMPUTER 1 IN terminal is output. • Signals are output from MONITOR OUT terminal even in standby mode. However, from AUDIO OUT terminal, no audio signal is output. • A computer monitor cannot accept Y/PB/PR signals correctly. • The AUDIO IN terminal doubles for devices connected to COMPUTER 1 terminal and COMPUTER 2 terminal. • When an AUDIO OUT terminal is connected, sound is not output from the projector speaker. • Output volume of AUDIO OUT terminal can be adjusted by the VOL button. • Moving pictures played back on computers using DVD software may appear unnatural if it is projected with this projector, but it is not a malfunction. Label locations Remote control TLP-X2000 TLP-XC2000 Document camera TLP-XC2000 Operations Turning the power on and off ■ Connecting the power cord 1 Insert the power cord connector into the AC IN socket of the projector. 2 Insert the power cord plug into a wall or other power outlet. The ON/STANDBY indicator will change to orange, indicating standby mode. Power cord connector (Supplied) ■ Removing the lens cover Be sure to remove the lens cover when the power is turned on. If it is left on, it could become deformed due to heat. Operations Caution - use of controls or adjustments or performance of procedures other than those specified herein may result in hazardous radiation exposure. 24 ■ Turning the power on Press the ON/STANDBY button. When the beep sound is [On], the projector beeps, the power turns on, and the ON/STANDBY indicator lights in green. After a moment, the start-up screen appears. Control panel Remote Control Start-up screen CAUTION • Do not look into the lens while the lamp is on. The strong light from the lamp may cause damage to your eyes or sight. • Do not block the air intake or exhaust. Doing so could cause a fire due to internal overheating. • Do not place your hands, face, or other objects near the air exhaust. Doing so could cause burns, deform/break the object. 25
-
 1
1 -
2
-
3
-
4
-
5
-
6
-
7
-
 8
8 -
 9
9 -
 10
10 -
 11
11 -
 12
12 -
 13
13 -
 14
14 -
 15
15 -
 16
16 -
 17
17 -
 18
18 -
19
-
20
-
21
-
22
-
23
-
24
-
25
-
26
-
27
-
28
-
29
-
30
-
31
 |
 |
