Toshiba TLP-X2000 User Manual - Page 27
Lens and main unit cleaning, Air filter cleaning
 |
View all Toshiba TLP-X2000 manuals
Add to My Manuals
Save this manual to your list of manuals |
Page 27 highlights
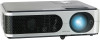
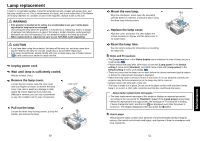
Air filter cleaning The air filter prevents dust and debris from getting inside the projector. Never run the projector with the filter removed. It is recommended that the air filter is cleaned regularly. • The message "Check the air filter for dirt." is displayed every 100 hours. (If the usage time exceeds 100 hours, this message is displayed for about 30 seconds when the image is displayed for the first time after power is turned on. This display will be dismissed with any operation.) • Check out the filter and any debris is found, use the following procedure for cleaning. WARNING • Request cleaning and maintenance of a ceiling-mounted unit from your projector dealership. 1 Unplug power cord. 2 Remove the air filter. Pull out the air filter by taking the catch shown in the figure. 3 Clean the filter. Carefully remove the dust and dirt from the air filter with a vacuum cleaner or the like. 4 Replace the air filter. Lens and main unit cleaning WARNING • Request cleaning and maintenance of a ceiling-mounted unit from your projector dealership. Attempting to clean/replace the lamp at a high site by yourself may cause you to fall down, thus resulting in injury. ■ Lens cleaning • Clean the lens with a commercially available blower and/or lens cleaner. • The lens is easily scratched, so do not rub it with hard objects, or strike it. ■ Main unit cleaning • Clean the main unit after unplugging the power cord. • Wipe dirt off the main unit gently with a soft cloth. • Do not wipe the main unit with a damp cloth. Doing so may allow water to get inside, resulting in an electric shock or failure. • Do not use benzene, thinner and the like as they may deform or discolor the unit or damage the paint surface. • When using a chemically treated cloth, follow the precautions included with the cloth. Maintenance Notes • Allowing dirt and dust to build up in the air filter will worsen the air circulation inside the projector, causing the internal temperature to rise, causing the projector to stop working or malfunction. • Insert the air filter all the way in. Leaving gaps will allow dust and dirt to get inside the projector again. • If you wash the air filer with water, make sure to dry it completely before replacing it. • If the air filter is torn, consult with your dealer about replacing it with a new one. Continuing to use a ripped filter will allow dust and dirt to get inside the projector. 52 53
-
 1
1 -
2
-
3
-
4
-
5
-
6
-
7
-
8
-
9
-
10
-
11
-
12
-
13
-
14
-
15
-
16
-
17
-
18
-
19
-
20
-
21
-
 22
22 -
 23
23 -
 24
24 -
 25
25 -
 26
26 -
 27
27 -
 28
28 -
 29
29 -
 30
30 -
 31
31
 |
 |
