Toshiba TLP-X2000 User Manual - Page 23
Using the document camera - service
 |
View all Toshiba TLP-X2000 manuals
Add to My Manuals
Save this manual to your list of manuals |
Page 23 highlights
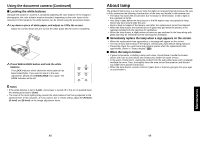
Using the menus (Continued) [Key lock] Protect from operating errors by locking on the control panel buttons of the projector. (The remote control operations are available.) Control panel operations are locked after the setting is done, and accordingly operation with the control panel buttons is disabled. • To release the key lock, set the [Key Lock] to [Off] using remote control. Pressing the [RETURN] button on the projector for 10 seconds also sets the [Key Lock] to [Off]. (When operating the main unit, the 2 indicators of LAMP and TEMP light in orange for 3 seconds, and at the same time the projector beeps.) ■ Displaying Information (Status display) This displays information about the input signal, lamp use time, etc. "Yes": displayed, "No": not displayed Item Description Computer Y/PB/PR Video S-video Camera (XC2000) Projector Input Input source name Yes Yes Yes Yes Yes Mode name RGB input mode [Note 1] Yes No No No No Resolution Resolution (in dots) Yes No No No No Frequency Sync frequency Yes No No No No Sync Sync signal polarity [Note 2] Yes No No No No Signal format Y/PB/PR signal format No Yes No No No Video mode Color method of video signal No No Yes Yes No Lamp time Time of lamp use [Note 3] Yes Yes Yes Yes Yes Lamp reset count The count for lamp replacement Yes Yes Yes Yes Yes Total time The total time that this projector is used. Yes Yes Yes Yes Yes Version Firmware version [Note 4] Yes Yes Yes Yes Yes Notes 1: The mode of supported RGB signals p.57 is shown. 2: Sync signal polarity shown as P (positive) or N (negative) for [H/V]. 3: Displays [Lamp time] as a measure of when the lamp should be replaced. (Cannot be used as a counter of guaranteed lamp time.) Please replace the lamp after 2000 hours of use if [Lamp power] is set to [Standard], or after 3000 hours of use if [Lamp power] is set to [Low], consult with a dealer about getting replacement for lamp TLPLW11 (sold separately). 4: [Version] shows the version of the projector's internal control program. This version is referred to for customer service, etc. Note • The displayed information will not be refreshed if the status changes. To refresh the information, dismiss the display, then display it again. Using the document camera Please read this chapter if the model you purchased includes a document camera. ■ Preparation of the document camera Status before preparation (When stored) 1) Setup the arm 2) Raise the camera head 3) Let the camera lens face below 4) Let the camera lens face the object PRECAUTIONS • Do not jolt or force the camera head or camera arm. Doing so could cause malfunction. • The CMOS image sensor mounted on the camera of this projector is produced by precision engineering. Please be informed that missing pixels and bright spots are not considered as problems. Note • It takes about 10 seconds from when the power is turned on until the operation is possible. This is not a problem. Operations 44 45
-
 1
1 -
2
-
3
-
4
-
5
-
6
-
7
-
8
-
9
-
10
-
11
-
12
-
13
-
14
-
15
-
16
-
17
-
 18
18 -
 19
19 -
 20
20 -
 21
21 -
 22
22 -
 23
23 -
 24
24 -
 25
25 -
 26
26 -
 27
27 -
 28
28 -
29
-
30
-
31
 |
 |
