Toshiba TLP-X2000 User Manual - Page 14
Basic operations - reset to factory default
 |
View all Toshiba TLP-X2000 manuals
Add to My Manuals
Save this manual to your list of manuals |
Page 14 highlights
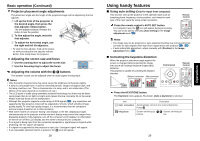
Turning the power on and off (Continued) Notes • The start-up screen will disappear after a moment. You can dismiss the start-up screen before this by performing any operation. You can also configure the start-up screen not to appear via the Display setting menu p.39 . • The first time you use the projector after purchase, after the start-up screen disappears, the start menu is displayed p.27 . • Beep sound can be set not to beep in the Default setting 1 menu p.42 . • When [Key lock] is [On], the operation buttons of the projector do not work p.43 . • When [Password setting] is [On], then the start-up screen is displayed after the Password entry screen disappears p.33 . ■ Turning the power off 1 Press the ON/STANDBY button. A message appears on the screen, confirming that you wish to shut off the power. This message will disappear after a moment. (This operation is no longer valid after the message disappears.) 2 Press the ON/STANDBY button once again. When the setting of beep sound is [On], the projector beeps, and the screen turns off, but the internal cooling fan continues to operate. Then, the projector goes into standby mode. During cooling, the ON/STANDBY indicator flashes. While the indicator is flashing, the power can not be turned back on. At this point of time, it does not matter even if you unplug the power cord. Note • The projector consumes about 10W of power in standby. We recommend that you unplug the power cord if you will not be using the projector for an extended period. PRECAUTION • If you turn the power on before cooling is complete, give the lamp time (about 5 minutes) to cool before plugging it back in. If the lamp overheats, it may fail to light. LCD Panels LCD panels wear out. In order to prolong the lifetime of your LCD panel, take the following precautions. • In order to extend the lifetime of the LCD panel, always turn off the power when not in use, and make sure that the lamp is off. Keeping the lamp off is also very effective at saving electricity. • If the air filter becomes dirty and clogged, the projector's internal temperature will rise, shortening the lifetime of the LCD panel and causing malfunctions. Clean the air filter from time to time p.52 , and replace it periodically. Contact the store where you purchased your projector, or your local Service Station for replacement air filters. 26 Basic operations 1 Turn on the power. Turn on the power by following the instructions in "Turning the power on" p.25 . 2 Select the language and the lamp power (When using the first time). When the projector is used for the first time after purchase, the start menu for language (to display the menus and messages on the screen) and lamp power selection and configuration is displayed in English. (If the screen is out of focus, adjust it according to the step 6 .) q Use the or button to select the desired language and press the button. Message for setup confirmation is displayed in a selected language. Then, the menu for lamp power selection and configuration is displayed. It is automatically set as Standard. To change the setting, follow the step w. w Use the or button to select the lamp power and press the button. The lamp power, if selected, will be toggled without pressing the button. The display automatically disappears in a few seconds. English French German Italian Spanish Portuguese Russian Swedish Turkish Polish Japanese Chinese (simplified) Chinese (traditional) Korean Notes • When the projector is turned on the next time, the start menu does not appear upon startup. However, if [Reset all] is executed from the Default setting 2 menu p.43 , the start menu will be displayed the next time when the power is turned on. • The language can also be set via the Display setting menu p.39 and Lamp power via the Default setting 1 menu p.42 . • This owner's manual assumes that English has been selected. 3 Activate the connected device. Turn on and start the connected device such as a computer. 4 Press the INPUT button. An image of the connected equipment is projected. Each time you press the INPUT button, it switches to the input of the connected equipment that is outputting video signals. Notes • When [Auto input search] is set to [Off] in the Default setting 1 menu p.42 (factory setting is [On]), the Input select menu appears if you press the INPUT button. • If no signal is being output from the connected equipment, pressing the INPUT button does not change the input and "There is no other input signal." will appear. 27 Operations
-
 1
1 -
2
-
3
-
4
-
5
-
6
-
7
-
8
-
 9
9 -
 10
10 -
 11
11 -
 12
12 -
 13
13 -
 14
14 -
 15
15 -
 16
16 -
 17
17 -
 18
18 -
 19
19 -
20
-
21
-
22
-
23
-
24
-
25
-
26
-
27
-
28
-
29
-
30
-
31
 |
 |
