Toshiba Thrive AT1S5 User Guide 1 - Page 88
Using a docking station, Connecting your tablet to a docking station
 |
View all Toshiba Thrive AT1S5 manuals
Add to My Manuals
Save this manual to your list of manuals |
Page 88 highlights
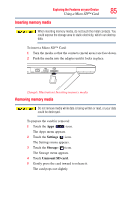
88 Exploring the Features on your Device Using a docking station Using a docking station (Sold separately.) The docking connector, located on the side of your tablet device, is used to attach your device to a docking station (not shipped with your system). You can leave network cables and external devices (such as an external keyboard, mouse, speakers, and USB devices) connected to the docking station when the tablet is not connected to it. This allows you to quickly connect your tablet to the docking station and have immediate access to all of your network resources and external devices. This eliminates the time-consuming process of connecting each external device individually, and saves wear and tear on the ports and cables. Docking connector (inside) Audio out jack Power interface Support stand Front Back (Sample Illustration) Docking station To achieve a proper connection between your tablet and the docking station, your tablet must be properly aligned with the docking station. For more information, consult the user's manual that came with your docking station, or visit support.toshiba.com. To find a docking station that is compatible with your tablet device, please visit accessories.toshiba.com. Connecting your tablet to a docking station 1 Assemble the AC adaptor (provided with your Toshiba tablet), see "Connecting to a power source" on page 27. NOTE Additional Toshiba USB/AC adaptors can be purchased separately at accessories.toshiba.com. 2 Gently pull out the support stand to hold the dock steady.
-
 1
1 -
2
-
3
-
4
-
5
-
6
-
7
-
8
-
9
-
10
-
11
-
12
-
13
-
14
-
15
-
16
-
17
-
18
-
19
-
20
-
21
-
22
-
23
-
24
-
25
-
26
-
27
-
28
-
29
-
30
-
31
-
32
-
33
-
34
-
35
-
36
-
37
-
38
-
39
-
40
-
41
-
42
-
43
-
44
-
45
-
46
-
47
-
48
-
49
-
50
-
51
-
52
-
53
-
54
-
55
-
56
-
57
-
58
-
59
-
60
-
61
-
62
-
63
-
64
-
65
-
66
-
67
-
68
-
69
-
70
-
71
-
72
-
73
-
74
-
75
-
76
-
77
-
78
-
79
-
80
-
81
-
82
-
 83
83 -
 84
84 -
 85
85 -
 86
86 -
 87
87 -
 88
88 -
 89
89 -
 90
90 -
 91
91 -
 92
92 -
 93
93 -
94
-
95
-
96
-
97
-
98
-
99
-
100
-
101
-
102
-
103
-
104
-
105
-
106
-
107
-
108
-
109
-
110
-
111
-
112
-
113
-
114
-
115
-
116
-
117
-
118
-
119
-
120
-
121
-
122
-
123
 |
 |
