Turtle Beach Ear Force XP500 User's Guide
Turtle Beach Ear Force XP500 Manual
 |
View all Turtle Beach Ear Force XP500 manuals
Add to My Manuals
Save this manual to your list of manuals |
Turtle Beach Ear Force XP500 manual content summary:
- Turtle Beach Ear Force XP500 | User's Guide - Page 1
XP500 Advanced Sound Editor 3 Downloading the XP500 Advanced Sound Editor Software 3 Installing the Software...3 Setting up the Software ...3 Using the Software with a XP500 ...4 Basic and Advanced Modes of Operation ...4 About the XP500 Presets...5 PS3 and XBOX Button...18 Headset Info Section - Turtle Beach Ear Force XP500 | User's Guide - Page 2
Microsoft Corporation. PlayStation is a trademark of Sony Corporation. All other trademarks are the properties of their respective companies and are hereby acknowledged. The Ear Force XP500 is a product of Voyetra Turtle Beach, Inc. 150 Clearbrook Road, Elmsford, NY 10523 www.turtlebeach.com Page 2 - Turtle Beach Ear Force XP500 | User's Guide - Page 3
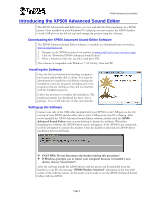
XP500 Advanced Sound Editor Introducing the XP500 Advanced Sound Editor The XP500 Advanced Sound Editor lets you view and edit all of the parameters in a XP500 preset. Once installed on your Windows PC or laptop, you can connect the XP500 headset via the USB port on the left ear cup and manage the - Turtle Beach Ear Force XP500 | User's Guide - Page 4
.com Using the Software with a XP500 The best way to use the XP500 Advanced Sound Editor is with a laptop located near your game console. This way you can hear the effects of changing parameter settings in the presets as you're playing the game. Connect the XP500 headset to your laptop with the - Turtle Beach Ear Force XP500 | User's Guide - Page 5
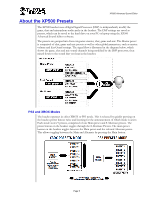
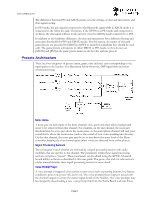
volume and Ear Guard settings. The signal flow is illustrated in the diagram below, which shows the game, chat and mic sound channels being modified by the DSP processor, then mixed down to the sound that you hear in the headset. PS3 and XBOX Modes The headset operates in either XBOX or PS3 mode - Turtle Beach Ear Force XP500 | User's Guide - Page 6
signal processing sections comprise a "preset". These parameters can be edited using the XP500 Advanced Sound Editor software as described in this user guide. The game, chat and mic tabs sections of this manual describe these signal processing sections in more detail. Voice Prompt Player A voice - Turtle Beach Ear Force XP500 | User's Guide - Page 7
MCU controls the programmable system functions and connects to a Windows PC via the USB port. This USB connection allows the MCU firmware to be updated with new versions downloaded from the Turtle Beach web site, and also allows editing of presets with the XP500 Advanced Sound Editor software. Page - Turtle Beach Ear Force XP500 | User's Guide - Page 8
of the XP500 Advanced Sound Editor. This is where you'll transfer presets between your XP500 headset and PC. This tab game, chat and mic levels are located in the game, chat and mic tabs. These volume controls allow you to balance the levels of game, chat and mic signals heard in the headset. Ear - Turtle Beach Ear Force XP500 | User's Guide - Page 9
XP500 Advanced Sound Editor Basic mode Presets Tab Clicking the Basic button places the noise gate threshold, listen to the mic while not speaking and bring up the threshold until you no longer hear the room noise. Then speak into the mic at a comfortable level and make sure the noise gate turns - Turtle Beach Ear Force XP500 | User's Guide - Page 10
Section This section is identical in Advanced and Basic modes. From here, you can transfer presets between your PC and the XP500 headset. The XP500 headset has two presets buttons; one that selects the Main preset and another that toggles through the 8 Alternate presets. These two buttons are - Turtle Beach Ear Force XP500 | User's Guide - Page 11
designed for the XBOX 360. Presets that begin with [PS3] are designed for the PS3. Game presets that begin with [DH] means they're using Dolby surround sound. Stereo game presets don't start with a [DH] in the name. You can download more presets from the Turtle Beach web site, www.TurtleBeach - Turtle Beach Ear Force XP500 | User's Guide - Page 12
the headset to a file on your PC and creates a manifest that allows you to restore the presets back to the headset later headset to be programmed if the battery is too low, to ensure it won't shut off while headset data is being edited. Headset Mode The XP500 headset operates in either XBOX or PS3 - Turtle Beach Ear Force XP500 | User's Guide - Page 13
the headset is in XBOX or PS3 mode. Listening to the Factory Presets 1. Connect the XP500 transmitter to your XBOX or PS3 so you can hear sound on the headset. Or, connect it to your PC if it has a digital optical output. 2. Run the XP500 Advanced Sound Editor and connect the XP500 to your PC using - Turtle Beach Ear Force XP500 | User's Guide - Page 14
Editor. If you used the default settings when installing the program, this would be C:\Turtle Beach\XP500 Advanced Sound Editor\SavedPresets. 3. On the XP500 Advanced Sound Editor, click on the pull-down box for the Game subpreset and you should see the file name you just downloaded. Select it to - Turtle Beach Ear Force XP500 | User's Guide - Page 15
them one at a time using the "Upload to Headset" button. Editing Presets Complete editing of presets requires that you run the XP500 Advanced Sound Editor software in Advanced Mode by clicking on the Advanced button at the bottom of the program screen. Any changes made with the chat, game and - Turtle Beach Ear Force XP500 | User's Guide - Page 16
't do anything to the headset sound. As you start turning it down, you'll start to block out loud blasts without affecting the lower level sounds. Try adjusting this so you can protect your ears from very loud sounds while still maintaining the excitement of the game experience. A good position for - Turtle Beach Ear Force XP500 | User's Guide - Page 17
a firmware update is available, click the "Check for Firmware Updates" button. The XP500 Advanced Sound Editor software will check the Turtle Beach web site for the latest firmware release and compare it to what's in your headset. If it's newer, it will prompt you to download it. After you download - Turtle Beach Ear Force XP500 | User's Guide - Page 18
the "Update" button to upload them into the headset. Update EEPROM Settings The EEPROM is memory in the XP500 that holds special values in addition to Presets. settings have been updated. If they have, you can download them to your PC, then click the "..." button to find the file, click on the name - Turtle Beach Ear Force XP500 | User's Guide - Page 19
Number This field shows the serial number of the headset, used for tracking purposes. Date Code This field shows an internal code used by the factory for tracking purposes. Version This field shows the version number of the XP500 Advanced Sound Editor software. "Refresh" Button Click this button to - Turtle Beach Ear Force XP500 | User's Guide - Page 20
channel while no one is speaking on the online chat and bring up the threshold until you no longer hear background noise. Xbox live. Chat Boost™ Gain Boost The Chat Boost stage is a dynamics processor that maintains the chat signal at a specified level in relation to the game level. As the game sound - Turtle Beach Ear Force XP500 | User's Guide - Page 21
loud. A setting of 3 - 4 seconds is typical. Note that the 1 - 11 intervals on the Attack and Release sliders refers to seconds. Release The release time determines how long the gain boost will remain after the game sound returns to a normal level. A typical setting is 9 seconds, meaning that if the - Turtle Beach Ear Force XP500 | User's Guide - Page 22
threshold, listen to the mic and turn up the threshold until you no longer hear the room noise. Then speak into the mic at a comfortable level and make your voice, but when you're not speaking it will shut out the sound of the air conditioner. Limiter The limiter makes sure your voice level won - Turtle Beach Ear Force XP500 | User's Guide - Page 23
XP500 Advanced Sound Editor Voice Morph Pitch Shift This slider lets you change the pitch of your voice either up and down. Moving the slider higher will make your voice sound higher-pitched, while moving it lower will make it sound is routed to the headset speakers so you can hear your voice as you - Turtle Beach Ear Force XP500 | User's Guide - Page 24
the top and bottom position. Silencer The Silencer noise gate eliminates background noise from the game sound input. When the game level is below the threshold setting, the noise gate blocks the game sound from passing, thereby creating silence. This helps eliminate the background noise from the - Turtle Beach Ear Force XP500 | User's Guide - Page 25
at the output of the Expander output allows the adjustment of the pre and post expander signal so that the unprocessed game sound can be balanced with the processed game sound. Low This slider sets the cutoff frequency for the low pass filter. Frequencies above the cutoff will not pass through. High - Turtle Beach Ear Force XP500 | User's Guide - Page 26
The multi-band equalizer lets you change the tone of the game sound. The sliders will boost or cut the designated frequencies by +/-12dB and split into four paths. The "Through" path (T) is the direct unmodified sound. The level of this path is controlled by the TGain slider. The Low Pass - Turtle Beach Ear Force XP500 | User's Guide - Page 27
XP500 Advanced Sound Editor These paths are mixed together to form the left and right outputs and the levels of each path determines the final effect achieved. Initial Gain (I Gain) This sets the overall gain into the Sound and T Gain sliders work together to provide the Sound Field effects. For - Turtle Beach Ear Force XP500 | User's Guide - Page 28
turn up the volume to hear soft sounds while limiting the volume of louder sounds, like gun shots and explosions game channel heard in the headset. Dolby on/off Button When using the Sound Field Expander, some settings might compromise the Dolby processing. In these cases, you can instruct the game
-
 1
1 -
 2
2 -
 3
3 -
 4
4 -
 5
5 -
 6
6 -
 7
7 -
8
-
9
-
10
-
11
-
12
-
13
-
14
-
15
-
16
-
17
-
18
-
19
-
20
-
21
-
22
-
23
-
24
-
25
-
26
-
27
-
28
 |
 |

XP500 Advanced Sound Editor
Page 1
XP500 Advanced Sound Editor Users Guide
- Table of Contents
Introducing the XP500 Advanced Sound Editor
........................................................................
3
Downloading the XP500 Advanced Sound Editor Software
..................................................................................................
3
Installing the Software
..........................................................................................................................................................
3
Setting up the Software
........................................................................................................................................................
3
Using the Software with a XP500
.........................................................................................................................................
4
Basic and Advanced Modes of Operation
............................................................................................................................
4
About the XP500 Presets
..........................................................................................................
5
PS3 and XBOX Modes
.........................................................................................................................................................
5
Presets Architecture
.................................................................................................................................................
6
Software Controls
–
Presets Tab
..............................................................................................
8
Advanced Mode Presets Tab
...................................................................................................................................
8
Volume (Master Volume Section)
.........................................................................................................................................
8
Basic mode Presets Tab
..........................................................................................................................................
9
Mic Section
..........................................................................................................................................................................
9
Mix Section
........................................................................................................................................................................
10
Master Volume Section
......................................................................................................................................................
10
Presets Section
......................................................................................................................................................
10
Creating Master Presets
....................................................................................................................................................
11
Presets Buttons
.................................................................................................................................................................
11
Saving a Preset
.................................................................................................................................................................
11
Deleting a Preset
...............................................................................................................................................................
11
“Upload to Headset” Button
................................................................................................................................................
11
“Save Presets to File” Button
.............................................................................................................................................
12
“Restore Presets from Files” Button
...................................................................................................................................
12
Battery Voltage
..................................................................................................................................................................
12
Headset Mode
...................................................................................................................................................................
12
Software Tutorial
......................................................................................................................
13
Listening to the Factory Presets
.............................................................................................................................
13
Downloading New Presets
.....................................................................................................................................
14
Managing Presets
..................................................................................................................................................
14
Creating Master Presets
....................................................................................................................................................
14
Deleting Presets
.................................................................................................................................................................
14
Uploading Single Presets to the Headset
...........................................................................................................................
14
Uploading all Presets to the Headset
.................................................................................................................................
15
Editing Presets
...................................................................................................................................................................
15
Software Controls - Configuration Tab
.....................................................................................
17
Update Section
.......................................................................................................................................................
17
Update Firmware
...............................................................................................................................................................
17
Update Voice Prompts
.......................................................................................................................................................
17
Update EEPROM Settings
.................................................................................................................................................
18
“Restore All Defaults” Button
..............................................................................................................................................
18
Headset Info Section
..............................................................................................................................................
19
“Refresh” Button
.................................................................................................................................................................
19
Software Controls
–
Chat Preset Tab (Advanced Mode Only)
.................................................
20
Silencer
..............................................................................................................................................................................
20
Chat Boost™
.....................................................................................................................................................................
20
Equalizer
............................................................................................................................................................................
21
Chat Volume
......................................................................................................................................................................
21
Software Controls
–
Mic Preset Tab (Advanced Mode Only)
...................................................
22
Silencer
..............................................................................................................................................................................
22
Limiter
................................................................................................................................................................................
22
Voice Morph
.......................................................................................................................................................................
23
Mic Monitor
........................................................................................................................................................................
23
Software Controls
–
Game Preset Tab (Advanced Mode Only)
...............................................
24
Silencer
..............................................................................................................................................................................
24
Sonic Lens™
.....................................................................................................................................................................
24
Multi-Band Equalizer
..........................................................................................................................................................
26
Sound Field Expander
........................................................................................................................................................
26
Blast Limiter
.......................................................................................................................................................................
28
Game Volume
....................................................................................................................................................................
28
Dolby on/off Button
............................................................................................................................................................
28