Turtle Beach Ear Force XP500 User's Guide - Page 11
Creating Master Presets, Presets Buttons, Saving a Preset, Deleting a Preset - gaming xbox headset
 |
View all Turtle Beach Ear Force XP500 manuals
Add to My Manuals
Save this manual to your list of manuals |
Page 11 highlights
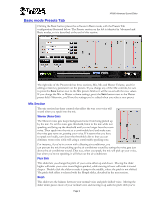
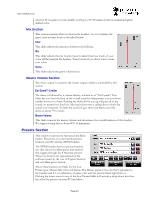
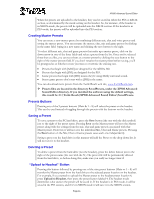
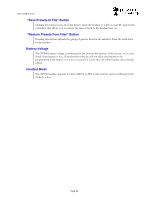
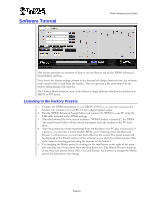
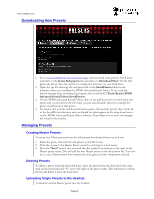
XP500 Advanced Sound Editor When the presets are uploaded to the headset, they can be stored in either the PS3 or XBOX section, as determined by the mode setting on the headset. So, for instance, if the headset is in XBOX mode, the presets will be uploaded into the XBOX section. If the headset is in PS3 mode, the presets will be uploaded into the PS3 section. Creating Master Presets You can create a new master preset by combining different mic, chat and voice presets and saving the master preset. You can rename the master, chat, mic and game presets by clicking in the name field. typing in a new name and clicking the save button to the right. To select different mic, chat and game presets that make up a master preset, click on the down arrow in one of the three fields and select a preset from the list. Once you've selected three that you like, you can save them as a master preset by clicking the save button to the right of the master presets field. If you don't rename the master preset before saving, you'll be prompted as to whether or not you want to overwrite the existing one. Presets that begin with [X360] are designed for the XBOX 360. Presets that begin with [PS3] are designed for the PS3. Game presets that begin with [DH] means they're using Dolby surround sound. Stereo game presets don't start with a [DH] in the name. You can download more presets from the Turtle Beach web site, www.TurtleBeach.com. Presets files are located in the directory SavedPresets, under the XP500 Advanced Sound Editor directory. If you installed the software using the default settings, this would be: C:\Turtle Beach\XP500 Advanced Sound Editor\SavedPresets. Presets Buttons Pressing any of the 9 presets buttons (Main & 1 - 8) will select the preset on the headset. This can be used instead of toggling through the presets with the buttons on the headset. Saving a Preset To save a preset to the PC hard drive, press the Save button (the one with the disk symbol) just to the right of the preset name. Pressing Save on the Master preset will save the Master preset along with the settings from the mic, chat and game presets associated with that Master preset. However, it will not save the individual Mic, Chat and Game presets. Pressing the Save button on the Mic, Chat or Game presets saves each one independently. Saving a preset on the hard drive in this manner will add the Preset to the drop down list. It will not save it to the headset. Deleting a Preset To delete a preset from the hard drive (not the headset), press the delete button just to the right of the preset name (the one with the X.) The preset file will be permanently deleted from the hard drive, so before doing this, make sure you really no longer want it! "Upload to Headset" Button Pressing this button followed by pressing one of the nine preset buttons (Main or 1 - 8) will transfer the Master preset from the hard drive to the selected preset location on the headset. For example, if you wanted to upload the Master preset to the headset preset location 4, press Upload to Headset, then press the preset button labeled 4. The headset mode determines what section the preset will be saved in. If the headset is in PS3 mode, it will be saved in the PS3 section, and if it's in XBOX mode it will save it in the XBOX section. Page 11
-
 1
1 -
2
-
3
-
4
-
5
-
 6
6 -
 7
7 -
 8
8 -
 9
9 -
 10
10 -
 11
11 -
 12
12 -
 13
13 -
 14
14 -
 15
15 -
 16
16 -
17
-
18
-
19
-
20
-
21
-
22
-
23
-
24
-
25
-
26
-
27
-
28
 |
 |