Uniden APPCAM23 English Owner's Manual - Page 12
Setup And Installation - ip
 |
View all Uniden APPCAM23 manuals
Add to My Manuals
Save this manual to your list of manuals |
Page 12 highlights
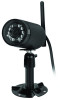
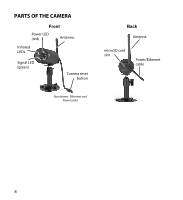
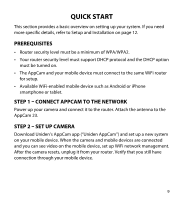
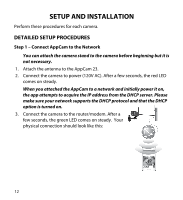
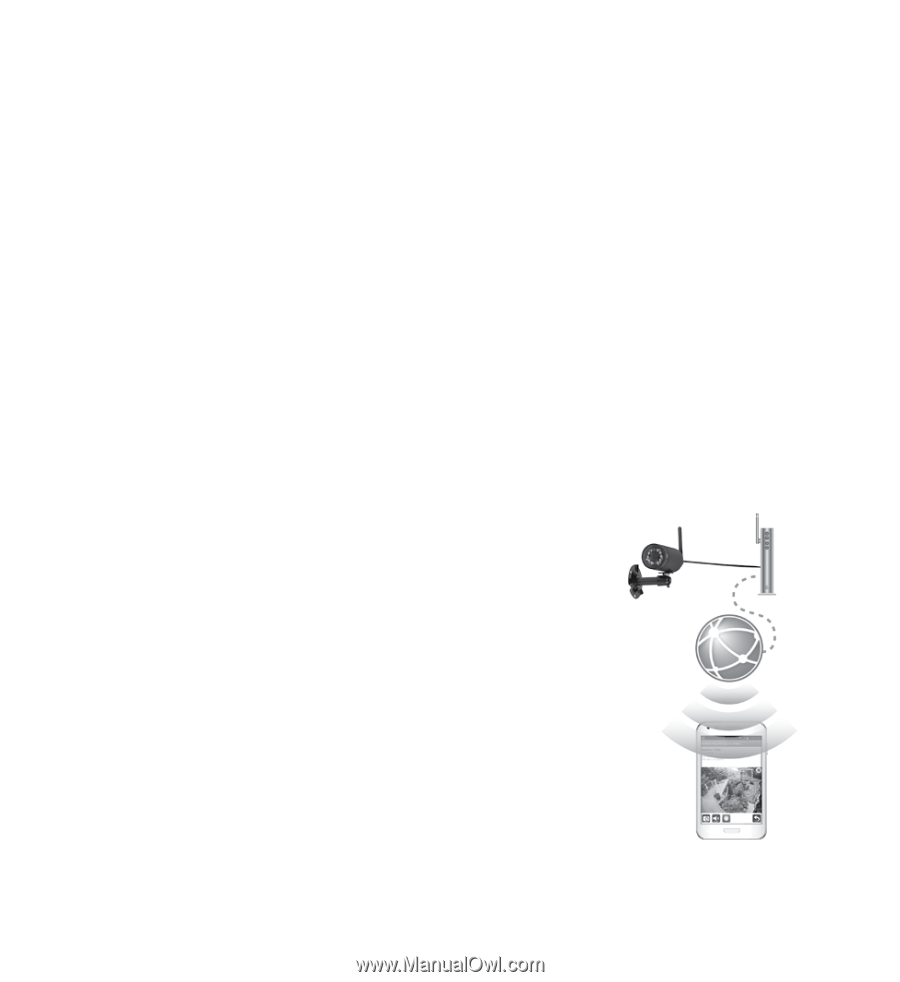
SETUP AND INSTALLATION Perform these procedures for each camera. DETAILED SETUP PROCEDURES Step 1 - Connect AppCam to the Network You can attach the camera stand to the camera before beginning but it is not necessary. 1. Attach the antenna to the AppCam 23. 2. Connect the camera to power (120V AC). After a few seconds, the red LED comes on steady. When you attached the AppCam to a network and initially power it on, the app attempts to acquire the IP address from the DHCP server. Please make sure your network supports the DHCP protocol and that the DHCP option is turned on. 3. Connect the camera to the router/modem. After a few seconds, the green LED comes on steady. Your physical connection should look like this: 12
-
 1
1 -
2
-
3
-
4
-
5
-
6
-
 7
7 -
 8
8 -
 9
9 -
 10
10 -
 11
11 -
 12
12 -
 13
13 -
 14
14 -
 15
15 -
 16
16 -
 17
17 -
18
-
19
-
20
-
21
-
22
-
23
-
24
-
25
-
26
-
27
-
28
-
29
-
30
-
31
-
32
-
33
-
34
-
35
-
36
-
37
-
38
-
39
-
40
 |
 |
12
SETUP AND INSTALLATION
Perform these procedures for each camera.
DETAILED SETUP PROCEDURES
Step 1 ± Connect AppCam to the Network
You can attach the camera stand to the camera before beginning but it is
not necessary.
1.
Attach the antenna to the AppCam 23.
2.
Connect the camera to power (120V AC). After a few seconds, the red LED
comes on steady.
When you attached the AppCam to a network and initially power it on,
the app attempts to acquire the IP address from the DHCP server. Please
make sure your network supports the DHCP protocol and that the DHCP
option is turned on.
3.
Connect the camera to the router/modem. After a
few seconds, the green LED comes on steady.
Your
physical connection should look like this: