ViewSonic CD4200 CD4200 User Guide - Page 13
Overview of the LCD-Control Buttons and Indicators - manual
 |
UPC - 766907266214
View all ViewSonic CD4200 manuals
Add to My Manuals
Save this manual to your list of manuals |
Page 13 highlights
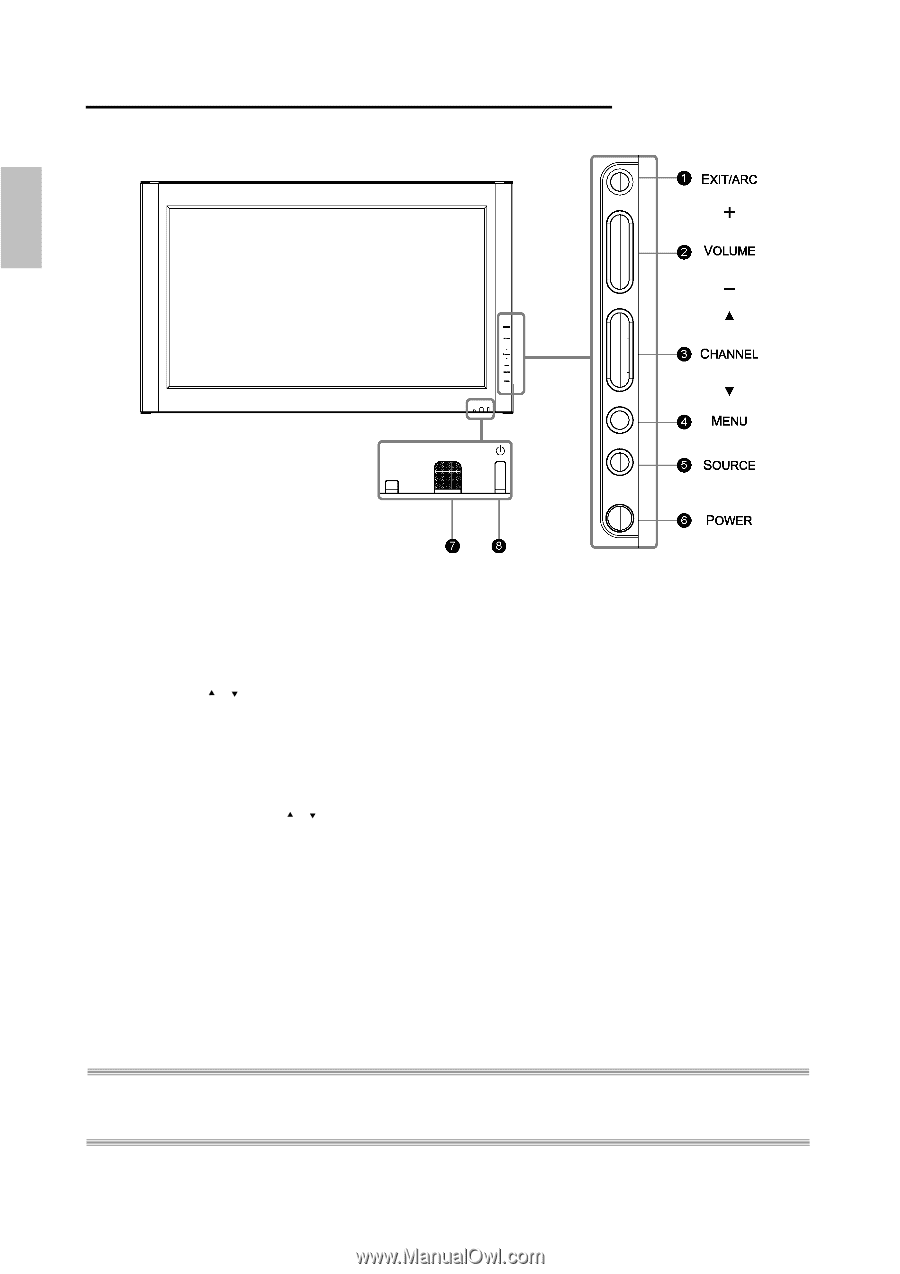
Overview of the LCD-Control Buttons and Indicators Front Panel Overview ENGLISH FUNCTION KEYS 1. EXIT/ARC : Select the display output mode (Video mode: Normal, Full Screen, Zoom, Subtitle ; PC mode: Normal, Full Screen). 2. VOLUME (+ / -) : Increase/decrease the volume or function as the left/right arrow button for menu. 3. CHANNEL (c / d) : Change function as the up/down arrow button for menu. 4. MENU : Display the main menu. When OSD (on-screen display) is appeared, press the button to select or access a sub-menu. 5. SOURCE : Select the input source (Video 1, Video 2 , YPbPr 1 , YPbPr 2 , HDMI, PC ). Press SOURCE button on right side and the source menu will appear on the screen. Press the CHANNEL (c / d) button on right side to select your preferred source input and press MENU to confirm. 6. POWER : Turn the LCD on or off. 7. REMOTE CONTROL SENSOR : Aim the remote control towards this spot on the LCD. 8. POWER INDICATOR : BULE LIGHT ─ power on PURPLE LIGHT ─ power saving; standby (offered in PC mode) RED LIGHT ─ power off NOTE 1 : These buttons on the LCD is only for basic settings. NOTE 2 : The drawing of this LCD in the user manual is for your reference. The actual LCD appearance may differ depending on your purchase. 6 ViewSonic CD4200
-
 1
1 -
2
-
3
-
4
-
5
-
6
-
7
-
 8
8 -
 9
9 -
 10
10 -
 11
11 -
 12
12 -
 13
13 -
 14
14 -
 15
15 -
 16
16 -
 17
17 -
 18
18 -
19
-
20
-
21
-
22
-
23
-
24
-
25
-
26
-
27
-
28
-
29
-
30
-
31
-
32
-
33
-
34
-
35
-
36
-
37
-
38
-
39
-
40
-
41
-
42
-
43
-
44
-
45
-
46
-
47
-
48
-
49
-
50
-
51
-
52
-
53
-
54
-
55
-
56
-
57
-
58
-
59
-
60
-
61
-
62
-
63
-
64
-
65
-
66
-
67
-
68
-
69
-
70
-
71
-
72
-
73
-
74
-
75
-
76
-
77
-
78
-
79
-
80
-
81
-
82
-
83
-
84
-
85
-
86
-
87
-
88
-
89
-
90
-
91
-
92
-
93
-
94
-
95
-
96
-
97
-
98
-
99
-
100
-
101
-
102
-
103
-
104
-
105
-
106
-
107
-
108
-
109
-
110
-
111
-
112
-
113
-
114
-
115
-
116
-
117
-
118
-
119
-
120
-
121
-
122
-
123
-
124
-
125
-
126
-
127
-
128
-
129
-
130
-
131
-
132
-
133
-
134
-
135
-
136
-
137
-
138
-
139
-
140
-
141
-
142
-
143
-
144
-
145
-
146
-
147
-
148
-
149
 |
 |