ViewSonic N3752w N3752W User Guide, English
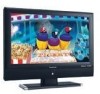
ViewSonic N3752w - 37" LCD TV Manual
 |
UPC - 766907241518
View all ViewSonic N3752w manuals
Add to My Manuals
Save this manual to your list of manuals |
ViewSonic N3752w manual content summary:
- ViewSonic N3752w | N3752W User Guide, English - Page 1
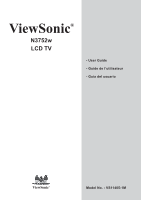
ViewSonic® N3752w LCD TV - User Guide - Guide de l'utilisateur - Guía del usuario ViewSonic® Model No. : VS11405-1M - ViewSonic N3752w | N3752W User Guide, English - Page 2
24 OSD Functions ADVANCED OPERATION - OSD MENU Video Menu ...27 Audio Menu ...27 Setup Menu ...28 TV Menu...31 VGA Menu...32 ADVANCED OPERATION - REMOTE CONTROL PIP/POP ...33 Other Information Specifications 34 Troubleshooting 35 Customer Support 36 Limited Warranty 37 ViewSonic N3752w - ViewSonic N3752w | N3752W User Guide, English - Page 3
TV technician for help. FCC Warning To assure continued FCC compliance, the user must use grounded power supply cord and the cables which are included with the equipment or specified. Also, any unauthorized changes but use the return and collection systems according to local law. ViewSonic 1 N3752w - ViewSonic N3752w | N3752W User Guide, English - Page 4
. 4. Follow all instructions. 5. Do not use this equipment near water. Warning: To reduce the risk of fire or electric shock, do not expose this apparatus to rain or moisture. 6. Clean with a soft, dry cloth. If further cleaning is required, see "Cleaning the LCD TV" in this guide for further - ViewSonic N3752w | N3752W User Guide, English - Page 5
this material, or the performance or use of this product. In the interest of continuing product improvement, ViewSonic Corporation reserves the right to change product specifications without notice. Information in this document may change without notice. No part of this document may be copied - ViewSonic N3752w | N3752W User Guide, English - Page 6
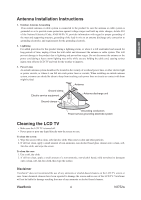
the use of any ammonia or alcohol-based cleaners on the LCD TV screen or case. Some chemical cleaners have been reported to damage the screen and/or case of the LCD TV. ViewSonic will not be liable for damage resulting from use of any ammonia or alcohol-based cleaners. ViewSonic 4 N3752w - ViewSonic N3752w | N3752W User Guide, English - Page 7
Start Guide • Remote Control with batteries • RCA A/V Cable • ViewSonic User Guide Fixing ViewSonic LCD TV to the Wall The LCD TV can be wall-mounted or freestanding. Before installing the product to the wall, please consider the following guidelines: • Read the Important Safety Instructions, at - ViewSonic N3752w | N3752W User Guide, English - Page 8
menu. Menu Turn OSD menu ON/OFF. CH Down Channel down when source is at TV or select a control while in OSD menu. CH Up Channel up when source is at TV or select a control while in OSD menu. ENTER To highlight a control in OSD menu. Power ON/OFF button Power LED Indicator / Remote Control Receiver - ViewSonic N3752w | N3752W User Guide, English - Page 9
Power (AC input) Using power cord provided, connect to a power source. Air TV input Connect to NTSC or ATSC TV source. Cable TV input Connect to Cable TV (CATV) or Digital Cable. SPDIF Optical output Connect this port to the SPDIF input of A/V device. HDMI to your headphone. ViewSonic 7 N3752w - ViewSonic N3752w | N3752W User Guide, English - Page 10
Remote Control ENGLISH ViewSonic 8 N3752w - ViewSonic N3752w | N3752W User Guide, English - Page 11
Change channel for TV only R Control buttons ** Play/ Stop/ Pause/ Record/ Forward/ Rewind II button = freeze picture S DISPLAY Display current information Note: PIP means Picture In Picture. * This feature may not be supported under all models. ** For use on other device. ViewSonic 9 N3752w - ViewSonic N3752w | N3752W User Guide, English - Page 12
and access default settings, press and hold desire device button for roughly six seconds and enter three digit reset code 000. • Replace batteries if remote control keys are not functioning properly, this is a normal behavior that indicates batteries are low. Device Buttons ViewSonic 10 N3752w - ViewSonic N3752w | N3752W User Guide, English - Page 13
six seconds. The top LED will turn on, enter pre-programmed code. LED will blink to indicate pre-programmed code was captured correctly. LED Device Buttons Pre-Programmed Code Notes Record the three digit codes for your device here: TV DVD STB VCR VPB WMA AUD AUX ViewSonic 11 N3752w - ViewSonic N3752w | N3752W User Guide, English - Page 14
The AUX key is used to operate a second TV, DVD, STB, VCR, VPB,WMA, and AUD. A fourth digit is necessary to identify the type of device the key will control. AUX Button TV = 1 DVD = 2 STB = 3 VCR = 4 VPB = 5 WMA = 6 AUD = 7 For example, to control a Sony DVD player with a code of 027 under the - ViewSonic N3752w | N3752W User Guide, English - Page 15
ENGLISH Pre-Programmed Code Tables ViewSonic LCD TV's and Plasmas BRAND N1700W N1300 N1500 N1750W N2010 N2010-E N2700W N2750W N3020W N3200W N3200W-E VPW4255 VPW5500 N2000 N3000W CODE 001 002 003 004 005 006 007 022 029, 045, 048, 050, 076, 082 030, 092, 129, 143 056, 139 ViewSonic 13 N3752w - ViewSonic N3752w | N3752W User Guide, English - Page 16
ENGLISH STB - Set Top Box BRAND CODE Akai 019 Alba 005, 006, 007 Allsat 019 Alphastar 057 Amstrad 001 Ankaro 012 Anttron 005 Apollo 005 Armastrong 010 Asat 015, 017 010 001, 006, 017, 032, 034 006 006, 011, 017, 019, 023, 029, 058 006 016 040, 041 008 012 ViewSonic 14 N3752w - ViewSonic N3752w | N3752W User Guide, English - Page 17
015 016 005 006 016 006, 014, 015 008, 012, 028 033, 037, 052 Cable BRAND CODE ABC 006, 067, 069, 105 Archer 072, 073 Cabletime 060 Contec 078 Eastern 079 France Telecom 061 Stargate 080 Tocom 067, 085 United Cable 105 Universal 071, 072, 073 Zenith 103 ViewSonic 15 N3752w - ViewSonic N3752w | N3752W User Guide, English - Page 18
Daytron Denon Dimensia Electrohome Emerson Fisher Fuji Funai Gerrard GE Go Video Goldstar Gradiente Harman Kardon Harwood Hitachi JBL CODE 102 101, 144, 145 127 005, 126 122 119 059, 105, 120 122 124, 125 083, 020, 021, 037, 044, 067, 070, 085, 090, 104, 105, 124, 125, 137 ViewSonic 16 N3752w - ViewSonic N3752w | N3752W User Guide, English - Page 19
, 147 VPB BRAND Next Vision N4 Next Vision N5 Next Vision N5-2 Next Vision N5-2E Next Vision N6 Next Vision HD10 Next Vision HD12 CODE 001 002 006 007 003 004 005 BRAND WMA100 WMA CODE 013 ViewSonic 17 N3752w - ViewSonic N3752w | N3752W User Guide, English - Page 20
ENGLISH AUD BRAND CODE Aiwa 024, 041, 063 Akai 013 Bose 039 Carver 075 Curtis Mathes 065 Denon 001, 053, 054, 059, 076 Fisher 005, 066 Starcom 026 Technics 014, 043, 047, 074 Thomson Toshiba Uher Yamaha Zenith 015, 016 036 013 017, 018, 061, 072,077 089 ViewSonic 18 N3752w - ViewSonic N3752w | N3752W User Guide, English - Page 21
away from children and pets. • When the remote control will not to be used for an extended period, remove the batteries. 2. Connecting RF antenna and Cable TV Make sure the power is OFF before installing your LCD TV. 1) Air TV: Connect the LCD TV to TV antenna with 75-ohm coaxial cable. Preset the - ViewSonic N3752w | N3752W User Guide, English - Page 22
ENGLISH 3. Connecting to DVD / Set Top Box Connect Video/ Audio cables from compatible devices into the back panel of LCD TV. 1) With AV cable: RCA A/V Cable 2) With S-Video cable: ViewSonic VCR or DVD Player S-Video Cable (not supplied) Audio Cable (not supplied) VCR or DVD Player 20 N3752w - ViewSonic N3752w | N3752W User Guide, English - Page 23
output terminal) HDMI Cable (not supplied) 4. Connecting to External Stereo System to Listen to LCD TV Sound Connect the audio output terminal of the LCD TV to audio in terminal of the stereo system (stereo system sold separately). Audio Cable (not supplied) ViewSonic Stereo system 21 N3752w - ViewSonic N3752w | N3752W User Guide, English - Page 24
VGA cable from VGA output of computer to the VGA terminal input of your LCD TV. PC VGA 15 Pin Cable 7. PC Audio In Connect the Audio cable (green) from audio output of your computer to the audio input terminal (green) of the LCD TV. PC PC Audio Connection (not supplied) ViewSonic 22 N3752w - ViewSonic N3752w | N3752W User Guide, English - Page 25
supplied) A/V Device Stereo System 9. Connecting with the power cord Connect the power cord to the AC inlet on the back of your LCD TV, after all connections have been completed, and plug the other end of the power cord into a correctly grounded electrical outlet. AC wall socket ViewSonic 23 - ViewSonic N3752w | N3752W User Guide, English - Page 26
LCD TV, you may use the TV remote control or top panel buttons to select input source, change channels, or adjust volume. Turning on the LCD TV Before using the LCD TV: 1. Connect external equipment properly. 2. Insert the power plug, and the power LED indicator will light red. Power On/Off To turn - ViewSonic N3752w | N3752W User Guide, English - Page 27
the TV menu , and switch between Air and Cable. Sleep Time Setting Repeatedly press SLEEP button to set the off timer. The function is used to automatically shut off the LCD TV after a preset period of time passed. There are several times for choice - OFF, 30min, 60min, 90min, or 120min. ViewSonic - ViewSonic N3752w | N3752W User Guide, English - Page 28
modes for TV/ DTV channels. Using the OSD function You can use the OSD menus and options to adjust various settings by using the remote control. The basic operation is as following: • Press MENU to display OSD Menu. • Press ◄► to select your desired top Menu. • Use ▲▼ to select the control you want - ViewSonic N3752w | N3752W User Guide, English - Page 29
Digital Audio Language: To select the audio language of the digital TV. ˎNote: To adjust the above controls in the Audio settings, Smart Sound Mode must be set to "User". • Smart Sound Mode: To select sound mode between User, Rock, POP, Live, Dance, Techno, Classic, and Soft. ViewSonic 27 N3752w - ViewSonic N3752w | N3752W User Guide, English - Page 30
input source, there is no "V-Chip" function in the menu.) ENGLISH • Language: To select an OSD language from English, French or Spanish. • Parental: To set up parental control. When you enter this control, the screen below will be displayed. The factory default of the password is "0000". To enable - ViewSonic N3752w | N3752W User Guide, English - Page 31
make sure you remember your new password after changing. If the password is forgotten or missing, please use the remote control to enter "8866" to clean the password and reset a new one. Clear All: To clear all the locks set before, press ENTER. Press MENU to return to the previous page. • V-Chip - ViewSonic N3752w | N3752W User Guide, English - Page 32
(If you select User, you can adjust the degree of R, G, B in Color Temp. to suit your personal preference.) • Time Zone: To select Time Zones. • OSD Timeout: To setup the display time of OSD. (5, 15, 45, and 60 seconds) • Memory Recall: To restore the factory default settings. ViewSonic 30 N3752w - ViewSonic N3752w | N3752W User Guide, English - Page 33
formats and set up caption modes for digital TV channels. (C1~C4, Service1~Service 6, or OFF) • Digital CC Style: Press ◄► to select Caption Style from As Broadcaster or Custom. When Custom is selected, use ▲▼ to select the desired controls, ◄► to adjust detailed settings. ViewSonic 31 N3752w - ViewSonic N3752w | N3752W User Guide, English - Page 34
select a font color from Black, White, Green, Blue, Red, Cyan, Yellow, or picture. • Manual Clock: To adjust the horizontal pixel clock of the video. • H. Position: To adjust the horizontal position of the picture. • V. Position: To adjust the vertical position of the picture. ViewSonic 32 N3752w - ViewSonic N3752w | N3752W User Guide, English - Page 35
picture.) Press PIP on the remote control repeatedly. The screen will change from normal screen → PIP screen → POP screen. PIP Screen POP Screen • PIP Input Source Select 1. Press PIP Source button to select input source for sub-screen as following. (You must press PIP button first.) Main Screen - ViewSonic N3752w | N3752W User Guide, English - Page 36
Power consumption On Stand by UL, FCC-B (Doc-B), NOM, BEST-7 < 200 W (green LED) < 3 W (red LED) Preset Timing Mode (Pre-adjusted to GTF® 1360 x 768 @ 60 Hz) Warning: Do not set the graphics card in your computer to exceed these refresh rates; doing so may result in permanent damage to the LCD TV - ViewSonic N3752w | N3752W User Guide, English - Page 37
or not connected; please check all the CATV connections. • The cable TV service is interrupted; please contact your cable operator. Picture is cut off/with sidebar screen • Is the image positioned correctly? • Are screen mode adjustments such as picture size set correctly? ViewSonic 35 N3752w - ViewSonic N3752w | N3752W User Guide, English - Page 38
need the product serial number. Country/ Region Web Site United States www.viewsonic.com/support/ T=Telephone F=Fax T= (800) 688 6688 F= (909) 468 1202 Email [email protected] Canada www.viewsonic.com/support/ T= (866) 463 4775 [email protected] ENGLISH ViewSonic 36 N3752w - ViewSonic N3752w | N3752W User Guide, English - Page 39
instructions supplied with the product. b. Repair or attempted repair by anyone not authorized by ViewSonic. c. Any damage of the product due to shipment. d. Removal or installation of the product. e. Causes external to the product, such as electric power fluctuations or failure. f. Use of supplies - ViewSonic N3752w | N3752W User Guide, English - Page 40
ViewSonic®
-
 1
1 -
 2
2 -
 3
3 -
 4
4 -
 5
5 -
 6
6 -
 7
7 -
8
-
9
-
10
-
11
-
12
-
13
-
14
-
15
-
16
-
17
-
18
-
19
-
20
-
21
-
22
-
23
-
24
-
25
-
26
-
27
-
28
-
29
-
30
-
31
-
32
-
33
-
34
-
35
-
36
-
37
-
38
-
39
-
40
 |
 |

ViewSonic
®
ViewSonic
®
N3752w
LCD TV
- User Guide
- Guide de l’utilisateur
- Guía del usuario
Model No. : VS11405-1M