ViewSonic PJL855 User Guide - Page 14
ViewSonic PJL855 - LCD Projector SVGA Manual
 |
UPC - 766907212013
View all ViewSonic PJL855 manuals
Add to My Manuals
Save this manual to your list of manuals |
Page 14 highlights
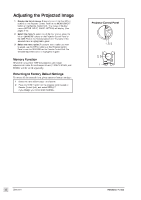
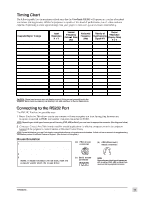
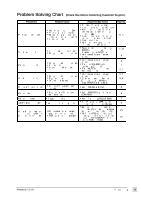
Timing Chart The following table lists the maximum refresh rates that the ViewSonic PJL855 will operate at a number of standard resolutions (timing presets). While the projector is capable of this level of performance, not all video cards are capable of operating at these signal timings. See your graphics card user's guide to ensure compatibility. Vertical Frequency (Refresh Rate) (Hz) Output Polarity of Resolution Synchronizing (Display Dots) Signal H/V HxV Computer/Signal Timings Input Resolution HxV Horizontal Frequency (kHz) Industry 640 x 400@56Hz VESA 720 x 400@85Hz VESA 640 x 480@85Hz Mac® 13" 640 x 480@67Hz VESA VGA-3 640 x 480@73Hz VESA VGA-3 640 x 480@75Hz VESA VGA-3 640 x 480@85Hz VESA SVGA 800 x 600@56Hz VESA SVGA 800 x 600@ 60Hz VESA SVGA 800 x 600@ 72Hz VESA SVGA 800 x 600@75Hz VESA SVGA 800 x 600@85Hz Mac 16" 832 x 624@75Hz VESA XGA 1024 x 768@60Hz VESA XGA 1024 x 768@70Hz VESA XGA 1024 x 768@75Hz 640 x 400 640 x 480 640 x 480 640 x 480 640 x 480 640 x 480 640 x 480 800 x 600 800 x 600 800 x 600 800 x 600 800 x 600 832 x 624 1024 x 768 1024 x 768 1024 x 768 56.4 85.0 85.0 66.7 72.8 75.0 85.0 56.3 60.2 72.2 75.0 85.1 74.57 60.0 70.1 75.0 24.8 37.9 43.3 35.0 37.9 37.5 43.3 35.2 37.9 48.1 46.9 53.7 49.7 48.4 56.5 60.0 1024 x 640 1008 x 640 853 x 640 1024 x 768 1024 x 768 1024 x 768 1024 x 768 1000 x 750 1000 x 750 1000 x 750 1000 x 750 1000 x 750 1024 x 768 1024 x 768 1024 x 768 1024 x 768 CAUTION: Some input sources may not display properly if they are not compatible with the projector. Some input sources may not display in full size, as shown in Output Resolutions. Connecting to the RS232 Port The RS232C Port has two possible uses: 1 Mouse Emulation This allows you to use a mouse with one computer at a time, by toggling between one computer connected to RGB1 and another computer connected to RGB2. NOTE: Depending on which type of mouse you will be using (PS/2, ADB, or Serial) you must use the appropriate connector. (See diagrams below) 2 Computer Control Port This is only used for special applications in which a computer controls the projector (instead of the projector's control buttons or Remote Control Unit). NOTE: To use this feature you must first develop customized software using various control codes. To find out how to access this supplementary information, contact ViewSonic Customer Support. (See the back of this guide.) Mouse Emulation (a) 1 With both the projector and the computer powered OFF, connect the projector and the mouse terminal of the computer using the appropriate cable. (See diagrams to the right). 2 Disconnect the existing mouse. 3 Power ON the projector, then power ON the computer. NOTE: If mouse emulation will not start, reset the computer and/or check the mouse driver. PS/2 mouse connector Mini Din 6pin 6 4 2 1 5 3 (b) ADB (Macintosh) mouse connector Mini Din 4pin 4 2 3 1 (c) Serial mouse connector D-sub 9pin 1 6 2 7 3 8 4 9 5 NOTE: Depending on which type of mouse you will be using (PS/2, ADB, or Serial) you must use the appropriate connector. ViewSonic PJL855 Technical Information 13
-
 1
1 -
2
-
3
-
4
-
5
-
6
-
7
-
8
-
 9
9 -
 10
10 -
 11
11 -
 12
12 -
 13
13 -
 14
14 -
 15
15 -
 16
16 -
 17
17 -
 18
18 -
 19
19
 |
 |