ViewSonic PJL855 User Guide - Page 5
ViewSonic PJL855 - LCD Projector SVGA Manual
 |
UPC - 766907212013
View all ViewSonic PJL855 manuals
Add to My Manuals
Save this manual to your list of manuals |
Page 5 highlights
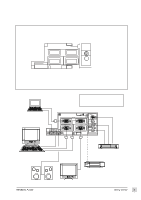
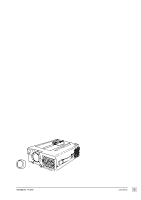
Getting Started Congratulations on purchasing a ViewSonic PJL855 Office TheaterTM LCD projector! Save the original box and all packing material for future shipping needs. Package Contents ViewSonic PJL855 Office Theater Remote Control Unit/Mouse & Laser Pointer 2 AA batteries 3 AC power cords (U.S., Europe, and China) Computer video cable (15-pin mini D-sub connector) • Video/Audio cable (RCA connectors) • S-Video cable (RCA connectors) • Audio (stereo) mini-DIN cable PS/2 mouse cable Serial (RS232) mouse/computer-control cable ADB (Macintosh®) mouse cable Macintosh adaptor User's guide INF and ICM files on CD-ROM* Carrying Case * IMPORTANT: The supplied INF file assures compatibility with Windows operating systems, and the ICM file (Image Color Matching) ensures accurate on-screen colors. When using a computer as the signal source, ViewSonic® recommends that you install both of these files. • Insert the supplied CD-ROM into your system, wait for it to auto-start, select "Monitor Drivers," and follow the on-screen instructions. Installation 1 Connect signal input cables With both the PJL855 and the computer powered OFF, connect the appropriate video and audio cables to the computer, VCR, or other input sources. Macintosh® users: Connect the supplied Macintosh adapter to the video cable, then to the PJL855. 3 (continued) When a PC is one of the input devices (not for Macintosh®): (1) Install INF and ICM files See intructions in the "IMPORTANT" note above. (2) Set signal timing of graphics card Set the graphics card(s) to 800 x 600@75Hz (resolution and refresh rate). To be best prepared for any future customer service needs: • Write the serial number (see the bottom of the projector) in "For your Records" on page 1 of this guide. • Register the warranty of your projector on the Internet at: http://www.viewsonic.com 2 Connect power cord Connect the power cord to a properly grounded AC outlet, then to the PJL855. 3 Power-ON projector and all input devices (computer, VCR, etc.) 4 Install batteries into Remote Control Unit See intructions below. • • Power-ON the PJL855 projector. Power-ON all input devices. Inserting Batteries into the Remote Control Unit 1 Remove the compartment cover by sliding it in the direction of the arrow shown below. 2 Insert the batteries (Alkaline type) with the polarities (+,-) facing the direction shown below. 3 Replace the compartment cover. CAUTION: • Only use AA (LRG) type of batteries. • To prevent leakage that may damage the unit, do not combine old and new batteries. • When inserting batteries, be careful to insert them according to the correct polarities (+,-). • If not using the Remote Control Unit for an extended period of time, remove the batteries. 4 Getting Started ViewSonic PJL855
-
 1
1 -
 2
2 -
 3
3 -
 4
4 -
 5
5 -
 6
6 -
 7
7 -
 8
8 -
 9
9 -
 10
10 -
 11
11 -
12
-
13
-
14
-
15
-
16
-
17
-
18
-
19
 |
 |