Viking RDMOR200SS Use and Care Manual - Page 18
Features
 |
View all Viking RDMOR200SS manuals
Add to My Manuals
Save this manual to your list of manuals |
Page 18 highlights
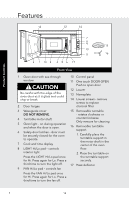
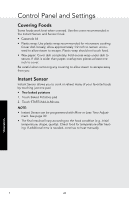
Product Controls Features 14 12 14 7 8 2 9 15 10 11 16 6 1 13 4 3 5 6 17 Front View 1 Oven door with see-through window CAUTION Be careful with the edge of the oven door as it is glass and could chip or break. 2 Door hinges 3 Waveguide cover DO NOT REMOVE. 4 Turntable motor shaft 5 Oven light - on during operation and when the door is open. 6 Safety door latches - door must be securely closed for the oven to operate. 7 Cook and time display 8 LIGHT Hi/Lo pad - controls interior light Press the LIGHT Hi/Lo pad once for Hi. Press again for Lo. Press a third time to turn the light off. 9 FAN Hi/Lo pad - controls fan Press the FAN Hi/Lo pad once for Hi. Press again for Lo. Press a third time to turn the fan off. 10 Control panel 11 One touch DOOR OPEN Push to open door 12 Louver 13 Nameplate 14 Louver screws - remove screws to replace charcoal filter. 15 Removable turntable - rotates clockwise or counterclockwise Only remove for cleaning 16 Removable turntable support 1. Carefully place the turntable support in the motor shaft in the center of the oven floor. 2. Place the turntable on the turntable support securely. 17 Heat deflector E 16
-
 1
1 -
2
-
3
-
4
-
5
-
6
-
7
-
8
-
9
-
10
-
11
-
12
-
 13
13 -
 14
14 -
 15
15 -
 16
16 -
 17
17 -
 18
18 -
 19
19 -
 20
20 -
 21
21 -
 22
22 -
 23
23 -
24
-
25
-
26
-
27
-
28
-
29
-
30
-
31
-
32
-
33
-
34
-
35
-
36
-
37
-
38
-
39
-
40
-
41
-
42
-
43
-
44
-
45
-
46
-
47
-
48
-
49
-
50
-
51
-
52
-
53
-
54
-
55
-
56
-
57
-
58
-
59
-
60
-
61
-
62
-
63
-
64
-
65
-
66
-
67
-
68
-
69
-
70
-
71
-
72
-
73
-
74
-
75
-
76
-
77
-
78
-
79
-
80
-
81
-
82
-
83
-
84
-
85
-
86
-
87
-
88
-
89
-
90
-
91
-
92
-
93
-
94
-
95
-
96
-
97
-
98
-
99
-
100
-
101
-
102
-
103
-
104
-
105
-
106
-
107
-
108
-
109
-
110
-
111
-
112
-
113
-
114
-
115
-
116
-
117
-
118
-
119
-
120
-
121
-
122
-
123
-
124
-
125
-
126
-
127
-
128
-
129
-
130
-
131
-
132
 |
 |
