Vivitar DVR 850W DVR850W User Manual - Page 26
Photo Setting options, Flash Setup - how do i use flash light
 |
View all Vivitar DVR 850W manuals
Add to My Manuals
Save this manual to your list of manuals |
Page 26 highlights
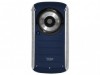
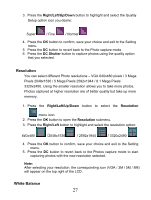
5. Please insert an SD memory card of up to 8 GB to capture more photos without having to download them to the computer to free up internal memory. 6. When the internal memory is full, a "F" icon will show on the LCD screen when you attempt to capture further photos. Photo Setting options In Photo capture mode there are four photo resolutions for you to choose from before capturing your photos (640x480, 2048x1536, 2592x1944 and 3320x2490 pixels). The higher the resolution selected the better the quality of the photo, however higher quality photos use up more memory. You can also enter and change the Flash Setup / Quality / White Balance / Exposure / Self Timer / Color Effect /Date Stamp and Setup Mode. Flash Setup Quality Resolution White Balance Exposure Self timer Color Effect Date Stamp Setup To enter the Settings submenu options for the Photo mode: 1. Press the OK button. 2. Press the Right/Left/Up/Down button to select the Setting you wish to change from the main menu that appears. Flash Setup This setting is used to adjust the flash that can be activated in poor light conditions. The flash is affective when taking photos where the object is within 1.8 to 2.5 meters. 25
-
 1
1 -
2
-
3
-
4
-
5
-
6
-
7
-
8
-
9
-
10
-
11
-
12
-
13
-
14
-
15
-
16
-
17
-
18
-
19
-
20
-
 21
21 -
 22
22 -
 23
23 -
 24
24 -
 25
25 -
 26
26 -
 27
27 -
 28
28 -
 29
29 -
 30
30 -
 31
31 -
32
-
33
-
34
-
35
-
36
-
37
-
38
-
39
-
40
-
41
-
42
-
43
-
44
-
45
-
46
-
47
-
48
-
49
-
50
-
51
-
52
-
53
-
54
-
55
 |
 |
