Vivitar DVR 850W DVR850W User Manual - Page 29
Exposre
 |
View all Vivitar DVR 850W manuals
Add to My Manuals
Save this manual to your list of manuals |
Page 29 highlights
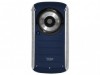
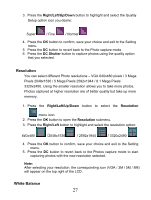
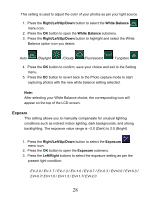
This setting is used to adjust the color of your photos as per your light source. 1. Press the Right/Left/Up/Down button to select the White Balance menu icon. 2. Press the OK button to open the White Balance submenu. 3. Press the Right/Left/Up/Down button to highlight and select the White Balance option icon you desire: Auto /Daylight /Cloudy /Fluorescent / Tungsten 4. Press the OK button to confirm, save your choice and exit to the Setting menu. 5. Press the DC button to revert back to the Photo capture mode to start capturing photos with the new white balance setting selected. Note: After selecting your White Balance choice, the corresponding icon will appear on the top of the LCD screen. Exposre This setting allows you to manually compensate for unusual lighting conditions such as indirect indoor lighting, dark backgrounds, and strong backlighting. The exposure value range is -2.0 (Dark) to 2.0 (Bright) 1. Press the Right/Left/Up/Down button to select the Exposure menu icon. 2. Press the OK button to open the Exposure submenu. 3. Press the Left/Right buttons to select the exposure setting as per the present light condition: EV-2.0 / EV-1.7 / EV-1.3 / EV-1.0 / EV-0.7 / EV-0.3 / EV+0.0 / EV+0.3 / EV+0.7/ EV+1.0 / EV+1.3 / EV+1.7/ EV+2.0 28
-
 1
1 -
2
-
3
-
4
-
5
-
6
-
7
-
8
-
9
-
10
-
11
-
12
-
13
-
14
-
15
-
16
-
17
-
18
-
19
-
20
-
21
-
22
-
23
-
 24
24 -
 25
25 -
 26
26 -
 27
27 -
 28
28 -
 29
29 -
 30
30 -
 31
31 -
 32
32 -
 33
33 -
 34
34 -
35
-
36
-
37
-
38
-
39
-
40
-
41
-
42
-
43
-
44
-
45
-
46
-
47
-
48
-
49
-
50
-
51
-
52
-
53
-
54
-
55
 |
 |
