Vivitar DVR 850W DVR850W User Manual - Page 28
Resolution, White Balance
 |
View all Vivitar DVR 850W manuals
Add to My Manuals
Save this manual to your list of manuals |
Page 28 highlights
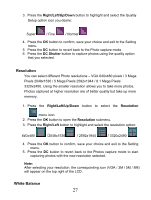
3. Press the Right/Left/Up/Down button to highlight and select the Quality Setup option icon you desire: Super / Fine / Normal 4. Press the OK button to confirm, save your choice and exit to the Setting menu. 5. Press the DC button to revert back to the Photo capture mode. 6. Press the DC Shutter button to capture photos using the quality option that you selected. Resolution You can select different Photo resolutions - VGA 640x480 pixels / 3 Mega Pixels 2048x1536 / 5 Mega Pixels 2592x1944 / 8.1 Mega Pixels 3320x2490. Using the smaller resolution allows you to take more photos. Photos captured at higher resolution are of better quality but take up more memory. 1. Press the Right/Left/Up/Down button to select the Resolution menu icon. 2. Press the OK button to open the Resolution submenu. 3. Press the Right/Left button to highlight and select the resolution option: 640x480 /2048x1536 / 2592x1944 / 3320x2490 4. Press the OK button to confirm, save your choice and exit to the Setting menu. 5. Press the DC button to revert back to the Photos capture mode to start capturing photos with the new resolution selected. Note: After selecting your resolution, the corresponding icon (VGA / 3M / 5M / 8M) will appear on the top right of the LCD. White Balance 27
-
 1
1 -
2
-
3
-
4
-
5
-
6
-
7
-
8
-
9
-
10
-
11
-
12
-
13
-
14
-
15
-
16
-
17
-
18
-
19
-
20
-
21
-
22
-
 23
23 -
 24
24 -
 25
25 -
 26
26 -
 27
27 -
 28
28 -
 29
29 -
 30
30 -
 31
31 -
 32
32 -
 33
33 -
34
-
35
-
36
-
37
-
38
-
39
-
40
-
41
-
42
-
43
-
44
-
45
-
46
-
47
-
48
-
49
-
50
-
51
-
52
-
53
-
54
-
55
 |
 |
