Vizio VBR210 VBR210 User Manual - Page 7
Controls & Connections - wireless setup
 |
UPC - 845226004728
View all Vizio VBR210 manuals
Add to My Manuals
Save this manual to your list of manuals |
Page 7 highlights
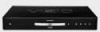
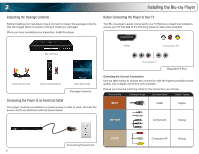
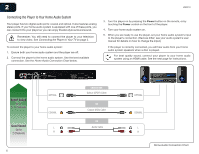
Controls & Connections 1 Before the first-time setup, take a few moments to familiarize yourself with the various controls and connections. This will make the setup process much faster and your experience with the player much more enjoyable! Front Panel Rear Panel Power/Standby Disc Drawer Eject Stop Next Play/Pause Previous Front Panel Power/Standby: Touch to turn the player on/off. Disc Drawer: Insert the disc here to play. Eject: Touch to open or close the disc drawer. Play/Pause: Touch to play or pause disc playback. Stop: Touch to stop disc playback. Previous: Touch to play previous chapter. Next: Touch to play next chapter. Using the Touch Controls The touch-sensitive controls are located on the front of the player. When the player is on, the controls light up. To use the touch-sensitive controls, place the tip of your finger on one of the lit control symbols. Do not push on the controls forcefully-make complete contact with your finger and the player will respond. HDMI Optical USB Audio Ethernet Wireless Component AV / Composite AV Coaxial Audio Transmitter Power Cord Rear Panel USB: Connect a USB thumb drive to play audio or a photo slideshow. Ethernet: Connect to your router or modem with an ethernet cable. HDMI: Connect to your TV or home audio system with an HDMI cable. Component AV/ Connect to your TV with component or Composite AV: composite RCA cables. Optical Audio: Connect to a home audio system with an optical (SPDIF) cable. Coaxial Audio: Connect to a home audio system with a coaxial (RCA) cable. Wireless Transmitter: When connected to a network, the blue light flashes. When the transmitter is on, the orange light flashes. Do not attempt to disconnect or otherwise tamper with the wireless transmitter. Power Cord: Connect to an electrical outlet. 1
-
 1
1 -
 2
2 -
 3
3 -
 4
4 -
 5
5 -
 6
6 -
 7
7 -
 8
8 -
 9
9 -
 10
10 -
 11
11 -
 12
12 -
13
-
14
-
15
-
16
-
17
-
18
-
19
-
20
-
21
-
22
-
23
-
24
-
25
-
26
-
27
-
28
-
29
-
30
-
31
-
32
-
33
-
34
-
35
-
36
-
37
-
38
-
39
-
40
-
41
-
42
-
43
-
44
-
45
-
46
 |
 |
