Weber Summit Platinum D6 LP Owner Manual - Page 10
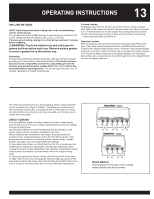
WARNING: Check the bottom tray and catch pan for, grease build-up before each use. Remove excess
 |
View all Weber Summit Platinum D6 LP manuals
Add to My Manuals
Save this manual to your list of manuals |
Page 10 highlights
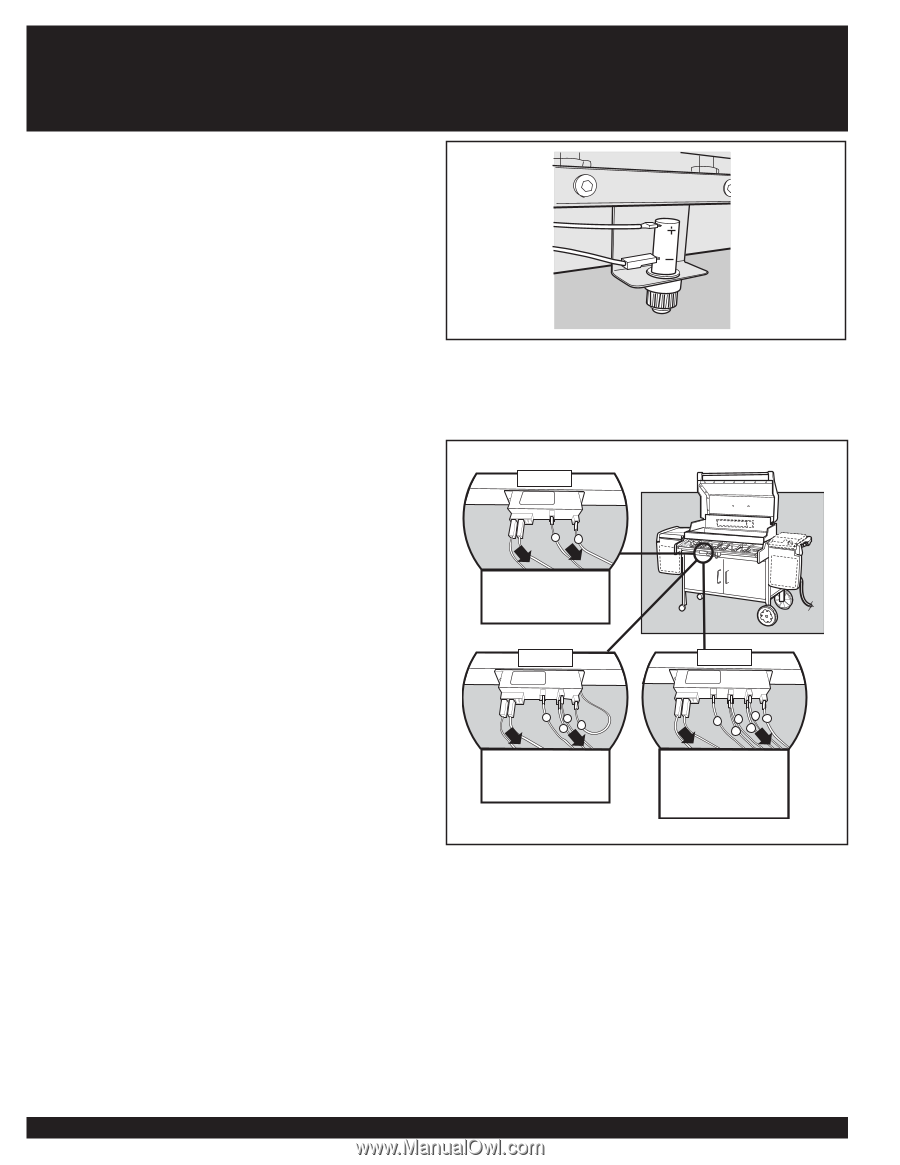
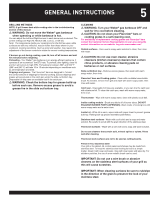
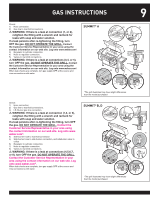
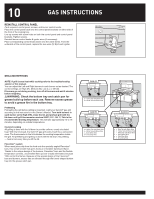
10 GAS INSTRUCTIONS REINSTALL CONTROL PANEL Parts required: control panel, screws, and burner control knobs. Place the control panel back onto the control panel brackets on either side of the front of the cooking box. Line up screws with screw holes on both the control panel and control panel brackets. Tighten screws. (1) Reinstall burner control knobs & igniter wires (if necessary). Place corresponding control knobs down onto the valve stems. From the (2) underside of the control panel, replace the two wires (1, 2) of each igniter. GRILLING METHODS NOTE: If grill looses heat while cooking refer to the troubleshooting section of this manual. You can adjust the Left and Right burners in each burner set as desired. The control settings are High (H), Medium (M), Low (L), or Off (O). If burners go out during cooking, turn off all burners and wait 5 minutes before relighting. ƽWARNING: Check the bottom tray and catch pan for grease build-up before each use. Remove excess grease to avoid a grease fire in the bottom tray. Preheating Preheating the grill before grilling is important. Light your Summit® gas grill according to the instructions in this Owner's Manual. Turn both burners in each burner set to High (HH), close the lid, and preheat grill with the lid down until grill thermometer reaches 550ºF (260˚-288˚C).This is the recommended broiling temperature. This will take approximately 10 to 15 minutes, depending on outside temperatures. Covered cooking All grilling is done with the lid down to provide uniform, evenly circulated heat. With the lid closed, the Summit® gas grill cooks much like a convection oven. The thermometer in the lid indicates the cooking temperature inside the grill. All preheating and grilling is done with the lid down. No peeking - heat is lost every time you lift the lid. Flavorizer® system When meat juices drip from the food onto the specially angled Flavorizer® bars, they create smoke that gives foods an irresistible barbecued flavor. Thanks to the unique design of the burners, Flavorizer® bars and the flexible temperature controls, uncontrolled flare-ups are virtually eliminated, because YOU control the flames. Because of the special design of the Flavorizer® bars and burners, excess fats are directed through the funnel-shaped bottom tray into the grease catch pan. Gold A4 -+ -+ ab a = Yellow Tab with Black Wire b = White Tab with Black Wire Gold B4 -+ -+ ac bd a = Yellow Tab with Black Wire b = White Tab with Black Wire c = Solid White Wire d = Grounding Wire Gold D4 -+ -+ a c ef bd a = Blue Tab with Black Wire b = Yellow Tab with Black Wire c = White Tab with Black Wire d = Solid White Wire e = Solid Blue Wire f = Grounding Wire
-
 1
1 -
2
-
3
-
4
-
 5
5 -
 6
6 -
 7
7 -
 8
8 -
 9
9 -
 10
10 -
 11
11 -
 12
12 -
 13
13 -
 14
14 -
 15
15 -
16
-
17
-
18
-
19
-
20
-
21
-
22
-
23
-
24
-
25
-
26
-
27
-
28
-
29
-
30
-
31
-
32
-
33
-
34
-
35
-
36
 |
 |