Weber Summit Platinum D6 LP Owner Manual - Page 6
Gas Instructions - lps
 |
View all Weber Summit Platinum D6 LP manuals
Add to My Manuals
Save this manual to your list of manuals |
Page 6 highlights
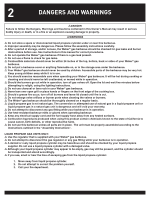
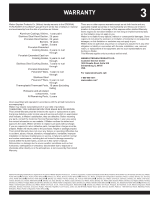
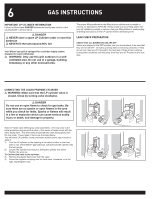
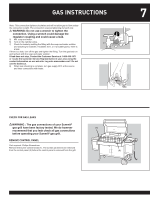
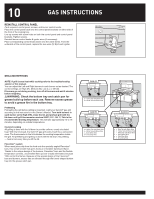
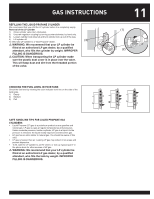
6 GAS INSTRUCTIONS IMPORTANT LP CYLINDER INFORMATION Failure to follow these DANGER statements exactly may result in a fire causing death or serious injury. ƽ DANGER ƽ NEVER store a spare LP Cylinder under or near this barbecue. ƽ NEVER fill the tank beyond 80% full. Your Weber® gas grill is equipped for a cylinder supply system designed for vapor withdrawal. ƽ WARNING: Only use this grill outdoors in a wellventilated area. Do not use in a garage, building, breezeway or any other enclosed area. The proper filling methods for the filling of your cylinder are by weight or volume, as described in NFPA 58. Please make sure your filling station fills your LP cylinder by weight or volume. Ask your filling station to read purging and filling instructions on the LP cylinder before attempting to fill. LEAK CHECK PREPARATION CHECK THAT ALL BURNER VALVES ARE OFF Valves are shipped in the OFF position, but you should check to be sure that they are turned OFF. Check by pushing down and turning clockwise. If they do not turn, they are off. Proceed to the next step. If they do turn continue turning them clockwise until they stop, then they are off. Proceed to the next step. CONNECTING THE LIQUID PROPANE CYLINDER ƽ WARNING: Make sure that the LP cylinder valve is closed. Close by turning valve clockwise. ƽ DANGER Do not use an open flame to check for gas leaks. Be sure there are no sparks or open flames in the area while you check for leaks. Sparks or flames will result in a fire or explosion which can cause serious bodily injury or death, and damage to property. Some LP tanks have differing top collar assembles. (The top collar is the metal protective ring around the valve.) One series of tanks mount with the valve facing front. The other tanks mount with the valve facing away from the fuel scale. These types of tanks are illustrated below. You will need: LP cylinder, a soap and water solution and a rag or brush to apply it. 1) Turn the LP cylinder so the opening of the valve is either to the front, side or rear of the Weber® gas barbecue. Lift and hook the cylinder onto the fuel gauge. 2) Loosen the cylinder lock wing nut. Swing the cylinder lock down. Tighten the wing nut. To Connect the hose to the cylinder: 3) Remove the plastic dust cover from the valve. 4) Screw the regulator coupling onto the tank valve, clockwise, or to the right. Hand-tighten only.
-
 1
1 -
 2
2 -
 3
3 -
 4
4 -
 5
5 -
 6
6 -
 7
7 -
 8
8 -
 9
9 -
 10
10 -
 11
11 -
 12
12 -
13
-
14
-
15
-
16
-
17
-
18
-
19
-
20
-
21
-
22
-
23
-
24
-
25
-
26
-
27
-
28
-
29
-
30
-
31
-
32
-
33
-
34
-
35
-
36
 |
 |