Weider 8970 Uk Manual - Page 12
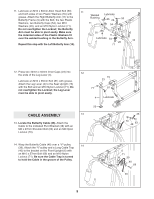
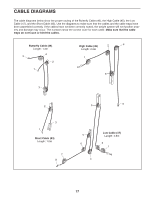
Locate the Low Cable 47.
 |
View all Weider 8970 manuals
Add to My Manuals
Save this manual to your list of manuals |
Page 12 highlights
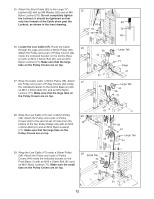
25. Attach the Short Cable (83) to the Large "U"- 25 bracket (82) with an M8 Washer (62) and an M8 Nylon Locknut (70). Do not completely tighten the Locknut; it should be tightened so that only two threads of the Cable show past the Locknut, as shown in the inset drawing. 83 83 62 70 70 82 82 26. Locate the Low Cable (47). Route the Cable 26 through the cage and under a 90mm Pulley (38). Attach the Pulley and a pair of Pulley Covers (44) inside the indicated bracket on the Centre Base (2) with an M10 x 53mm Bolt (61) and an M10 Nylon Locknut (71). Make sure that the large tabs on the Pulley Covers are on top. 27. Wrap the Cable under a 90mm Pulley (38). Attach 27 the Pulley and a pair of Pulley Covers (44) inside the indicated bracket on the Centre Base (2) with an M10 x 53mm Bolt (61) and an M10 Nylon Locknut (71). Make sure that the large tabs on the Pulley Covers are on top. 38 44 61 2 44 Large Tab 44 71 Cage 47 Large Tab 44 38 71 28. Wrap the Low Cable (47) over a 90mm Pulley 28 (38). Attach the Pulley and a pair of Pulley Covers (44) to the second set of holes from the bottom of the two Pulley Plates (36) with an M10 x 53mm Bolt (61) and an M10 Nylon Locknut (71). Make sure that the large tabs on the Pulley Covers are on top. 61 2 71 36 61 44 38 Large Tab 44 47 29. Wrap the Low Cable (47) under a 90mm Pulley (38). Attach the Pulley and a pair of Pulley Covers (44) inside the indicated bracket on the Front Base (1) with an M10 x 53mm Bolt (61) and an M10 Nylon Locknut (71). Make sure the small tabs on the Pulley Covers are on top. 29 Small Tab 44 71 1 38 47 44 61 12
-
 1
1 -
2
-
3
-
4
-
5
-
6
-
 7
7 -
 8
8 -
 9
9 -
 10
10 -
 11
11 -
 12
12 -
 13
13 -
 14
14 -
 15
15 -
 16
16 -
 17
17 -
18
-
19
-
20
-
21
-
22
-
23
-
24
-
25
-
26
 |
 |