Western Digital My Cloud User Manual - Page 21
Troubleshooting Connections, Add more users, Place helpful shortcuts on my Desktop
 |
View all Western Digital My Cloud manuals
Add to My Manuals
Save this manual to your list of manuals |
Page 21 highlights
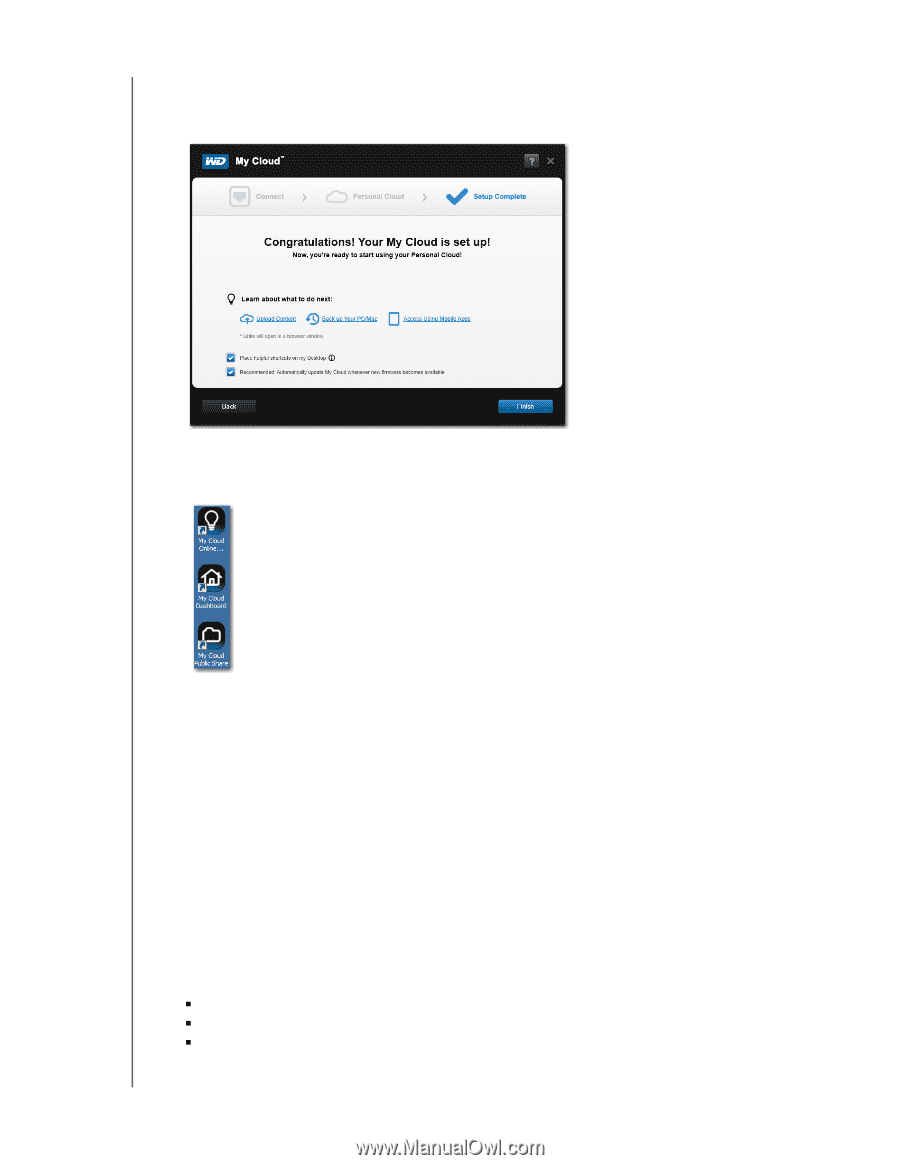
GETTING STARTED 3. To add more accounts, click Add more users to add them here, or use the Add a User screen. (See "Creating a User" on page 48.) 4. Click Next to display a screen indicating that the setup is complete: 5. Click any of the links on the page to learn more about your drive. 6. Place helpful shortcuts on my Desktop is enabled by default. To disable, clear the check box. The shortcut icons are: Displays the online Learning Center Opens the My Cloud dashboard for configuring your WD My Cloud device Opens the contents of the Public Share 7. Recommended: Automatically update WD My Cloud whenever new firmware becomes available is enabled by default. To change settings for automatic update, see "Firmware" on page 87. To disable, clear the check box. 8. Click Finish to close the setup wizard. The online Learning Center Welcome screen displays, and the device's Public share opens in Explorer (Windows) or Finder (Mac). 9. If you set up a personal cloud, check your email to confirm your new WDMyCloud.com account. Note: You may need to check your email spam folder if your spam filter does not allow email from WD. Troubleshooting Connections The Connect - No WD My Cloud personal cloud storage found screen displays when the setup installer cannot find the drive on your system. Follow the steps on the page to ensure that your drive is: „ Plugged into a working outlet „ Connected to your router „ Displaying a solid blue light on the front WD MY CLOUD PERSONAL CLOUD STORAGE 16 USER MANUAL
-
 1
1 -
2
-
3
-
4
-
5
-
6
-
7
-
8
-
9
-
10
-
11
-
12
-
13
-
14
-
15
-
 16
16 -
 17
17 -
 18
18 -
 19
19 -
 20
20 -
 21
21 -
 22
22 -
 23
23 -
 24
24 -
 25
25 -
 26
26 -
27
-
28
-
29
-
30
-
31
-
32
-
33
-
34
-
35
-
36
-
37
-
38
-
39
-
40
-
41
-
42
-
43
-
44
-
45
-
46
-
47
-
48
-
49
-
50
-
51
-
52
-
53
-
54
-
55
-
56
-
57
-
58
-
59
-
60
-
61
-
62
-
63
-
64
-
65
-
66
-
67
-
68
-
69
-
70
-
71
-
72
-
73
-
74
-
75
-
76
-
77
-
78
-
79
-
80
-
81
-
82
-
83
-
84
-
85
-
86
-
87
-
88
-
89
-
90
-
91
-
92
-
93
-
94
-
95
-
96
-
97
-
98
-
99
-
100
-
101
-
102
-
103
-
104
-
105
-
106
-
107
-
108
-
109
-
110
-
111
-
112
-
113
-
114
-
115
-
116
-
117
-
118
-
119
-
120
-
121
-
122
 |
 |