Western Digital WD800B015 User Manual (pdf) - Page 10
Macintosh, Mac OS v9.2.2, Control Panel, Extensions Manager, File Exchange, Restart, Mac OS Extended
 |
View all Western Digital WD800B015 manuals
Add to My Manuals
Save this manual to your list of manuals |
Page 10 highlights
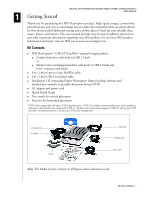
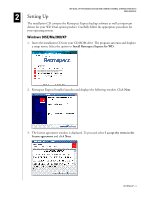
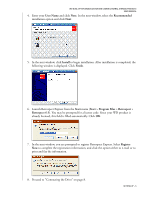
Macintosh WD DUAL-OPTION MEDIA CENTER AND COMBO EXTERNAL STORAGE PRODUCTS USER MANUAL Important: Macintosh users must reinitialize the WD drive to HFS Extended Format (or other Mac OS drive format) before using the installation CD. Skip to "Connecting the Drive" on page 8 to connect the drive, then follow the steps below to format and set up the drive. Mac OS v9.2.2 1. To format or reinitialize the drive, select Control Panel > Extensions Manager from the Apple menu. 2. Disable File Exchange from the extensions list by clearing the adjacent check box, and click Restart. 3. After restarting, a message appears prompting you to initialize the drive. Enter a name, select Mac OS Extended from the menu, and click Initialize. 4. Click Continue to confirm drive initialization. A hard drive icon with the name you assigned appears on the desktop after formatting is completed. To re-enable File Exchange, select the check box in Extensions Manager and click Restart. 5. After restarting, insert the installation CD into your CD-ROM drive. 6. A Retrospect Express CD icon appears on the desktop. Double-click the CD icon to open it, and double-click the Retrospect Express Installer icon to begin setup. Note: See "Windows 98SE/Me/2000/XP" on page 4 for examples of Retrospect Express setup screens. 7. In the next window, click the button to accept the license agreement and follow the on-screen instructions to complete the installation. After installation is completed, go to the Applications folder and launch Retrospect Express. 8. Retrospect Express prompts you to personalize your software copy. Complete the fields for your name and organization, accept the included license code, and click OK. 9. The next window prompts you to register Retrospect Express. Select Register Now to complete the registration information, and click the option either to e-mail or to print and fax the information. 10. Proceed to "Using the Backup Software" on page 13. SETTING UP - 6
-
 1
1 -
2
-
3
-
4
-
 5
5 -
 6
6 -
 7
7 -
 8
8 -
 9
9 -
 10
10 -
 11
11 -
 12
12 -
 13
13 -
 14
14 -
 15
15 -
16
-
17
-
18
-
19
-
20
-
21
-
22
-
23
-
24
-
25
-
26
-
27
-
28
-
29
-
30
-
31
-
32
-
33
-
34
-
35
 |
 |
