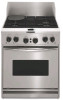
Whirlpool KDRP407HSS Use and Care Guide - Page 12
Electronic Oven, Control, Oven Use
 |
View all Whirlpool KDRP407HSS manuals
Add to My Manuals
Save this manual to your list of manuals |
Page 12 highlights
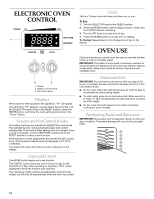
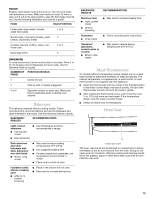
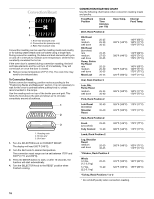
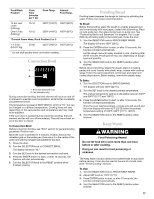
ELECTRONIC OVEN CONTROL Clock This is a 12-hour clock and does not show a.m. or p.m. To Set: 1. Turn the SELECTOR knob to the RESET position. 2. Press the ENTER button until the display shows "12:00" and the CLOCK indicator is blinking. 3. Turn the SET knob to set the time of day. 4. Press the ENTER button to accept time on display. To Change: Repeat steps 2-4 to change time of day to the display. 1. Display 2. Selector Control Knob 3. Set Control Knob Displays When power is first supplied to the appliance, "PF" will appear. Any other time "PF" appears, a power failure has occurred. Turn the SELECTOR control knob to the RESET position, press the ENTER button, and follow the clock setting instructions in the "Clock" section. Selector and Set Control Knobs All cooking functions are set with the SELECTOR control knob. The selected function will automatically begin with current settings after 10 seconds if other settings are not changed. Once a cycle is complete, turn the SELECTOR control knob to the RESET position to select a new function. All temperature or time adjustments are set with the SET control knob. All temperature adjustments are displayed in 5°F (3°C) increments. The speed with which the knob is turned is reflected on the display. Enter and Cancel The ENTER button begins any oven function. The CANCEL button stops any oven function except for the Clock/Time of Day. After canceling an operation, "End" will be displayed to show the function was canceled. The cooling fan might continue operating after a function has ended, but will shut off automatically when the oven has cooled. OVEN USE Odors and smoke are normal when the oven is used the first few times, or when it is heavily soiled. IMPORTANT: The health of some birds is extremely sensitive to the fumes given off. Exposure to the fumes may result in death to certain birds. Always move birds to another closed and well ventilated room. Aluminum Foil IMPORTANT: Do not line the oven bottom with any type of foil, liners or cookware because permanent damage will occur to the oven bottom finish. s Do not cover entire rack with foil because air must be able to move freely for best cooking results. s To catch spills, place foil on rack below dish. Make sure foil is at least 1 in. (2.5 cm) larger than the dish and that it is turned up at the edges. s Do not cover food with aluminum foil when convection cooking (on some models). Positioning Racks and Bakeware IMPORTANT: Never place food or bakeware directly on the oven door or bottom. Permanent damage will occur to the porcelain finish. 12
-
 1
1 -
2
-
3
-
4
-
5
-
6
-
 7
7 -
 8
8 -
 9
9 -
 10
10 -
 11
11 -
 12
12 -
 13
13 -
 14
14 -
 15
15 -
 16
16 -
 17
17 -
18
-
19
-
20
-
21
-
22
-
23
-
24
-
25
-
26
-
27
-
28
-
29
-
30
-
31
-
32
-
33
-
34
-
35
-
36
-
37
-
38
-
39
-
40
-
41
-
42
-
43
-
44
-
45
-
46
-
47
-
48
 |
 |
